Sorry, I don't know what gave me the impression your were using Lua. Let me see what I can find for Arduino. Might actually be a lot easier.
I I would attempt LUA- but I also haven't managed to get esplorer to do anything with my ESP (other than it does connect, and the serial comms shows up)
If I try to do anything else it says it cannot connect..I have flashed the firmware (and boy was that a drama! had to use a cloud to compile it and it had what seemed a gazillion options...and I had not heard of ANY of them so just went with defaults so am amazed it does anything at all TBH!)
Regards
Rob
Yeah I wouldn't switch to Lua either. I'm more comfortable with Arduino at this point and it'll be easier to get things done. I have some working esp8266 scripts. Let me see if I can get it to send the URL as you're trying to do. I really like your project and I want to see it work.
Guess what. After hours of googling and testing I finally got my ESP to turn the printer on and off! Since this is your project, PM me and let me know how you want me to send you the code.
1 Like
You sir are a star! - and ALL the credit goes to you!
Please share it 
Just told my mrs that I will no longer be hunched over my PC quietly muttering to myself and grumbling into the monitor till the small hours - and she says thank you as well!
I managed to get LUA running via ESPlorer, but it seemed I needed to install a bunch of libraries - which I then thought I managed to do (via choclatey?) but I coudnt find how to convince ESPlorer that I had done this dance (if only it could have seen how many damn tabs I had open trying to research!)
Regards
Rob
1 Like
Thanks Rob! It's just too good an idea to pass up. Lol yeah, same here. I would say at least 15 tabs just for this project. Bits and pieces of information everywhere. Anyway, here's the code. Just add in your button handling.
/*
 * This sketch is proof of concept for accessing the Octoprint PSU Control plugin from an ESP8266.
 * Fill in SSID, PASSPHRASE, PRINTER_ADDRESS, PRINTER_USERNAME, PRINTER_PASSWORD, and API_KEY and compile.
 * From PSU Control documentation, valid commands are turnPSUOn, turnPSUOff, togglePSU, and getPSUState but I
 * have only tested turnPSUOn and turnPSUOff.
 * - Terry B.
 */

#include <ESP8266WiFi.h>
#include <ESP8266HTTPClient.h>
#include <Arduino.h>

#ifndef STASSID
#define STASSID "YOUR_SSID"
#define STAPSK  "YOUR_PASSPHRASE"
#endif

const char* ssid     = STASSID;
const char* password = STAPSK;

#define PRINTER_ADDRESS  "http://YOUR_PRINTER_IP_ADDRESS_OR_FQDN:PORT_IF_NOT_80/api/plugin/psucontrol"
#define PRINTER_USERNAME "YOUR_USERNAME"
#define PRINTER_PASSWORD "YOUR_PASSWORD"
#define API_KEY          "YOUR_OCTOPRINT_API_KEY"

void setup() {
  Serial.begin(57600);

  // Connecting to WiFi network
  Serial.println();
  Serial.println();
  Serial.print("Connecting to ");
  Serial.println(ssid);

  /* Set the ESP8266 to be a WiFi-client only */
  WiFi.mode(WIFI_STA);
  WiFi.begin(ssid, password);

  while (WiFi.status() != WL_CONNECTED) {
    delay(500);
    Serial.print(".");
  }

  Serial.println("");
  Serial.println("WiFi connected");
  Serial.println("IP address: ");
  Serial.println(WiFi.localIP());
}

void loop() {
   HTTPClient http;                                            //Declare object of class HTTPClient

   http.begin(PRINTER_ADDRESS);                                //Specify request destination
   http.setAuthorization(PRINTER_USERNAME, PRINTER_PASSWORD);
   http.addHeader("Content-Type", "application/json");         //Specify content-type header
   http.addHeader("X-Api-Key", API_KEY);
   int httpCode = http.POST("{\"command\":\"turnPSUOn\"}");    //Send command to printer
   String payload = http.getString();                          //For some reason we never actually get a response.

   Serial.println(httpCode);   //Print HTTP return code
   Serial.println(payload);    //Print request response payload

   http.end();  //Close connection
   delay(300000); // execute once every 5 minutes, don't flood remote service
}
3 Likes
Btw, sorry for the formatting. The forum reply doesn't lend itself very well to code.
--- Short formatting hint: mark the complete text to format and click </> in the icon bar to format --- 
1 Like
I can't get it to compile:(
int httpCode = http.POST("{"command":"turnPSUOn"}"); //Send command to printer
error: expected ')' before 'command'
Have just changed that line to
http.POST("{\"command\":\"turnPSUOn\"}"); //Send command to printer
flashed it to the esp...and it reset ...and I just heard my printer fire up behind me
You are a star,legend and genius!
I owe you a beer
Regards
Rob
Edited a few times because I had a bit of a morris dance trying to get the code to display as code - and I guess the escapes were there in your original post, but the formatting killed them
Thanks Rob! Legendary persistence, if anything. lol Yes, that's it. I think pasting into the forum removed the escape characters. Strange. I guess we need to escape the escape characters. lol Glad you figured it out. Let's go grab a beer!
Thanks. Good to know! Let me edit my post.
Funny how I just cut the code and pasted it between the tags and the backslashes just reappeared. Thanks for the tip.
Have just wired in a couple of switches and pulldown resistors, I now have a "quick power on switch" for the 2 octoprinted units via the one ESP8266 (although I only physically have one complete printerat the moment...hoping my corexy project happens soon enough)
Your code was laid out so well that it was completely drama free to add a second octoprint server, so thanks once again
I still need to design a nice case to house the esp and switches...but now thinking I may add some status leds and get it to poll the printer for other stuff ....maybe, I do have some ssd displayes in the arduino kitbox that will otherwise just gather dust
Thanks once again, I am blown away that it all works
Regards
Rob
2 Likes
I have noticed it is using 100% CPU according to 'top' - should this be a concern?
Should be solved if you or @TerryB add a small pause into the loop "sleep 0.05"
Christian
Thanks. I'll try that. How much CPU utilization do you think this will save?
100% 
Without sleep:
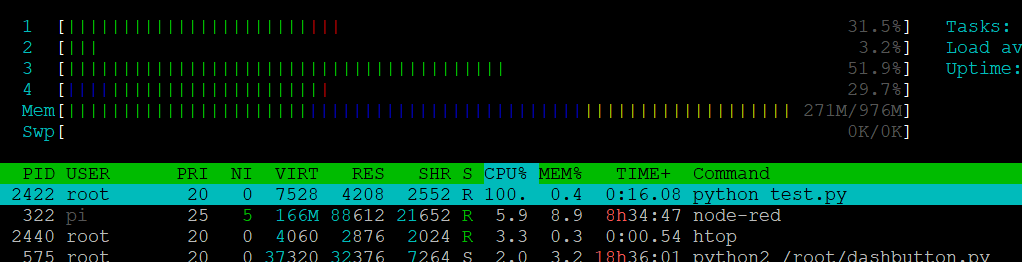
With Sleep:
"waiting for edge" is also a good solution to save cpu power.
Christian
2 Likes
Shows how little I know about python. lol Thanks for the tips!
That's awesome Rob! I can already imagine what it'll look like from your description. Post some pics! The LED indicators or a screen is another good idea putting getPSUState to good use.
Oh... it is life changing for me!
Does exactly what I want it to, and expandable to as many inputs as my printer allowance will stretch
(possibly even trivial to have a keypad matrix should I turn my play room into a print farm...LOL)

Video of it in action...(Spoiler alert...Not that exciting, finger appears stage left, pushes button, printer turns on)
Working like a charm
Regards
Rob
1 Like
That's freaking awesome! Are those keyboard switches? Are you powering an ESP8266 setup in there through that USB cable or are the switches hardwired to the RPi through a USB cable?
Switches came with an arduino kit I bought ages ago, simple momentary jobbies
I think they came with snap on colourful button caps which should be in the tin I stashed them in, will see how much room the next printer consumes to decide if this is going to be a final design or if it needs to evolve to fit in
Yes purely using the USB (from one of the PI's) to supply power to the ESP, - I /could/ use a battery and have it truly wireless, but its much 'safer' tethered to the printer so I don't misplace it in the chaotic enviroment I call home
Screen showing stats and wireless charger receptacle by the printers??
It's working great for now, so could well stay as it is 
Regards
Rob
1 Like