I'm operating Octoprint with a printer equipped with an ATX like powersupply.
Th ATX hat a pushbutton to either switch on or of.
It would be a nice feature to let Octoprint switch off the printer at the end of the printjob.
Is there a way to obtain this function?
I look in to it.
But how do you connect it to the psu power button.
That's going to be very dependent on your board, but this might help.
You just need to put your opto-isolated relay controlled by the Pi's GPIOs BEFORE the switch. Turn Octoprint on and relay powers switch, flip switch and printer turns on. When print is done Octoprint kills power via relay.
The relay setup is well documented. Dunno if ATX 5v signal rail provides isolation for the GPIOs or that the GPIOs 3.3v signal is enough juice to switch it so that's why I offered the relay solution. Good luck.
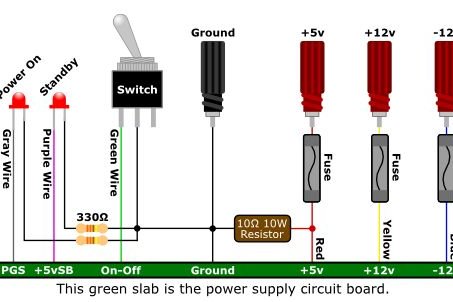
Just to be pedantic, if we're talking about ATX power supplies, there's a single wire in the big motherboard connector which eventually makes it to the motherboard's power switch.
In this diagram, the wire I'm talking about is that green one in the big molex connector. Anything that can connect that green wire to ground will turn on the ATX. Removing the connection should turn it off.
1 Like
thanxs for advising me.
but this is way out of my league, I'm 70 years old and scared to blow up my stuff.
so when the printer is ready I'll switch it of manually.
again thnx for trying to help me.
I'm not too far behind you there. I worked on Teletypes in ::cough:: West Germany.
Yes but I'm not electronically skilled.
So I rely on proven(working) solutions and I'm reluctant to prototyping.
You might want to consider a smartplug option. Then you can use a couple of different plugins (shameless plug) that are available. The easiest to use would be a TPLink-Smartplug more than likely, there are several people that have used my plugin for that with success. I also recently developed a wemo switch option that should work with the wemo plugs, and I'm looking for testers for that one.
2 Likes
As @jneilliii says his TPLink-Smartplug plugin together with the Shutdown-Printer plugin would do what you need. The TPLink-Smartplug plugin works with a TP-Link smart plug and allows you to switch the power to your printer through a button on the top menu bar. The Shutdown-Printer plugin additionally gives you the ability to shutdown the printer when a print finishes or fails.
![]()

You will need to determine the IP address of the TP-Link device and both plugins need this information. If your router gets powered down you will need to re-check in case the IP address changes. There is a way to prevent the IP address changing in these circumstances but that might be outside the scope of this thread.
And of course, the TP-Link Smart Plug has a button on it which you can press as well. Additionally, both the KASA and Alexa phone apps allow you to toggle from there. The latter (or an Echo device) can allow you to say "Alexa, turn off the 3D printer" and it will do so.
Thats exactly what I do. Jneilliii also recently helped me out since both my Pi & Printer are on the same smartplug. He was able to shutdown OctoPrint before powering down the plug. Really cool! 
Thanks @Tronnic for testing. I pushed the updated release as I'm sure there are more people out there with Prusa MK3s that are installing the Pi Zero W directly on the Einsy board. I've considered it with my Einsy board in the CR-10 but prefer the performance of the Pi 3 over the Zero W.
I use a keyestudio relay board. Easy to mount on Raspberry pi. Just connect the power on wires to the relay, and a few code lines, and you´re ready to go. Just need a separate power supply to raspberry, so it can remain on controlling the printer power.
http://www.keyestudio.com/keyestudio-rpi-4-channel-relay-shield.html
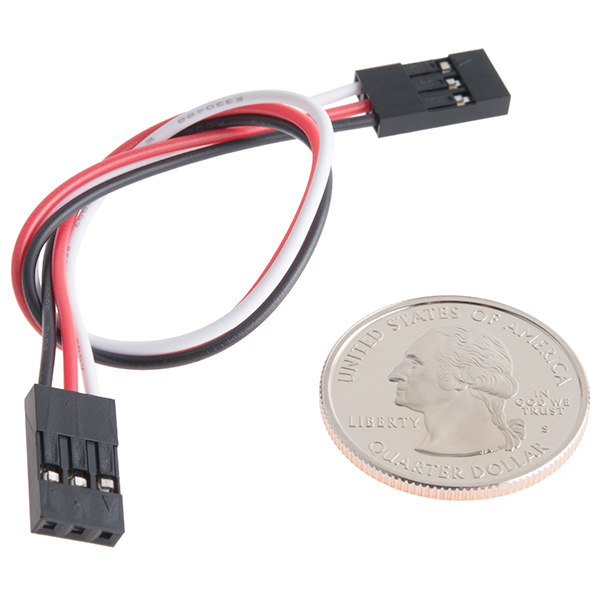
@taratata In a case like this, I think I would use a three-wire jumper (usually red/white/black) of wires and run it from the Raspi pins 4,6,8 in a line.
So you still get your 5V, Gnd and a control pin (in this case GPIO pin 8 instead of 3). The colors of the wires aren't correct, technically, but I've found that these are my favorite ways of connecting the Raspi over to those mini breadboards...
This isn't your circuit below but it's one that I'm working on and typical of the resistor + transistor situation. (Mine is a signal + signal + Gnd pin arrangement on the right connector in case you were confused.)
