There was something different about the 1.4.1rc4 release candidate that (unless you follow me on Twitter or already watched OctoPrint On Air #33) you probably didn’t notice, but it made a world of a difference to me. 1.4.1rc4 was the first release candidate to go through final release preparations using my newly created test setup which will save me a ton of time per release cycle, and since it features some fairly cool technology and was a several years long journey I want to tell you a bit about it.
The problem
Let’s start with how the release preparations have looked like for the past years. I have a release checklist that I run through for each and every release and release candidate. It’s currently maintained in Microsoft OneNote but it would work just as well as a simple Markdown document in a Gist, and for the longest time that’s actually how I did it.
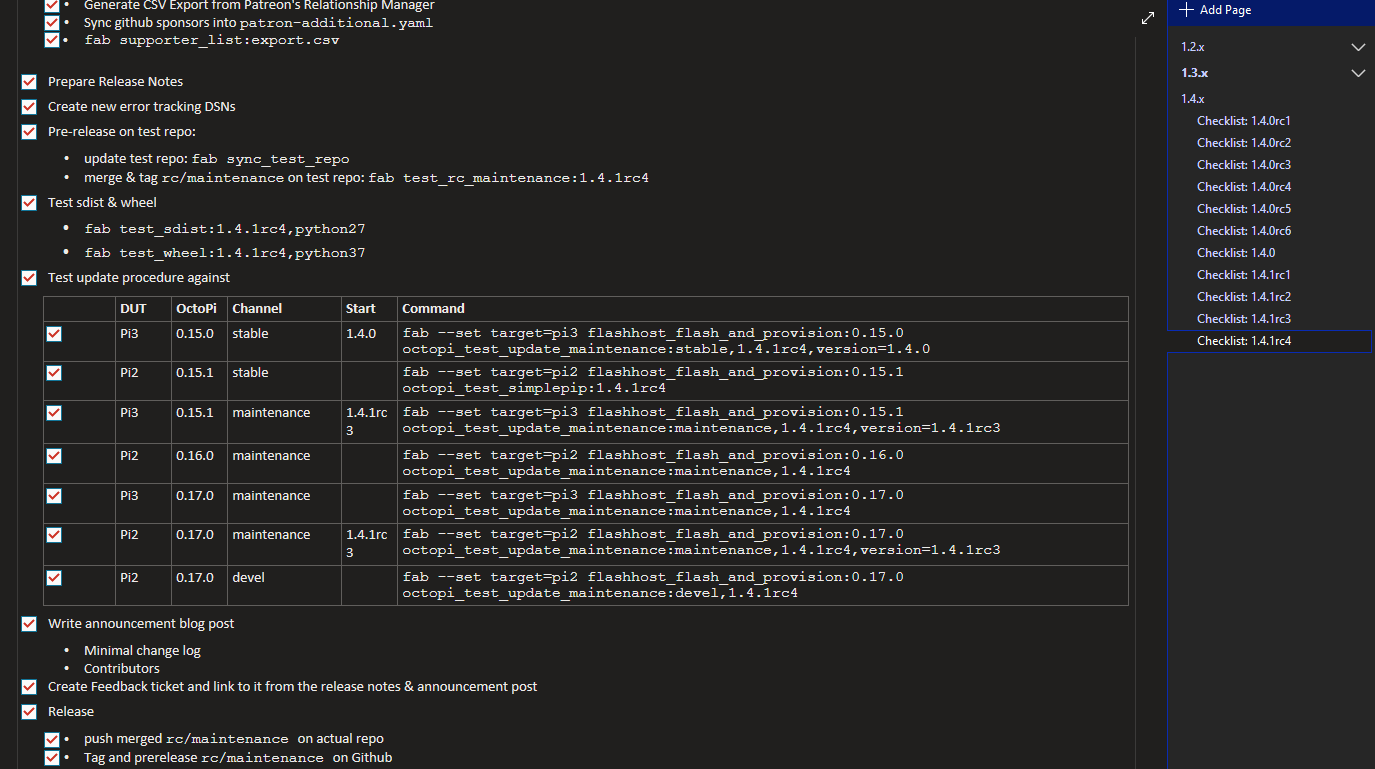
This checklist contains all the steps that I need for pushing out a release, from the final commits into the code for updating the translations, supporter list and error reporting IDs, writing release notes, into tagging the release version, running a whole gauntlet of install and update tests before finally pulling the actual trigger on the release, pushing a prepared blog post live and then finally merging the release branches back through the whole branch hierarchy on the code repository.
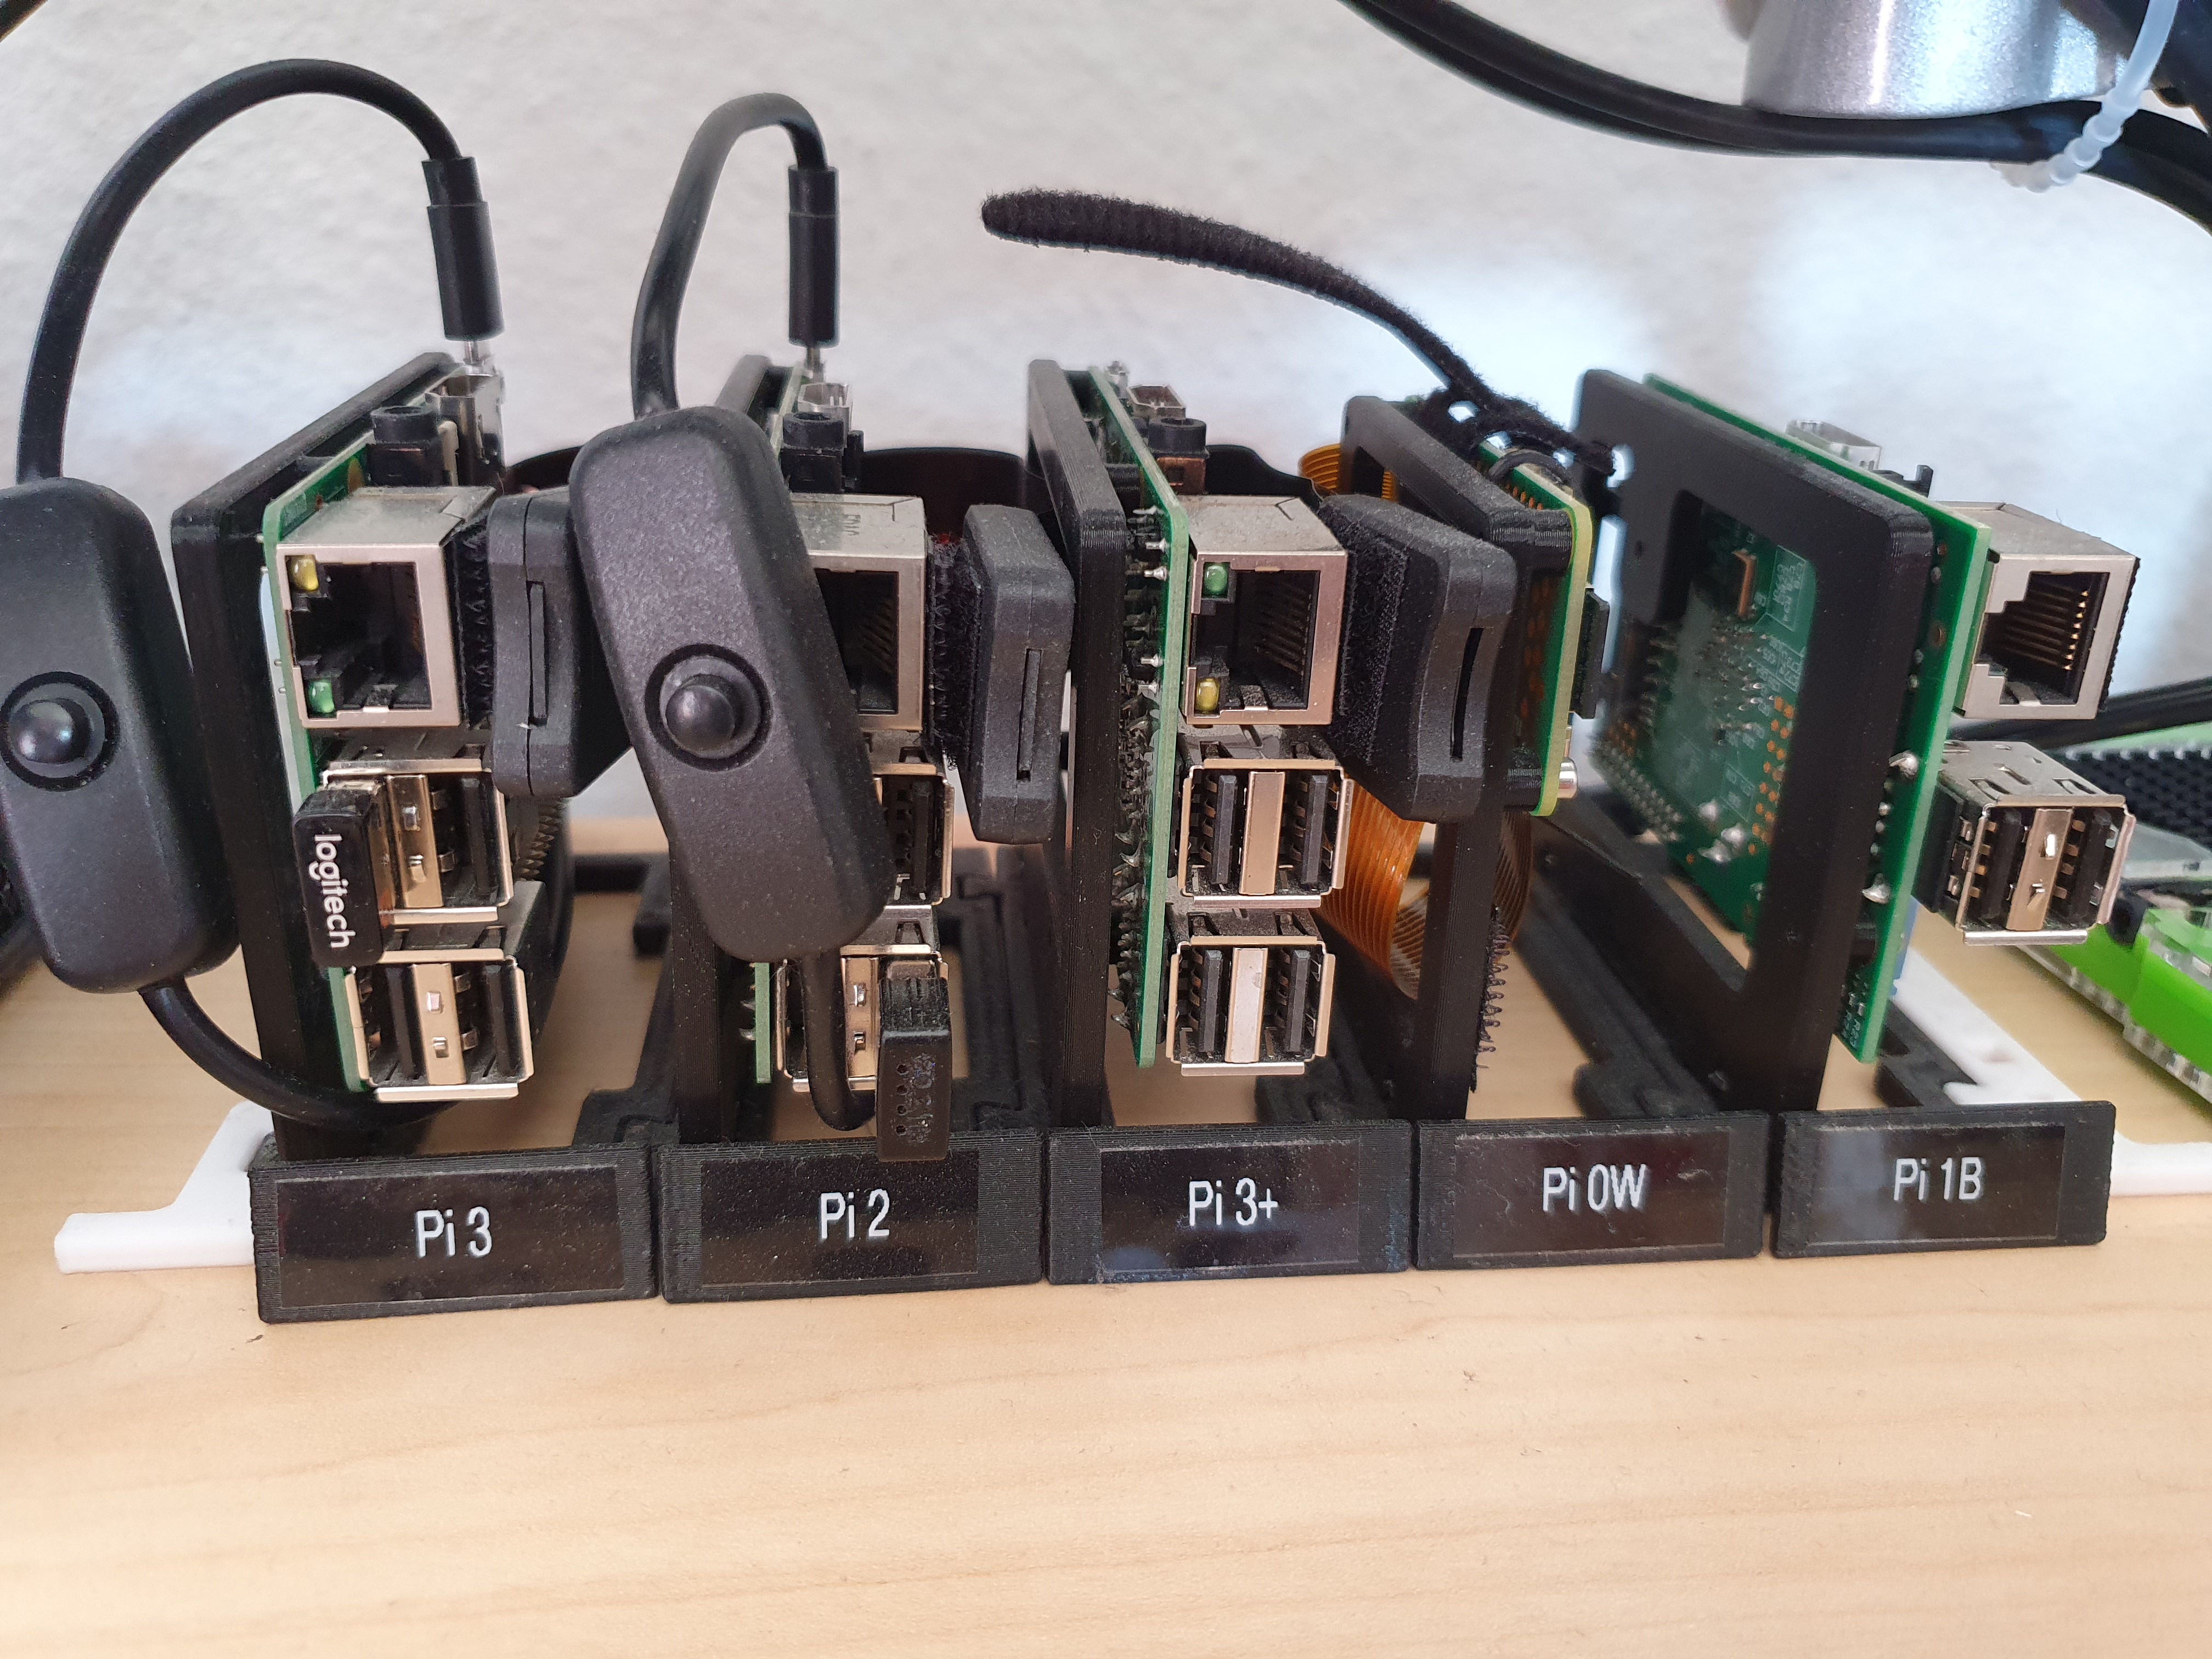
The part of that process that so far ate most of the time for each release was the install and update tests. In order to ensure that there are no nasty surprises when pushing a release out to everyone of you, I flash several instances of various versions of OctoPi and manual installs, provision them, set them to a determined start state consisting of a start version and selected release channel, then fake the release notification and check that the update finishes successfully and everything looks fine. I have been using a bunch of helper scripts powered by Fabric 1.x for huge parts of that for a long while now, but some steps of this whole process I still had to do manually for each and every single update test, of which there are usually 7-10 per release: flashing SD cards and creating my starting point.
For every update scenario I had to:
- Power down a test Pi
- Eject its SD card
- Insert the card into the card reader on my desktop PC
- Flash the target image
- Configure WiFi, hostname and password
- Eject the card from the card reader
- Reinsert the card into the test Pi
- Wait for the Pi to boot
- Run through the first time setup wizard
- Update OctoPrint to the version I want to test updating from
- Configure the correct release channel
- Install a custom plugin to fake release notifications
I automated step 5 a couple years ago using a task defined in my Fabric file which would place the
needed octopi-wpa-supplicant.txt, octopi-hostname.txt and octopi-password.txt files on the
boot partition of the Pi. That was at least one time sink removed from the process. The next step
was to automate steps 9 through 12, again by some added tasks in my Fabric file and after some fiddling
around that was also achieved.
But the biggest time sink of all of that was still all that SD card juggling and waiting for things to flash, so steps 1-4 and 6-8. For those to happen, SD cards have to be moved around physically. Booting the test Pis from network or via a configurable USB drive or something was not an option, as in order to do that I’d have had to change the firmware or the boot parameters of the test Pis themselves, causing them to no longer mirror the devices you all are using out there for running OctoPrint, and thus making the tests less trustworthy.
Looking for solutions
I have been pondering this problem for several years now and over the course of time I kept looking for various possible solutions again and again while manually running my test cluster.
I looked into a flash station that would at least allow me to flash a whole bunch of cards at once to use for all of the test scenarios, but most available flash stations are used to flash the same image to multiple cards, not multiple images, so that was a dead end (and it would also have been prohibitively expensive anyhow and still forced me to juggle cards).
I looked into SD card emulation but had to realize that doing that would at least require an FPGA, a lot of time and firmware development and even then would not guarantee the outcome I needed as having my tests possibly slowed down by emulation would negate most of the speed gains I could achieve by automation and would also be very frustrating to use.
I looked into building something that could switch the data lines of an SD between two readers, and that multiplexing approach looked like the most promising one. But the DIY solutions I found sounded a bit hit and miss and I couldn’t find anything available that was still affordable or even buildable or buyable. That is, until my most recent research into that direction at the start of July.
Building a prototype
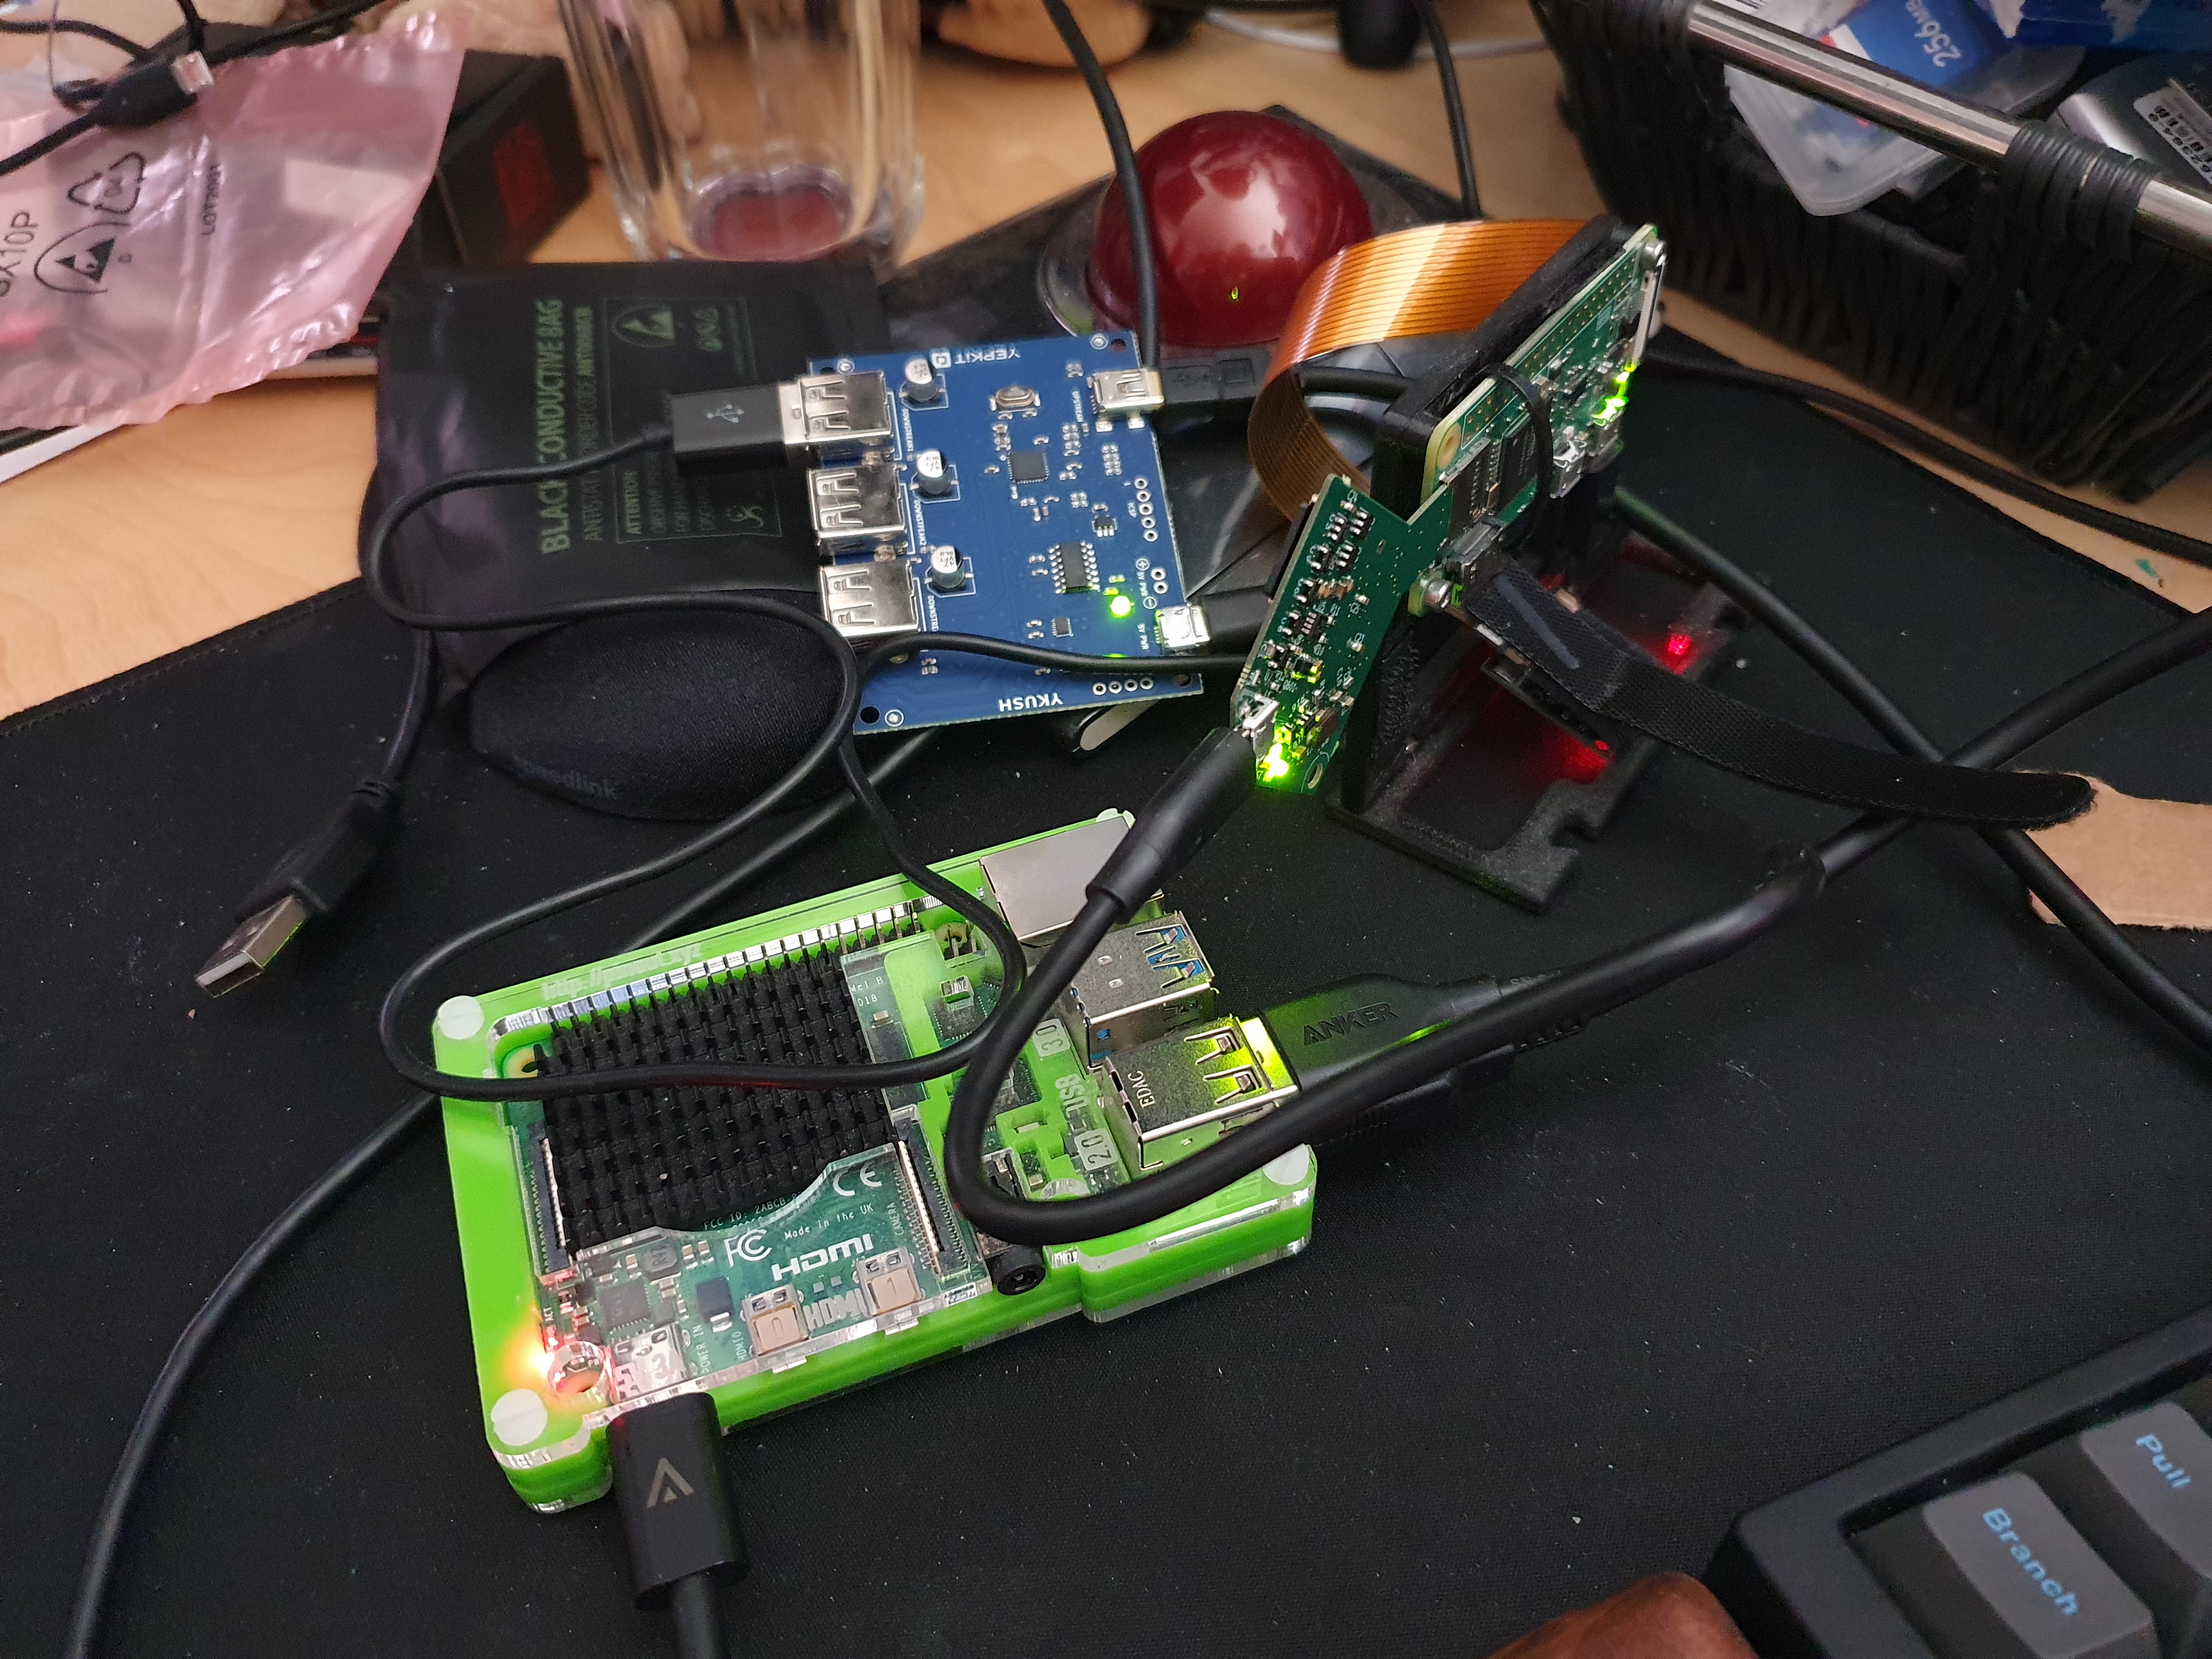
I found a nifty little device produced by Linux Automation GmbH called USB-SD-Mux that was created specifically to test embedded devices that boot from MicroSD cards and that have to have their SD card switched between themselves and a test host in order to provide them with various test scenarios. It is a little board that you plug into the MicroSD slot of your device under test (DUT) on one side, insert your MicroSD into a slot on the other and then connect to your test host (running Linux with at least kernel 4.*) via a MicroUSB cable. You can then toggle the card between host and DUT with a simple command. If it’s switched to the host, it will be seen as a regular mass storage device. With some udev rules you can even make the device names it presents as make predictable and thus fully automate toggling and mounting.
One of these boards cost around 100€, but it was pretty much exactly what I needed, so I ordered one to test.
Additionally, I looked around for a way to switch power to a bunch of USB powered Pis without having to use WiFi enabled power sockets or design something myself and thankfully fell over Yepkit’s YKUSH device. It’s a 3 port powered USB hub, capable of individually switching each output (again via a small command line tool that’s available for Linux) and claiming to support up to 2A concurrently per port. Cost: ~35€. I ordered one as well.
The parts arrived and I rigged up a first prototype, with a Pi4 as the controller/host and a single DUT - a 0W that was collecting dust. After some late night fiddling around and installing some tools on a fresh Raspbian image I was able to toggle the DUT on and off and switch its MicroSD card between host, DUT and back while SSHd into the controller.
After that successful first test I quickly ordered a second USB-SD-Mux and started designing the actual testrig.
The testrig
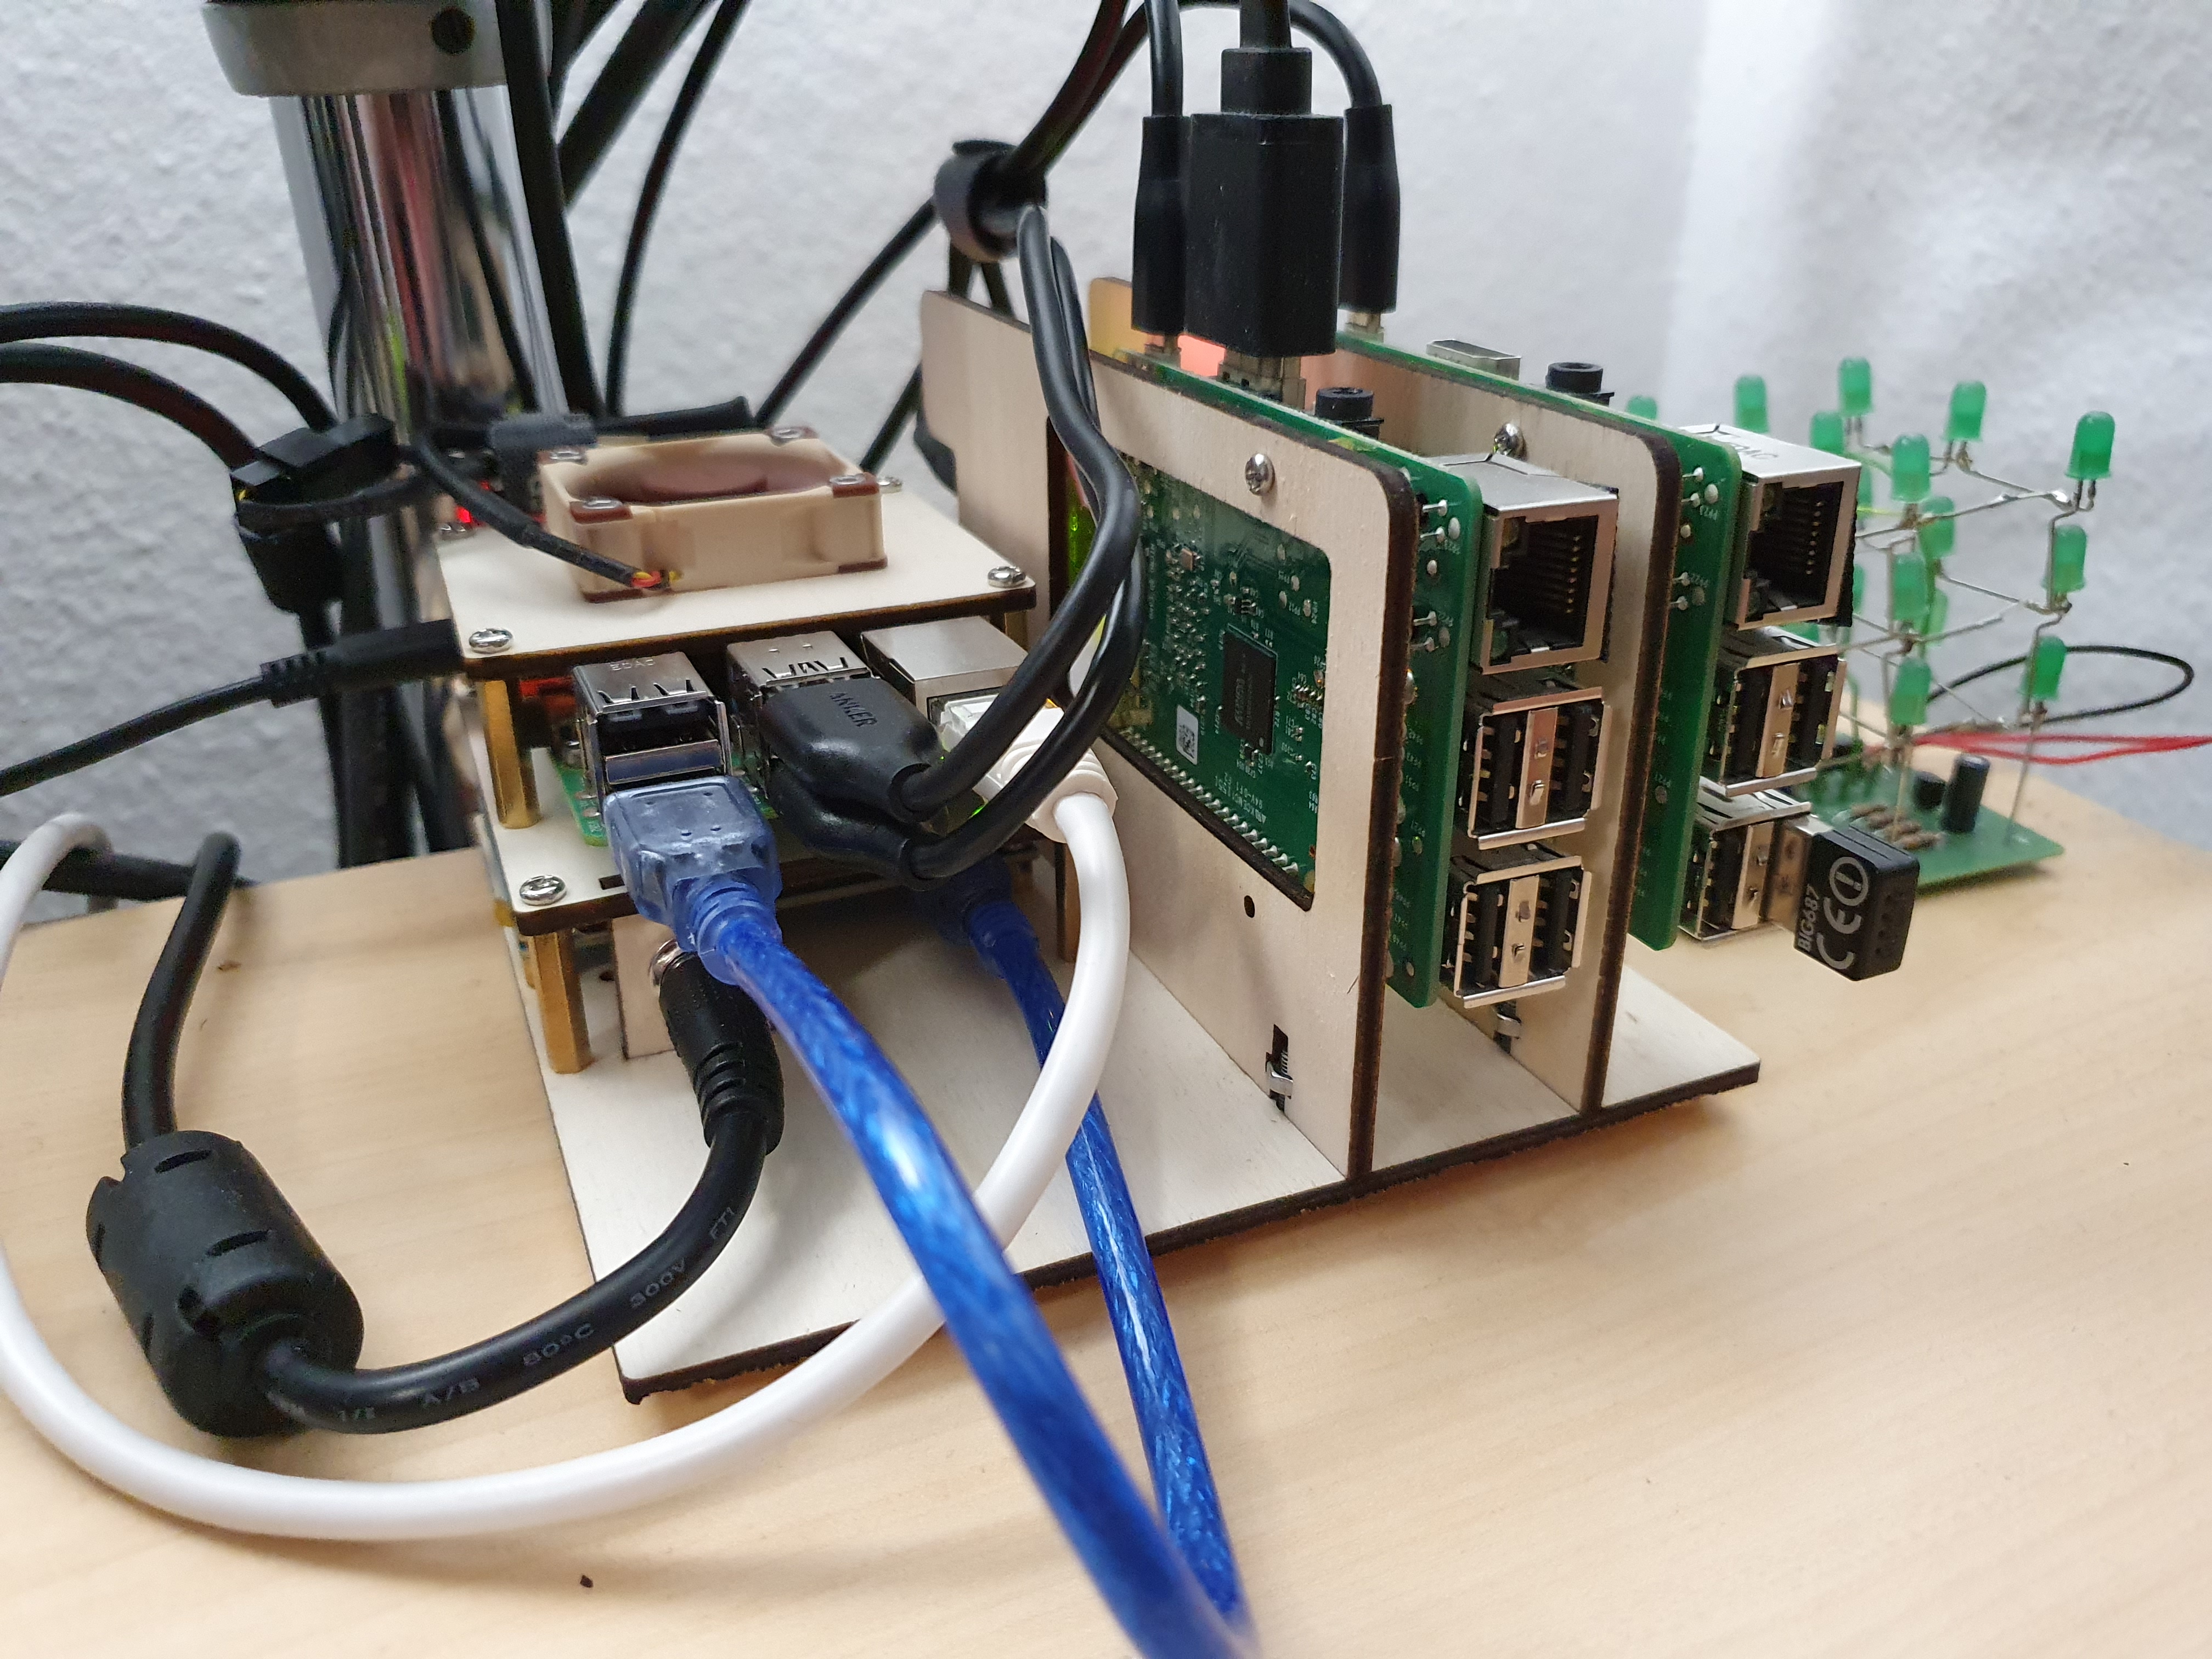
The goal was to create a testrig, capable of supporting two DUTs (a Pi 2 and a Pi 3), controlled by a Pi 4, and all of that contained in a small but accessible and maintainable package that still can get expanded too should I want to add a third DUT at some point.
Similar to my former test cluster setup the DUTs are mounted vertically with the ports facing forward and the SD card with inserted USB-SD-MUX facing backwards. I used a small printed standoff to also secure the USB-SD-MUX to the tray so that nothing could wiggle loose.
To the side of the DUTs are the controller and the USB hub in a horizontal configuration. I modified the USB hub to have a 5.5x2.5mm power input into which I plugged a 5V/8A power supply which should hopefully prevent any under voltage issues from cropping up on the DUTs.
Thanks to the awesome people at Mr Beam Lasers GmbH I’ve recently been able to add their OctoPrint powered MrBeam dreamcut to my office, so that’s what I used to create the mounting hardware that I needed out of 3mm Plywood. And this is the result:
SSHing into the controller now allows me to quickly switch both of the DUTs on and off, and also toggle their SD card between the controller and the DUT in order to flash them and configure WiFi credentials and so on. I added a bunch of commands to my Fabric file to accomplish that as well, and after some more scripting I can now say that my goal has finally been achieved: All of the steps outlined above can be done with a command line like
TAG=1.4.1rc4 TARGET=pi3 fab flashhost_flash_and_provision:0.17.0 octopi_test_update_maintenance:maintenance,version=1.4.1rc3
As I said, 1.4.1rc4 was the first release candidate to be pushed out with the help of the revised test setup and using the testrig, and the update testing that used to take 2h+ was done in under 1h. To say that I’m ridiculously excited would be an understatement.
Conclusion
After several years of juggling SD cards on every release and growing increasingly frustrated by that, I finally found a solution to automate all of that and then some. It wasn’t a cheap solution, but considering how much time it will save me in the future and also how many cases of “did I do X or didn’t I do X yet?” slowing down or nuking whole test runs will be prevented by this it was well worth the investment.
I might still look into automating the actual update and “does everything look good” steps of the test runs further, using end-to-end tests powered by cypress like I just recently added to the continous integration on Github, but for now I’m calling this long overdue build a very successful project and can’t wait to continue to use it for future releases.
If you want to take a look at the Fabric file or the BOM and files of the testrig, you can find all of that on Github.
This is a companion discussion topic for the original entry at https://octoprint.org/blog/2020/07/29/automating-octoprints-release-tests/

