Hey guys, I've been trying to figure out how to control my Sonoff relay that's flashed with Tasmota with the PSU Control. For a while, I've been using the Octoprint Tasmota plugin for controlling it's power state, but I noticed that there is very little support in various mobile apps for the plugin, so I'm trying to switch to PSU Control but I can't seem to be able to control my plug.
You should take that up with the mobile app developers. I vaguely remember one of those mobile apps integrating my TPLink plugin, maybe you can get them to support my Tasmota one as well.
But to answer your question directly you could use system commands and then create a shell script that runs the appropriate command. A similar issue was brought up for the TempFailSafe plugin and my TPLink plugin, and the issue posted below may shed some insight.
Here's a modified version of the instructions for Tasmota...
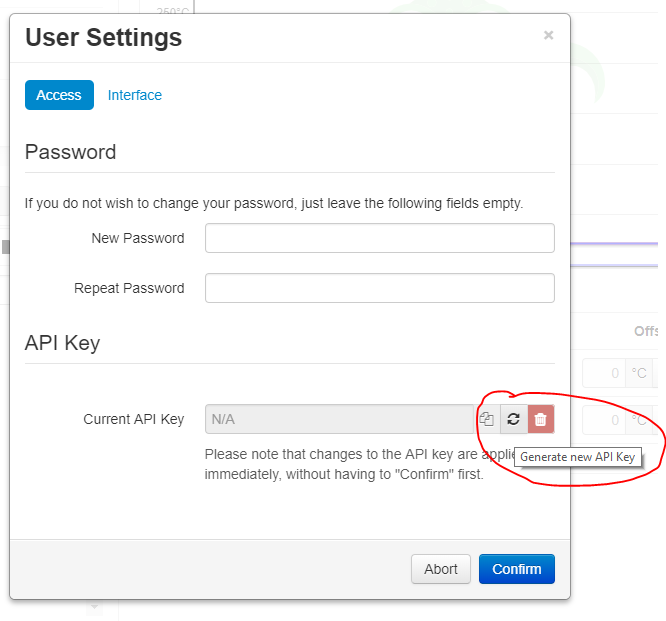
You will first need to go into you user settings and generate your api key. Click your name in the top right corner and select "User Settings". In the dialog that opens press the refresh button to generate your key. You will need to copy that into our shell script later.
Then once you have that information you'll SSH to your pi and run the following commands.
cd ~/
nano turn_off_printer.sh
This will open a text editor to allow you to enter the commands for your shell script. Type in the following into the blank document that was created from the above command. Making sure to replace <put user api key here> with the one you created earlier and <put plug ip here> with the ip of your tasmota plug and <put index here with the index value of your plug.
#!/bin/bash
curl -H "X-Api-Key: <put user api key here>"  -H 'Content-Type: application/json' --data '{"command":"turnOff","ip":"<put plug ip here>","idx":"<put index here>"}' -X POST http://localhost:5000/api/plugin/tasmota
Hold down the ctrl key and press the x key on your keyboard and the answer Y to the prompt to save the file. Now we have to make that file executable by running the following command.
chmod +x turn_off_printer.sh
That should be it. Now in PSUControl plugin enter the following into the system command to run.
/home/pi/turn_off_printer.sh
Hey, sorry for the late reply! I did go and tried out the script but it never seemed to execute <_>
Hi @NovaViper
I'm using A Sonoff S20 with https://github.com/jneilliii/OctoPrint-Tasmota but I've never tested it in "emergency" situation.
Leo
If I get some time tonight I'll verify the settings and see if I can reproduce the necessary steps.
@NovaViper already has the Tasmota plugin installed, he's just trying to get it to be powered off using a shell command that gets run by the PSU Control plugin.
Thank you.
Leo
So this was way easier than I thought. All you need to do is put the curl commands into the PSU Control plugin like below. Of course you need to replace the ip address with the ip of your tasmota device. If you have web admin enabled with a password there are some more parts of the link that you have to put in there. With this approach you don't need the Tasmota plugin at all.
1 Like
Cool! That seems to work perfectly! But how do I have make the plugin check for the relay's power state? Im looking through the commands for Tasmota but I can't seem to find it <_>
--Edit--
Ok, so I figured out what command gets the status (which is just POWER), but how do I filter it out to only have the result? When I go and run the command, it gives back {POWER: "OFF"}, which doesn't seem to be a format that PSUControl can read
It's a json string. You'd have to wrap the command into a separate script I assume to process the response. Not sure how you'd do that with straight linux commands, but an example wrapper script for tplink is given in the PSUControl wiki. The key part is that your exit code needs to be either 0 or 1.
1 Like
How does the wrapper script work? I tried something like this and it didn't work
relay_state=`curl http://<ip>/cm?cmnd=Power | jq -r '.POWER'`
if [ $relay_state -eq ON ]
then
	echo "On"
	exit 0
elif [ $relay_state -eq OFF ]
then
	echo "Off"
	exit 1
else
	echo "Unknown Error"
	exit 1
fi
;;
exit 1
Oh nvm! I noticed that I had -eq instead of == since I was comparing strings instead of numbers. The script works perfectly now, thanks!
1 Like
For completeness, here are the steps to configure PSUControl to use a wrapper script for all 3 options, turning on, turning off, and sensing.
- Install jq if not already installed.
sudo apt-get install jq
- SSH to your pi and create your wrapper script.
nano /home/pi/tasmota_wrapper.sh
- Copy the below into your nano window.
#!/bin/bash

PLUG_ADDR=$1
ACTION=$2

case $ACTION in
    on)
        echo "Turning On..."
        relay_state=`curl -s http://${PLUG_ADDR}/cm?cmnd=Power%201 | jq -r '.POWER'`
        if [ $relay_state == ON ]
        then
            echo "Success"
            exit 0
        elif [ $relay_state == OFF ]
        then
            echo "Failure"
            exit 1
        else
            echo "Unknown Error"
            exit 1
        fi
        ;;
    off)
        echo "Turning Off..."
        relay_state=`curl -s http://${PLUG_ADDR}/cm?cmnd=Power%200 | jq -r '.POWER'`
        if [ $relay_state == ON ]
        then
            echo "Failure"
            exit 0
        elif [ $relay_state == OFF ]
        then
            echo "Success"
            exit 1
        else
            echo "Unknown Error"
            exit 1
        fi
        ;;
    sense)
        relay_state=`curl -s http://${PLUG_ADDR}/cm?cmnd=Power | jq -r '.POWER'`
        if [ $relay_state == ON ]
        then
            echo "On"
            exit 0
        elif [ $relay_state == OFF ]
        then
            echo "Off"
            exit 1
        else
            echo "Unknown Error"
            exit 1
        fi
        ;;    *)
        echo "Usage $0: {IP} {on|off|sense}"
        exit 1
esac
- Make the wrapper script executable.
chmod +x /home/pi/tasmota_wrapper.sh
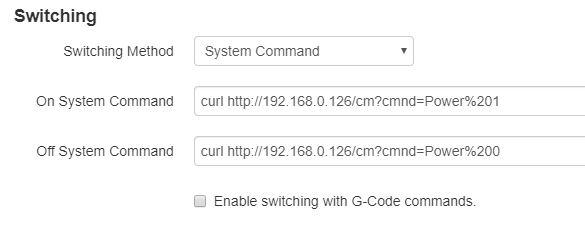
- In PSUControl configure the Switching Method to
System Commandand set the following, replacing 192.168.0.2 with your plug's ip address.
a. On System Command:/home/pi/tasmota_wrapper.sh 192.168.0.2 on
b. Off System Command:/home/pi/tasmota_wrapper.sh 192.168.0.2 off - In PSUControl configure the Sensing Method to
System Commandand set the following, replacing 192.168.0.2 with your plug's ip address.
a. Sensing System Command:/home/pi/tasmota_wrapper.sh 192.168.0.2 sense
Note: If you have authentication enabled in your tasmota web interface (highly recommended) then you will need to modify the wrapper script to include that in the curl command's URL. Appending the URL with &user=admin&password=my_password should work. Ideally this would be set in the script as command line arguments similar to the way the PLUG_ADDR is being used. The above script is assuming that is not set.
Note: If you have a multi-relay Tasmota device you will have to modify the wrapper script to include the index of the relay after the word Power in the curl and jq -r lines and ideally run SetOption26 1 in your Tasmota device's console. Ideally this would be set in the script as command line arguments similar to the way the PLUG_ADDR is being used. The above script is assuming a single relay device.
2 Likes
Does anyone know if something has changed in the way PSU Control works?
I've copied the script in the above post and I can run it fine in the command line. On, off, sense -- all works. But when I use the script for sensing as a System command in PSU Control settings, it isn't working. The icon doesn't turn green and I can't click it to turn the Tasmota plug off. If I use internal as sensing, then the icon changes color, and it sends both on & off commands correctly.
I can see the state being queried in the Tasmota console and as I said I get the right reply if I run the script in shell.
Wouldn't it be easier to just use my Tasmota plugin?
2 Likes
Ah, yes. I had a look at that earlier on the repo web page. It's not listing all of your plugin's features. The plugin looks very promising actually. Great!
2 Likes