Initial wipe plugin?

I am trying to find a plugin that will initiate a better cleaning line than what cura provides and one that would make the line along the x and y. If a pluggin isn't the answer is there a geode fix I could put into octoprint so it is used with all my slicers?

As I read my own post I begin to feel dumb. I think that if I used:

G92 E0 ;Reset Extruder

G1 Z2.0 F3000 ;Move Z Axis up

G1 X10.1 Y20 Z0.28 F5000.0 ;Move to start position

G1 X10.1 Y200.0 Z0.28 F1500.0 E15 ;Draw the first line

G1 X10.4 Y200.0 Z0.28 F5000.0 ;Move to side a little

G1 X10.4 Y20 Z0.28 F1500.0 E30 ;Draw the second line

G1 X10.1 Y20 Z0.28 F5000.0 ;Move to start position

G1 X200 Y10.1 Z0.28 F1500.0 E15 ;Draw the first line

G1 X200 Y10.4 Z0.28 F5000.0 ;Move to side a little

G1 X200 Y10.4 Z0.28 F1500.0 E30 ;Draw the second line

G92 E0 ;Reset Extruder

G1 Z2.0 F3000 ;Move Z Axis up
Thanks,

Trickflow

The gcode scripts within OctoPrint itself can run anything you want before print starts, so I would recommend looking into that as an option. You'll have to figure out what a good wipe line is for you, but once figured out you can put it there instead of your slicer if you so desire.

1 Like

I was hoping to edit before anyone saw it haha, does my gcode look valid for a y then x wipe?

The only thing you're missing is the temperatures. That would also need to be in the gcode scripts section, I think there are ways to use tokens there so that you get the temp from the gcode to insert, but I don't have much experience with that. Otherwise you'd have to use some other means to get to temp prior to starting print.

Would my gcode from the slicer start the temp up prior to the octoprint script? or would octoprint's script get priority?

The octoprint script would get injected prior to the slicer's start script.

Ok got it, ill mess with it more and post the one that works. I was just hoping someone had made an interface plugin where you could inject various cleaning line patterns to be lazy lol

Nothing yet. Relative to the heatup though, you may be able to utilize the smart preheat plugin to use within those scripts. I think it might be useful there as the default script variables/tokens don't seem to have initial heat up stuff, only last known temperature stuff.

Perfect thank you!

IMO, it's better to add this to the slicer's start gcode. Most slicer's have "variables" that can be used to customize the start gcode with the temperatures being used by the selected filament type.

I also have one comment on the posted gcode, you don't set absolute mode for either the XYZ axes (G90) or E (M82).

Since you mentioned Cura, the start gcode is stored for each printer and is editable. I think you will find a good place to insert your wipe and prime code along with the variables I mentioned.

2 Likes

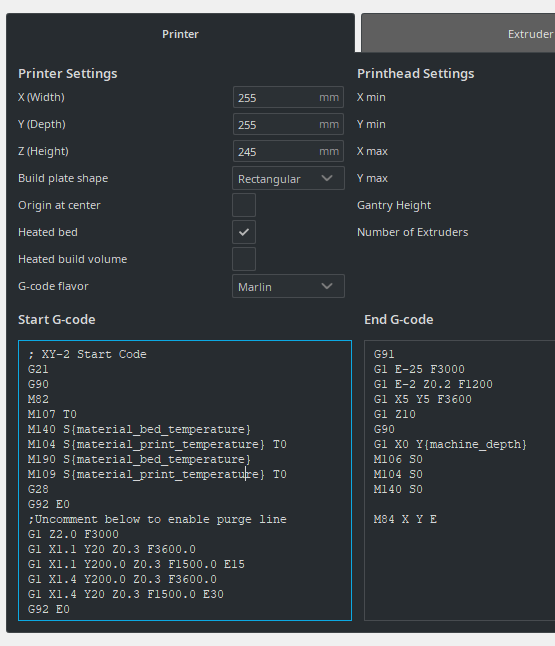
I' using this lines (inserted automatically in each .gcode-file before begin):
The relevant part here may be the 3 extrusion-lines below, I have good results with this initiation,
I'm using this with Prusa-Slicer, Cura and Simplify3D. My 3D-Printer is a CR10, modified...

;~~~~~~~~~~~~~
; Edit Temperature depending on the material:
; PLA: 200-215gC / 60 -65gC
; PETG: 230-250gC / 70-75gC
; TPU: 230gC / 60gC => half speed!
;Temp:
M104 S230 ;Set Hotend Temperature
M140 S72 ;Set Bed Temperature
M109 S240 ;Wait for Hotend Temperature
M190 S72 ;Wait for Bed Temperature
M105 ;Report Temperatures
;!!! Search further for M140 (Bed Temp), M104 (Extruder Temp.) and M106 (Fan) !!!
;~~~~~~~~~~~~~~~~~~

M82 ;absolute extrusion mode
M201 X500.00 Y500.00 Z100.00 E5000.00 ;Setup machine max acceleration
M203 X500.00 Y500.00 Z10.00 E50.00 ;Setup machine max feedrate
M204 P500.00 R1000.00 T500.00 ;Setup Print/Retract/Travel acceleration
M205 X8.00 Y8.00 Z0.40 E5.00 ;Setup Jerk
M220 S100 ;Reset Feedrate
M221 S100 ;Reset Flowrate

M420 S1 ; enable the leveling mesh that previously was aquired with M29 and saved with M500
G28 ;XYZ-Homing (w. BLTouch)

;Draw 3 Extrusion-Lines and press Filament-Rests to Bed:
;G28 ends with Z=20mm, so Nozzle is on 20mm (height)
G92 E0 ;Reset Extruder (to "0")
G1 X110.0 Y10.0 F8000 ;Move fast to first position (X110,Y10) with 8000mm/m ("X,Y-Zero" is at 10,10 mm from "0,0")
G1 Z0.25 ;Move Down Z-Axis(=Nozzle) to 0,25mm height from bed
G1 X10 Y10 Z0.25 F1200 E10 ;Draw the first line (100mm length) in X-direction "0") with 1500mm/m extruding 10mm
G1 X10 Y15 Z10 F3000 ;Move Y+5mm forward and Z+10mm up
G1 Z0.25 ;There Move Nozzle down to 0,25mm...
G1 X60 Y15 F1200 E15 ;...and draw the second line (50mm) in X-Plus-direction, extruding 5mm more
G1 X10 Y25 Z8 F3000 ;Move to third position (Y+10mm and Z=8mm height)
G1 Z0.25 ;there again move Nozzle down to 0,25mm
G1 X10 Y75 F1200 E20 ;...and draw the third line, now 50mm in Y-direction
G1 X10 Y80 Z6 ;finally move Nozzle to Y+5mm forward and up 6mm (height)
G92 E0 ;Reset Extruder (Extruder-relative-position to "0")

;~~~~~~~~
;gcode at end-of-file:
G91 ;Relative positioning
G1 E-2 F2700 ;Retract a bit
G1 E-10 Z0.2 F2400 ;Retract and raise Z
G1 X5 Y5 F3000 ;Wipe out
G1 Z10 ;Raise Z more

G90 ;Absolute positionning
G1 X10 Y270 ;Present print
;G1 X10 Y10 ;To Home-Position

M106 S0 ;Turn-off fan
M104 S0 ;Turn-off hotend
M140 S0 ;Turn-off bed
M84 ;Disable all steppers
M82 ;absolute extrusion mode
;End of Gcode

;~~~~~~~~~~~~~~
;for my prusa-slicer in conjuction with "DisplayLayerProgress-Plugin":
;gcode before each layer-change:
;Layer: [layer_num] / Z: [layer_z]mm
M117 INDICATOR-Layer[layer_num]

1 Like

I will try this, I'm currently struggling trying to get my bltouch to level. The print head is either burying into my bed or its extruding 2mm above no matter my z offset. But once I get it figured out ill repost with results from this! Thank you

2mm are definitively too much! Print-Head defect? Rails loose?
First Calibration and specially Offset calibration is really important, I mean, in magnitudes of 0,01 mm (!).
This can be achieved printig a 0.2mm rectangle (1 layer of 0.2mm) and observing this "one-layer": Is it too flat, squeezig material above or is it too round? The string has to be a little bit "down-pressed" (~oval), so that all together are building a nice, flat and uniformly even surface.
If you manage to reach this precision, you don't need anymore "elefant-food" compensation, etc.

I'm guessing that this is firmware related because it started after a print that went perfectly. I messed with too many settings and can't find any 8 bit ender 5 firmware updates that aren't already in.hex for me to modify them. I am going to try to flash TH3D firmware but I have checked all physical aspects and they are good. Can my z axis stepper get misaligned if my son had rotated it by hand mid print to compensate for a bad z offset?

But don't you have to edit it before each print depending on your material? If you do it in your slicer it will just use whatever temp you first layer is since that's the temp it will wait for.

@ryan780: Surely, but the thread here was searching for an initial wipe-method... For myself, in respect to temperatures - mostly I'm using PETG, so (for me) at the moment it's not necessary to modify each print. On the other side: Modifying temperatures it's not only the first layer you can modify manually (Extruder/Hotend with command M104 S[temp], Bed with command M140 S[temp] and Fan with M106 S[speed] / M107 =Fan off) but each layer or even segment...
Surely, f the slicer isn't adviced to modify any temp's after the first layer it will continue with the last given temp...
But if you are often using different materials, it's surely better to store different materials resp. temperatures in your slicer's [Temperature]-menu, each with a different profile &/or color, so its easier to choose and replace materials to print/slice. For myself I enjoy more to experiment with each material (flow, force versus temp's, density, strength, etc. - they are not only different between materials, but "same" materials are often really different between factories!...), so for the moment I do it "manually" - if needed...
@Trickflow: Other possible source of error may be (among others) your slicers (manual-)settings ?
On the other side: modifying "midprint" steps by hand isn't so easy – (mostly used Nema-17) Stepper-Motors under current are really strong to overcome with manual force... so this seems to me not so probable the reason.
But modifying your printer's firmware its an other (very great) chapter! – Myself I'm not using TH3D's modified (Marlin-)firmware but the original Marlin-1.1.x (w. Arduino-GUI) and strongly advice you carefully to study and only succesive modifying Marlin's original examples (and online-instructions...!), step by step, ensuring that each step is:

  1. doing what you want on your printer,
  2. securing each modified step / success with a backup,
  3. securing also each (succesfully) resulting .hex-file with a backup,

so in case something goes wrong you don't have to "begin from zero"...

In PrusaSlicer and I suspect Cura required temperatures are available to custom GCode. The initial bit of my startup GCode is

BlockquoteG28 ; home all
M420 S1 ; Bed Leveling State - enabled (G28 disables but not if RESTORE_LEVELING_AFTER_G28)
M104 S[first_layer_temperature] ; set extruder temp
M140 S[first_layer_bed_temperature] ; set bed temp
M190 S[first_layer_bed_temperature] ; wait for bed temp
M109 S[first_layer_temperature] ; wait for extruder temp
G92 E0 ; Reset Extruder

@nlohr1 you're kinda missing the point. The point is you are setting the temp for your print in your slicer, so why would you want to have to remember to go in and edit the Gcode manually after slicing it? This is not about setting up the temperature for your material, the question was about a swipe line at the beginning of the print. You're kinda wandering off target here.

Yes @towlerg hit the nail right on the head. If you add this into the defined "start code" for your printer, you never have to touch it again. It will just always be there. I think that is an easier solution than going in and editing things manually. And if you use 3 slicers, then set it up in all three slicers. Still going to be a lot less work than doing it manually and having to remember to do that each time.

And yes, in Cura it's in the printer's machine settings:

Set it up once and forget it.

@ryan780: I didn't "miss the point": See my (initially) proposed .gcode-lines to wipe out 3 extrusion-lines, and there specially the jumps between the wipe-out lines! This jumps makes the outcoming filament stick better to the bed as pure lines.
And you surely know that temperatures are necessary before you can extrude anything, so for newbies the sequence-order and where to put this 3 lines in conjuction with is important – the rest of code there (Temperatures, etc.) was only for my own tests and for completeness – I mentionned this also here, and also I mentionned to write the initial codes in each slicers beginning code instead to modify them manually – but possible that my answers to questions growing up from there, etc - to read my entire lines perhaps was too long for you...
In the past I experimented with many forms of wipe-out lines: Marlins proposed zig-zag-lines, circles, squares, etc, but the best result gave me this 3 lines with the mentionned 3 jumps between them. But wipe-out lines are only good if a small amount of filament is coming out of the nozzle. If a larger string of filament comes out before reaching temp / printing or if this string yet made a mess sticking around the nozzle, no wipe-out-lines can help anymore. So in this cases I use a stump tweezer (in the few seconds between reaching nozzle-temp and begin of printing, extracting filament-rests manually) – this beeing an old and proven solution, I'm thinking of making from that a "hardware-solution" with a kind of silicon-brush or "silicon-theeth"-door near the X0,Y0 of the bed, instead of wipe-out lines, but the problem of that way is how to fix that brush to the (hot) bed... surely an idea for another thread... :wink:
@Trickflow: Good luck with your new hardware!

I can't wait to try these my printers z axis died so I'm waiting for my prusa to get here now