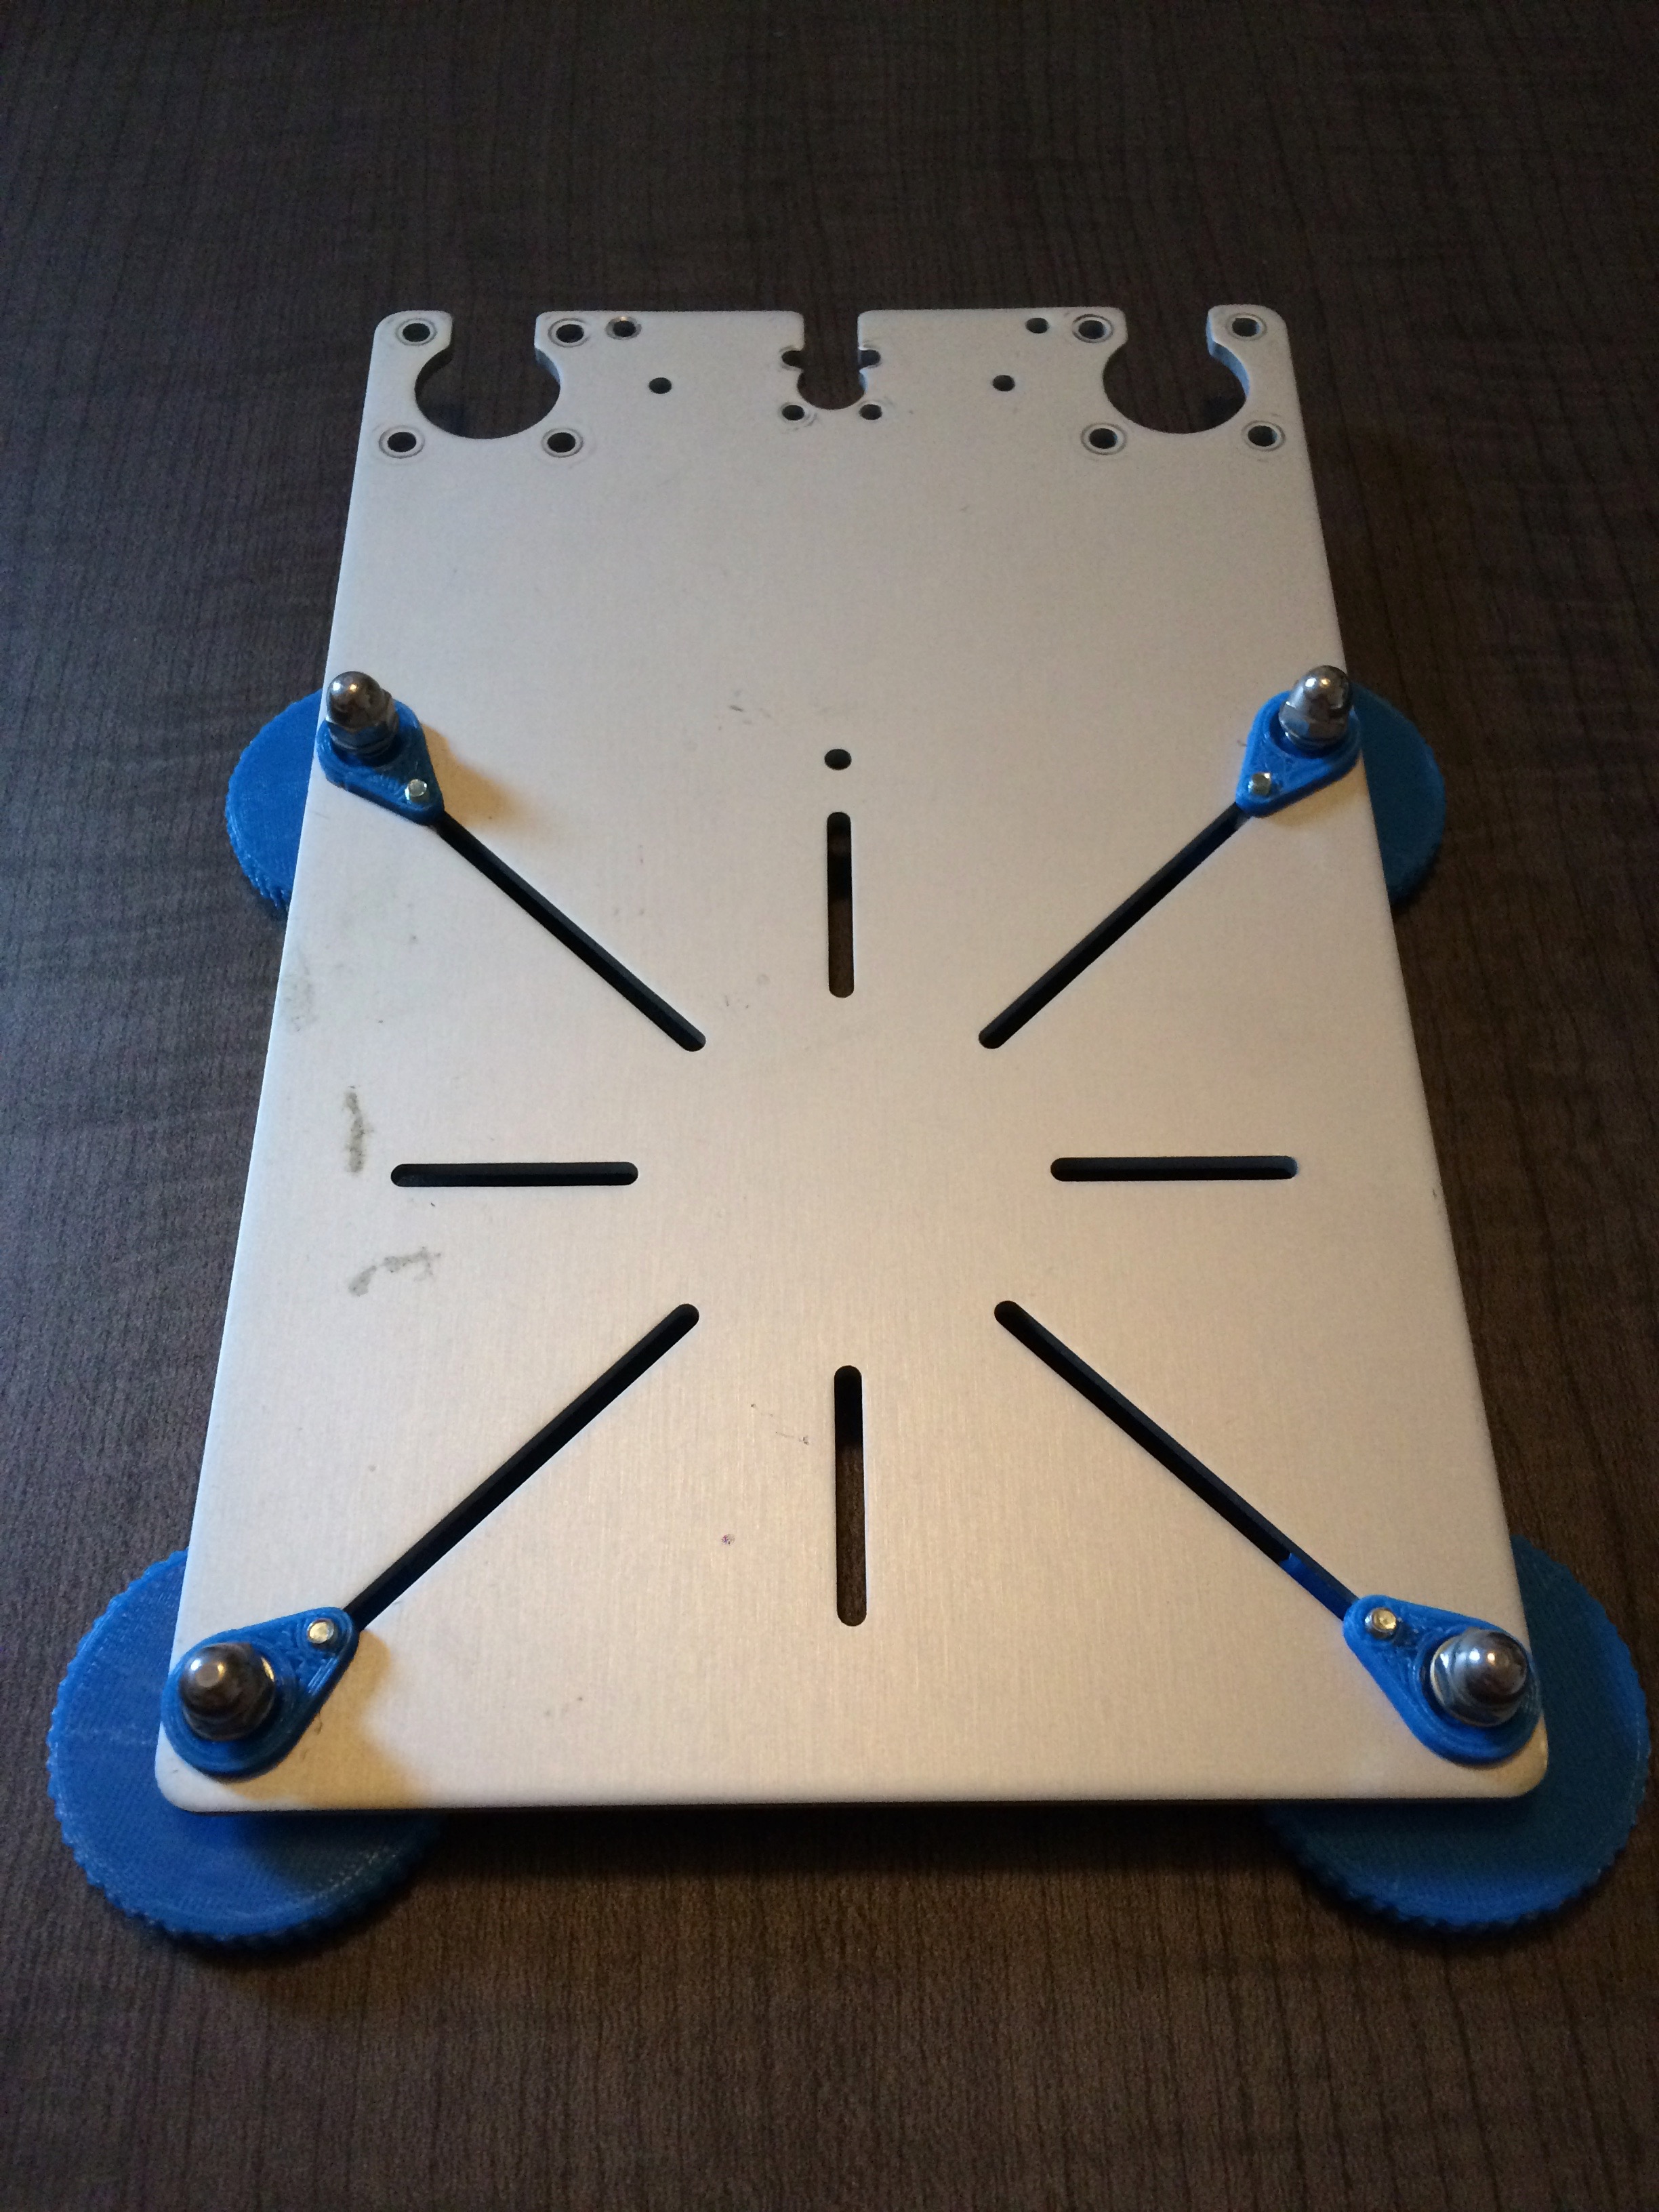
I realize that since I don't have all the other bells & whistles, I need to quickly modify my bed for this. I've just designed the knob(s) and am sending it to the printer. (I probably won't be able to test today. The girlfriend wants to go camping later... so maybe not even this weekend.)
No worries. I just pushed an updated version that added the values in the sidebar and added the z lift prior to homing. Settings changed in the sidebar will not persist, so you'll still have to go into OctoPrint settings to save the defaults. I also updated the knockout binding a bit to try and see if it helps with the text changing related issues that you were seeing @madmax2, let me know if it still loads initially as "Next" or "Start".
I'm still not sure about the "Finish" option, I think once you've used it a bit you'll see it's not that hard to remember you have to press the Stop button, as the buttons enable/disable based on stage, etc. or at least should.
Browser console should show information related to what commands are being sent as you click the Start/Next button for debugging purposes.
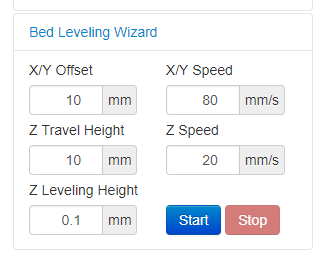
sending commands: G1 Z10 F1200,G28,G1 Z10 F1200,G1 X010 Y010 F4800,G1 Z0.1 F1200
sending commands: G1 Z10 F1200,G1 X290 Y290 F4800,G1 Z0.1 F1200
sending commands: G1 Z10 F1200,G1 X290 Y010 F4800,G1 Z0.1 F1200
sending commands: G1 Z10 F1200,G1 X010 Y290 F4800,G1 Z0.1 F1200
sending commands: G1 Z10 F1200,G1 X010 Y010 F4800,G1 Z0.1 F1200
sending commands: G1 Z10 F1200,G1 X290 Y290 F4800,G1 Z0.1 F1200
sending commands: G1 Z10 F1200,G1 X290 Y010 F4800,G1 Z0.1 F1200
sending commands: G1 Z10 F1200,G1 X010 Y290 F4800,G1 Z0.1 F1200
Stopping Bed Leveling Wizard.
Will test later
Did you solve the problem with regards to it not knowing where the nozzle is after moving the nozzle around when you press stop?
To replicated it, you start the process at corner A.
Press stop
then move nozzle up by Z amount you want.
then move the nozzle around, using the arrow keys
then click next again.
depending on where you move the nozzle to,
the nozzle can try to go beyond the Y max of the bed
or begins home z at a location where the bulldog clip is
=====
Thanks for putting the setting in the side panel.
It will give a good quick access and faster to see the current settings.
Any reason why it won't save setting in the side panel?
The reason for having a finish button and only going around the bed twice is because it gives people a cue that they have been at corner D twice already and that two adjustments is enough
when the next button changes to a finished button.
Users also do not need to mentally keep track of how many times the nozzle has traveled around the bed especially if they needed to do something else then go back to adjusting the bed, they would not need to know how many times they have been around the corners since once it has been around the bed twice, it will now show a finish button.
Believe or not there a users who do not know when to stop and just keeping pressing next.
You need to cater to the lowest common denominator of users who are clueless about when to stop adjusting the bed.
You also need to assume that not everyone knows when to stop pressing the next button.
Having a clear start and finish routine is much more better than one that looks like it can run indefinitely.
It is also the reason why we have wizards.
The purpose of a wizard is to have a simple routine with a beginning and end that walks people through getting something done in a very simple easy steps.
Or to make something that may be more complex into a simpler process.
e.g. setting up some software or getting started on some complex software, calibrating a monitor etc..
Essentially the wizard should walk a user through the bed leveling process with a clear START
and clear FINISH routine.
If it looks like it can run indefinitely ie no Finish button, then I don't think it can be considered a true wizard.
You need to assume that a user that is running a wizard could be a total noob and is clueless about when to stop.
====
Once you click finished the routine is complete and the nozzle moves Z up by 10mm or something and then homes X and Y = 0
This setups the nozzle to be in the correct home position with regards to X and Y
and then people can load a gcode and click print
which would then begin heating up the nozzle and heatbed.
In regards to this I just think it is good to have separation between clicking start which homes all
and clicking next which then goes to corner A.
Like I said while it is good to always heatup the bed prior to starting a bed leveling, not every user will remember to do so.
Having a stop at Home All, gives users a chance in case they forgot to do so.
It also gives some users
-a chance to cleanup any filament or ooze line left on the print bed
-adjust the bulldog clips a bit if it is too close to a thumbwheel etc.
-or just so they can have a pause to do something else before starting to go to corner A etc.
I did not do anything in regards to this yet. Now that I picked up that you were clicking the arrows in octoprint to move the nozzle, I think I know what is going on here. My guess is that octorpint throws the firmware into relative mode and then when you click next, it's moving way out potentially. I'll add in the G90 command to all movements and that should fix that issue.
I just can't wrap my head around how the plugin infrastructure works here. I'm not saying it's impossible, but at this time I just don't see how to accomplish this. The settings bindings in the plugin infrastructure makes saving settings from the settings area very easy. Again, how often are you changing those values?
Ok, this makes sense. I'll limit the process to 2 cycles of leveling and then change the button to Finish on that last "step". This may take me a bit, have to work through the programming logic.
Will incorporate these moves into the "Finish" step.
Ok, I'll incorporate this as part of the other looping logic.
The four knurled knobs came off the printer this morning, for what it's worth. A trip to Ace Hardware is in order for some springs, at least.
Ok @madmax2, I've incorporated the changes and I hope this gets us to a point where it is working as discussed. Upgrade to version 0.1.2 and let me know if your run into issues. Planning on publishing to the plugin repo tomorrow if I get the all clear from you.
I've just installed version 0.1.2 as it looks to be exactly what I need. However, all it does when I click Next is to go up & down in the first corner. My terminal reports this:
Send: G90
Recv: ok
Send: G1 Z10 F1200
Recv: ok
Send: G1 Xundefined Yundefined F4800
Recv: ok
Send: G1 Z0.1 F1200
Recv: ok
What can I do to help fix it or debug it? I know that it's absolutely hot off the block & very much in development...
How does it calculate the bed area & movement dimensions?
Justin
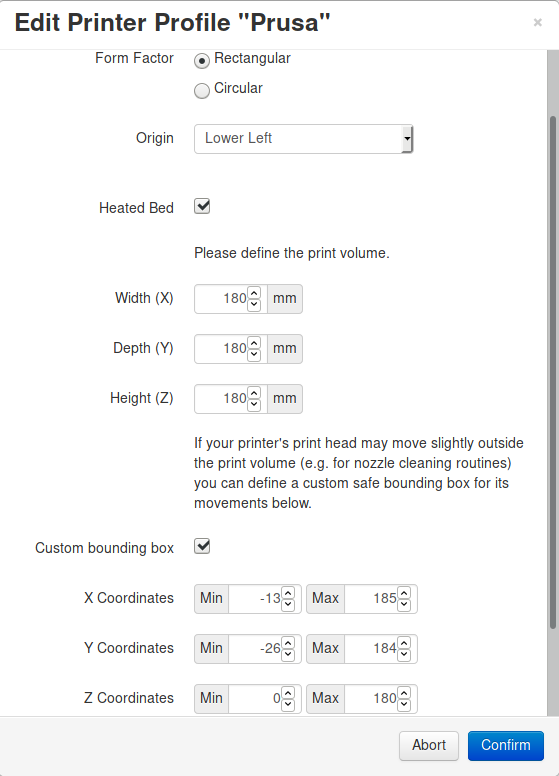
It is supposed to use the bed dimensions from the currently active printer profile configured in octoprint settings. Since the command isa showing undefined for those positions I wonder if you are using a circular bed? Are there any errors shown in your browser's console?
No, my bed size is properly defined. It's a standard Prusa i3 clone, running Marlin 1.1.8.
Maybe it doesn't like the minus numbers I have for my bed min values?
Finally. I've manage to move all the parts over from test- to production-rig. Ran the Manual Bed Leveling Wizard multiple times. I like it. It seems to do exactly what I'd want it to do. Just noting that I also have an IR sensor and G29 autoleveling on this; there was a time in the past where I'd added shims at each corner in an attempt to get this closer. The new leveling hardware I just made seems to work quite well with your plugin.
Before:
After:
It looks like I've got a lot more control now over the platform. I'll do a separate write-up over in Showcase for the project I just did to add leveling to my Robo C2.
That might be the issue. I've never tested the custom box options, although I've accounted for them. I'll do some testing when I can and see if I can get that figured out.
1 Like
Okay I just tested the newest version and it works according to the program logic as discussed.
I also tested to see if it will go beyond bed max size and it hasn't yet.
Looks like G90 absolute positioning solved this dangerous problem.
From what I have test so far, it looks like it is working very similar to the S3D wizard now.
I'll update the post if I find any problems.
===
I did noticed something different
when you click start, it homes all and then lifts Z up by some amount and then stops.
What was the reason for doing it like this,
instead of just leaving Z at home all position?
====
If you are interested in adding these in future updates I suggest you look at
Custom co-ordinates
adding custom co-ordinates like the original GUI window I posted
This will be useful for people who
- do 3 point leveling
- have circular beds??
- want to do 5 or more points leveling e.g. in the center etc.
Saving in the side panel
Fixing the bug why it won't save in the side panel.
I know that you said it won't be changed much, but for consistency it should save it if it was changed in the side panel.
I know that the connection side panel does save the info you changed so maybe ask Gina about it?
Anyway it is a minor bug.
If you solve it then good, but if not then don't worry.
===
BTW what ABL probe sensor do you use?
Do you use in on glass or what print surface?
Does it work well in an enclosure?
As you mentioned in regards to this users startup process, some might want to wipe the nozzle. That wouldn't be possible if it was down so I figured move it up after homing.
Ok @justinsb, issue should be resolved for you in the latest released version 0.1.3. If you force a refresh in Software Update it should detect the new version. Let me know how it goes.
I'll look into this option in the future for sure. Specifically for those people with circular beds. I'm sure that will come up eventually once I release the plugin to the repo. As it stands now, I'm not quite sure what it would do with a circular bed, would have to do some testing. That kind of math is not something I want to get into with dealing with offsets along a circumference.
ah okay got it
yeah I noticed your implementation felt a bit different when I press start and tested it yesterday..
so I just tested the s3d wizard again today and noticed it kept the Z at home all position when you press start
But the lift Z after home all might be better implementation
cos it will give people a chance to look at the nozzle and clean up and left over oozed filament
Often before when I used s3d wizard, and when it went to corner A
I slide in the paper and noticed it felt more tighter than normal
then I lifted Z and noticed that there was a bit of filament ooze nozzle which I then had to cleanup before restarting the wizard, so I would have to do a Z lift to clean it up.
The question is, how much Z lift is going up by after homing all?
If it lifts too low then it still maybe a bit harder to clean up the nozzle cos you need to bend your head down in an awkward position to see if there is any ooze.
Yeah in my own usage have not had a need to use the custom co-ordinates
since it requires more work to setting up the values of X and Y etc..
For the most part the plugin now will do what I need and is now a good replacement for the s3d wizard.
I am sure the purpose of s3d custom co-ordinates is for the 3 use case that I mention above:
- do 3 point leveling
- have circular beds??
- want to do 5 or more points leveling e.g. in the center etc.
Does circular bed require custom co-ordinates?
Spelling fix
I did pick up something that you may have missed
I notice in your spelling you spelled Axes, while in the S3D GUI it is spelled as Axis.
From my googling, Axis is a singular term, whereas, axes is the plural of axis.
So I think when you are labeling the X, Y, Z setting, since there is only one value for X/Y/Z axis, it should be Axis.
I will say, you might want to exercise the up/down incrementers for each of the input fields. I think I wanted to make the X/Y corner offset bigger than 10 and it went to zero.
The lift is the same as the travel lift setting currently.
I'm not really sure here. I do know that the origin for circular beds is typically center though, so the math would be way off. As it's programmed now, it assumes "lower left" origin point and wouldn't account for negative x or y.
You are correct. I labeled the X/Y as Axes because the setting is for both. I'm no grammar expert but I guess because of the / maybe it should be singular, but my thought was your setting the value for multiple. You'll notice Z uses the singular form already.