Manual Bed leveling wizard plugin suggestion/request

I have a suggestion - Manual Bed leveling wizard plugin.

On simplify3d there is a manual bed leveling wizard that makes the manual bed leveling much more easier to do.

When you start it
it homes XYZ = 0

Then when you click next,
the nozzle lifts up by x mm (e.g 15mm)

It then moves to the first corner offset amount e.g. X and Y = 10 (you can change 10 to whatever you want)
Then nozzle homes Z = 0
Then you can adjust the bed corner A with the thumbscrews

Then clicking next moves to corner C (this is diagonally opposite corner A)
the nozzle first lifts up by X (e.g 15mm) before moving to corner C

Then repeating the same bed leveling procedure
it moves to corner B

Then moves onto corner D.

Then it repeats the entire 4 corners a second time.

Note: We can cancel the bed leveling at any corner we want.

So the entire bed leveling map looks like this

D---------C
| | | | | | | |
| | | | | | | |
A---------B

1 Like

Yeah, I've been meaning to do one just like this... but with a twist (pun intended).

I've got a spare platform for my printer so that I can attach four guitar tuning pegs to the corners (rather than the usual adjustment). I then want to write a plugin that will use the IR sensor's sampled output to the aplay -f n command where a note like E (82.41 Hz) is adjusted by that sensor output then it's played to an attached speaker.

As you adjust the front/left corner by ear (or by using a guitar tuner app), the feedback loop of the sensor then adjusts the output frequency until it's the expected distance and the expected note.

Clicking Next then moves to the front/right and you're tuning an A with a similar process.

You could even include a test point in the center which should be a B or an upper E perhaps just as a reference/sanity check.

Since I've been playing the guitar for a while I have a good ear for tuning by sound. I think I'd welcome an interface like this if it resulted in an even playing field.

This one would fit the bill would it not?

1 Like

@jneilliii

No it does not.

I have used it already and it does not have a wizard.

If you used that plugin and the manual bed wizard in simplify 3d or compared it to my suggestion you will see it it is different.

Try to get a copy of simplify3d trial software and try out the wizard yourself
and then used the touchtest plugin. You will see how much more easier it is on the simplify3d software.

The difference with touch test bed leveling plugin is

  • you have to manually choose the corner you want the extruder to move to VS just clicking next button.
  • prior to pressing one of the corner button, you need make sure to lift the Z off the bed, by pressing the Z up button, else it will scrape/scratch your heat bed surface.
    Then you choose a corner and press that corner button, then you need to lower Z = 0 (by pressing Z down button, and make sure to choose the same distance that you chose when you lift Z off the bed)

As you can see, this is a lot more work to do the manual bed leveling VS a wizard.

Just look at how many button presses you need to press and the need to make sure to lift Z up each time we choose a corner, then lower Z down for each corner.

VS

Just simply pressing NEXT in a wizard.

Gotcha. Wasn't really sure if that would work or not. I see your point though, a wizard would be easier. Wouldn't really be too difficult to program this one I don't think, it's just sending positional gcode commands to the printer on click of a button in a loop.

Since the logic is already kind of worked out here I could probably code this up over the weekend if you're willing to test. I personally use ABL so don't have the screws anymore, although that doesn't really matter since like I said it really is just sending gcode commands that move the extruder.

1 Like

If you can code it up that would be good

Yeah ABL is great, but I think the majority of users are still doing manual bed leveling (due to cost or difficulty in setting up ABL)
so a wizard would make their life much more easier.

Here is a screenshot of the wizard GUI window in s3d

The simplify3d bed leveling wizard procedure in detail

Prior to homing all (begin leveling button) you can set the

Levelling speed
-Levelling speed of X/Y and Z (mm/s)

Levelling position
-Z height for leveling moves - how high should Z extruder should be when do the bed leveling
in this case 0.10mm

Actual travel moves between corners is about 10mm above the bed
if you want you can add these extra setting for Z height when travelling between corners.

Automatic leveling position based on build dimensions
-offset from table edge base on x mm (e.g. 10mm)
So the extruder will move to 4 corners based on the offset amount set.

Manual enter leveling
-If you don't want to use the automatic leveling position
you can manualyl enter the co-ordinates of 4 corners
and any other positions you want e.g. the center of the heat bed.
-Note you don't need to add these feature yet, but just something you can look at for a future version.
Personally I don't use manual co-ordinates but others might find it useful and just explaining that feature in the GUI window

After clicking button - Begin Leveling
extruder will home all

Then the same window appears but the Begin Leveling button is now replaced with NEXT button.
As you can see the GUI is still the same, and you can change the those values shown in the window at any time you want.

When you click NEXT button, it will move to first corner offset value
in this case X=10, Y=10
It will lift Z = 0.10mm (based on values set) first prior to moving to the first offset corner A.
Then when it moves to X=10, Y=10
it then lowers the extuder so Z=0

Then when you click next, it will move to corner C and lifts up the Z prior to the travel movement to corner C
then lowers it down Z=0

And it does the same procedure to corner B, then corner D.

Then it repeats the entire thing by going back to corner A to C to B then to D.

When you click next to move to corner D (second time)
It moves to corner D.
When you click next after leveling corner D (second time),
the extruder will lift up by 20 mm (so total of Z = 20 + 0.10 = 20.10mm
and home XY = 0

Then the NEXT button is now replaced with a FINISH button.
When you click FINISH button, the GUI window closes.

BTW Have you coded any other plugins?
I think this bed leveling wizard plugin will be very popular plugin if you code it
since there is no such plugin right now and there is a definite need for such a plugin.

Cool, thanks for the details. That helps a lot. Yes, I've made several plugins, you can see them here. I think some of them are popular.

I just had a test of the wizard again on s3d
and realise I need to make some corrections to process of the bed leveling

I have fix it up in the above post but will write again here so you can see

Corrections

Z height for leveling moves
-Z height for leveling moves - how high should Z extruder should be when you do the bed leveling on each corner, in this case z = 0.10mm

Actual travel moves between corners is about 10mm above the bed

I realise that 0.10mm is not the height of Z during travel moves
because 0.10mm is way too close to the bed and that means the Extruder could hit something like a bulldog clip used on many glass beds.
When it moves from D to A corner, if there is a bulldog clip the nozzle will hit and knock it off if z=0.10 mm.

So actual Z height during travel moves from what I guess by watching the wizard is about 10mm.
You can add a setting for Z height travel moves if you want so this can be changed or keep it at 10mm.

D corner (second time)
When you click next after leveling corner D (second time),
the extruder will lift up by 20 mm (so total of Z = 20 + 0.10 = 20.10mm)
and then home XY = 0

When we finished the wizard, we can begin a new print
and the XY would have been home correctly to XY = 0
and Z is at a good distance of 20.10mm above the heatbed
in case you need to wipe the nozzle filament ooze.

I'm not sure I agree with this logic. Why wouldn't you just go to z=0 and adjust? It makes more sense to me to just control the travel height.

I do have the initial framework for the UI started and binding to settings...

Offsets would be xy for border and z for "travel height". Still not sold on the naming yet, but I usually like to get it built and binding first and then add in the functionality.

2 Likes

GUI Looking good so far and quickly put together.
What programming language do you use to create this and that GUI?
Is it python only?

I don't know why in s3d they called it "Z height for leveling moves"
but I just tested the wizard by setting the value Z height for leveling moves = 10mm
and I can confirm that when it moves to the first corner for bed leveling,
it has kept the nozzle 10mm above that corner.

So that Z height setting is definitely not for the z height travel move between corners.

I just did a quick google search and it seems like the reason that they let you set the Z height for bed leveling
is because it doesn't assume thickness of the paper or whatever you are using
So if you enter 0.1mm it means the nozzle will try to position itself exactly 0.1mm above the bed,
and if your paper is that thick, then it would perfectly be touching the paper on top of the bed.

Basically it lets you set a z height for the thickness of the leveling device you are using
which can include (piece of paper, business card, feeler gauge)

====

Z axes should be rename to Z offset travel move.

I think you should add the Z height for bed leveling as shown in the original GUI
cos that will let us tell the wizard how thick our bed leveling device is.
Else if nozzle starts at Z=0 we definitely will not be able to slide in our leveling device
We will need to immediately adjust the thumbscrew in order to slide in our bed leveling device be it a (sheet of paper, business card or feeler gauge)

If we can set that Z height, then it will leave a gap, so we slide in our bed leveling device more easily
without having to initially adjust the thumbscrew yet.

This is actually a huge time saver, if we decide to change from a piece of paper = 0.1mm to to a feeler gauge that could be 0.3mm etc..

We just change that one Z height value = 0.3mm instead of having to adjust 4 thumb screws to accomodate the new 0.3mm feeler gauge.

==

Should the bed leveling wizard be inside the octoprint settings?
It would be better if it was in a tab on the main interface or part of the side panel etc. to allow easier access
or part of the drop down menu.

I'm an old school programmer and use Notepad++ to do all the coding. It's a combination of python, javascript, and html. There is great documentation on programming plugins over here. I started by following the tutorial and just developed from there when I first started doing plugins.

I will update the naming and add in that z height offset as mentioned, but I think you may be missing something here, or I am. From my prior experience with manual leveling the reason you use a sheet of paper is because that thickness of the paper is approximately equivalent to the amount of distance that will be made up when the extruder and bed heat up to temp due to thermal expansion. Do you level your bed with the bed/extruder heated to temp?

As for where to put it, tab vs settings vs sidebar, I chose settings because I personally like to keep the main interface as clutter free as possible. I might be spoiled by ABL, but I assumed leveling is not something you do every day or before every print, but I might be wrong there. From prior manual leveling experience I would just do it once the prints started showing signs of bad/inconsistent bed adhesion.

Added in the offset and updated the label as mentioned. I now have the correct looping functionality, and believe for simplicity to just keep the process an infinite loop and change the cancel button to "stop".

I now just need to add in the match calculations for determining the points to probe based on these offsets and the bed dimensions and the sending of gcode commands to do the movements.

1 Like

Small UI updates...

1 Like

I'm very much interested in this. I will eventually doctor up my platform to allow for the adjustments in the corners. The underlying design for this is just... bad at times.

Ok, I have an initial release for you guys to test out for me. Seems to function properly best I can tell utilizing the virtual printer and I went ahead and moved the start and stop buttons to the sidebar, as it does make sense to have that there for easy access. Buttons enable/disable based on printer state, etc. Settings remain where they were. You can test it out by installing using the below url in plugin manager. Let me know how it goes.

https://github.com/jneilliii/OctoPrint-BedLevelingWizard/archive/master.zip

Once you've installed, configure your preferred settings and then save. Then on the sidebar press the start button, adjust screw, press next, adjust screw, repeat until you're happy and then press stop.

Hold off a couple of minutes on this guys, I want to make one change before you install.

Ok, guys, give it a go and let me know.

I'll try to run this tomorrow when I get home.

Okay I just did some test with the plugin
and it works good for a first attempt
but it would be good if you can implement some changes below.

There's some differences to the S3D wizard which I think should be included

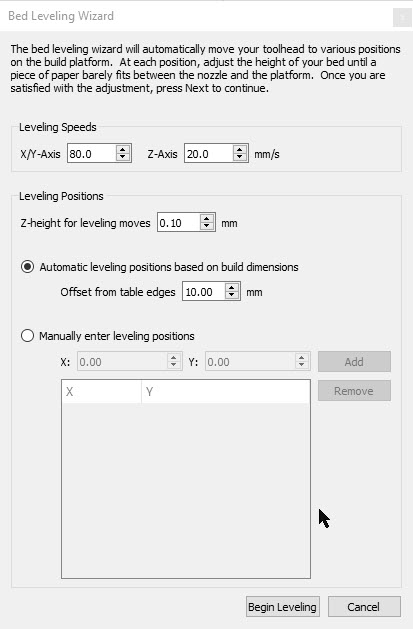
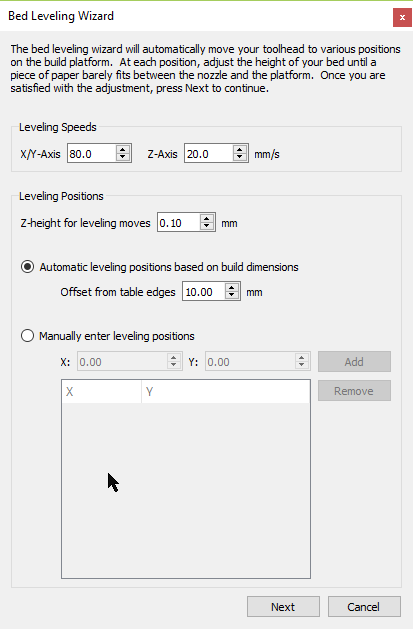
  • Initially Next button should be called Start button.
    This important because it will let you know that pressing the start button will take the nozzle to X/Y/Z=0
    It will let the user know this will start the bed leveling procedure at Home All.

If button was always next button, then it could start procedure at the next corner which we may not remember depending on when we press the stop button or when the last corner was tested.

When you press start button, it should home all and then stop,
the start button should now be called Next. it should not move to the first corner A,
until we press the next button,

This so that some people can heat the bed up at this point before clicking next
or they may not want to start the first corner yet, but still have the nozzle home all.

  • After the second time at corner D,
    the Start button should be changed to Finish button when you click Next at corner D.
    When you click Finish, it should raise the Z by like 20mm and then home X, Y = 0.

If there is no finish button, there is no indication of when to stop for most users.
Usually two adjustment of each corner is good enough.

When you home X/Y = 0, the finish button should be changed to start button
and the entire bed leveling procedure should reset again.

VERY IMPORTANT FIXES (else can damage printer)

  • Always begin the procedure with a Start button.

  • If you press STOP, the Next button must be changed to Start button.
    and the entire bed leveling procedure must reset to the beginning.
    This is important because if this is not done, and we were to move the nozzle at other locations.
    when we click next again, the procedure does not know where the nozzle is, so it can try to push the nozzle beyond the bed dimensions.

This has happened when I tested it.

In S3D, when you press cancel button, the entire GUI window closes
and when you start bed leveling wizard window again, the entire procedure starts from the beginning again.
and the button is a start button (ie Begin Leveling button)

Without resetting the entire procedure, if you press next button, it will try to home the Z at the current location where the nozzle is located, and if you happen to have a bulldog clip there, then the nozzle will hit it when homing Z.

This was also observed when testing.

  • There probably should be some safety precaution, when we press start button
    the nozzle moves Z up by 15mm or something before homing X,Y = 0 and then Z = 0

The reason is because if we happened to have the nozzle at z=0 at any location e.g. corner D, it will move the nozzle to X/Y=0 first and if there is a bulldog clip between corner D and corner A
it will hit it when it moves to corner A.

===

In general it works but I did notice some safety issue which needs to be fix else it can damage the bed or the nozzle.

The main issue is

  1. nozzle does not know it's current location after you press stop button
    So if you were to move the nozzle around after pressing the stop button
    then press next button, the nozzle could move beyond the bed size trying go to the next corner or home Z at bad location where a bulldog clip is located.

This can be fix by resetting the entire procedure whenever user press stop button
and the next button is changed to a start button.

So when user press start button, nozzle will home all again, it is the only way that the nozzle can know where it is located again.

  1. There needs to be clear routine that runs only twice around the 4 corners and then resets back again.
    And a start button will indicate the start of that routine and the finish button will indicate the end of that routine.

Currently there is no define beginning and ending of the bed leveling routine,
so when you press next button it will just try to go to the next corner from last corner

This is very dangerous and has been observed in testing because if you were to move the nozzle somewhere else and then press Next button, the routine will just try to go to next corner without knowing where the nozzle is located now and has tried to move the nozzle beyond the bed size (since it doesn't know where the nozzle is located) or it will hit a bulldog clip when it tries to move the next corner or home Z.

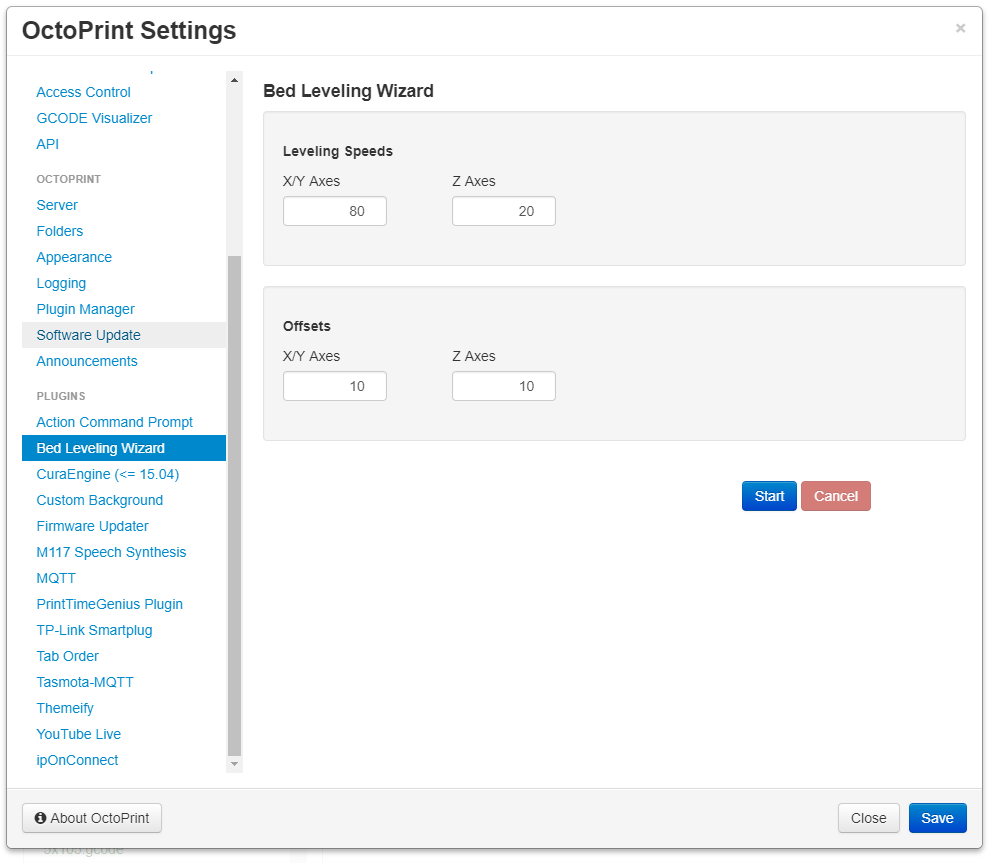
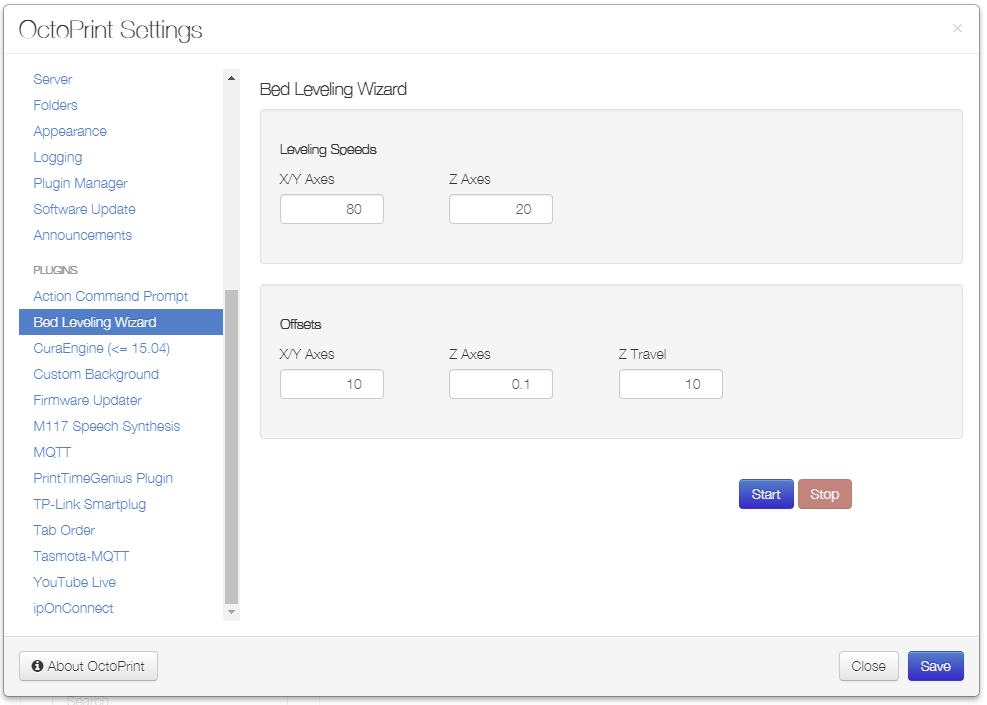
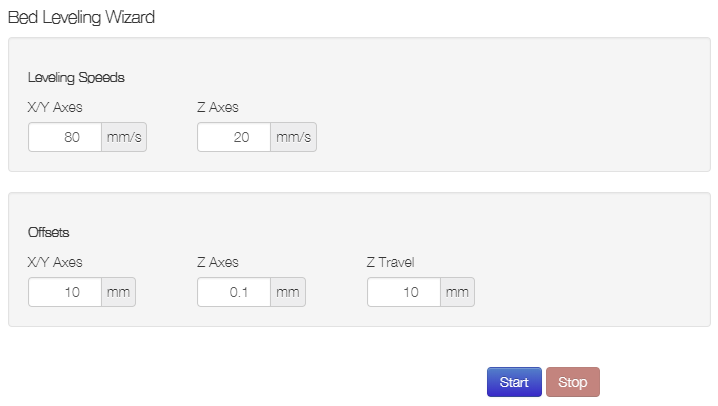
  1. it would also be good if you can put those settings in the side panel
    It would make it easier for us to change the values instead of going through current method.
    It does not look like it would take up much space on the side panel
    and people can collapse it if they don't need to use bed leveling wizard.

===

These are the first major issues I observed when testing.

If you can implement the fixes mention
I can test some more to see if those problems mention still occur.

I'm not sure what you are seeing here, but it is programmed to load with the word Start for the blue button. @OutsourcedGuru when you test let me know if it loads for you with the word next initially.

What's the difference between the user preparing what they need prior to pressing start vs after pressing start? Homing first and then heating the bed up is going to cause inconsistencies on where Z=0 really is. If you home cold and then heat up, physical location of Z=0 is going to change. I guess this is where that previous offset height on probe is coming into play for you and Simplify3D.

I think you're too caught up on how Simplify3D does it here. I think most people will get the fact that you can stop at any time during the process and repeat until you get what you need and press stop.

Similar to the previous comment, the plugin is programmed to change the blue button text to Start when the user presses the Stop button and reset the process to the beginning. There must be something going on here on your installation that is not allowing this to happen. @OutsourcedGuru please confirm when you test.

Good idea; because i use ABL I have "safe_homing" enabled which does this automatically for me, but will update the process to first move Z up the offset distance configured and then home.

As mentioned above the process does reset when you press the Stop button. Something is going on here on your installation that is not happening for me. Can you check your octoprint.log and browser console for any errors on startup please? Restart OctoPrint from the System menu, once it comes back up force a reload by holding down the CTRL key and pressing the F5 key and then let both go to force a cache reload.

Same as previous comment. I wonder if this is an issue for you because of relative vs absolute positioning? If you enter a command G90 prior to pressing start, and go through the steps does this still do the same thing for you?

How often do you really change those settings in SImplify3D? It seems to me it would be a one time set-up of these values and then you would never touch it again.


I'm going to do some additional testing on my end to see if I can reproduce the binding issues that appear to be happening for you (the button text changing stuff and process resetting on pressing stop) and hopefully @OutsourcedGuru can give it a go and provide additional feedback on this one.