Multi instance Octoprint with Data & Plugin Sharing using Docker
Ive set up a multi instance setup of Octoprint using Docker containers, and while this isn't anything new, my setup is using something i have not seen done before:
I configured my instances to be able to share uploaded data and even plugins between all instances!
The setup does not require any specialized software, its just based on a bunch of special mounts for the docker containers instead of just a single folder / volume
Predictable Device Paths
First you want to make sure you can always find your printers and cameras on the same device path, and the easiest way to achieve this is through udev rules. This also lets you do fun stuff ill get into later.
Its easiest if your devices have a serial number, or at least a differing vendor ID. Some of the cheaper cameras don't have a serial, so you will have to find another way to identify each device. Its also possible to identify the port / physical location of a device and write the udev rules based on that.
There are plenty of ways to get the information you need to write working udev rules, some of which are:
udevadm info -a -p $(udevadm info -q path -n /dev/<device>
cat /sys/kernel/debug/usb/devices
For cameras, you can also use envoirement variables from v4l, which are handy because they sometimes combine information you otherwise cant easily get in the current context
Example from my setup:
custom tty rules
cat /etc/udev/rules.d/custom-tty.rules
KERNEL=="ttyACM[0-9]*", SUBSYSTEM=="tty", ATTRS{idProduct}=="cvbn", ATTRS{idVendor}=="asdf", SYMLINK="tty-genius", RUN="/usr/bin/docker restart octoprint-genius"
KERNEL=="ttyUSB[0-9]*", SUBSYSTEM=="tty", ATTRS{idProduct}=="ertz", ATTRS{idVendor}=="yxcv", SYMLINK="tty-x1", RUN="/usr/bin/docker restart octoprint-x1"
custom camera rules
cat /etc/udev/rules.d/custom-camera.rules
SUBSYSTEM=="video4linux", ATTR{index}=="0", ENV{ID_V4L_CAPABILITIES}==":capture:", ENV{ID_VENDOR}=="abcd", ENV{ID_SERIAL_SHORT}=="hjkl", SYMLINK+="video-x1", RUN="docker restart octoprint-x1-video"
SUBSYSTEM=="video4linux", ATTR{index}=="1", ENV{ID_VENDOR}=="abcd", ENV{ID_SERIAL_SHORT}=="hjkl", SYMLINK+="video-x1-meta", RUN="docker restart octoprint-x1-video"
SUBSYSTEM=="video4linux", ATTR{index}=="0", ENV{ID_V4L_CAPABILITIES}==":capture:", ENV{ID_VENDOR}=="abcd", ENV{ID_SERIAL_SHORT}=="xyz", SYMLINK+="video-genius", RUN="docker restart octoprint-genius-video"
SUBSYSTEM=="video4linux", ATTR{index}=="1", ENV{ID_VENDOR}=="abcd", ENV{ID_SERIAL_SHORT}=="xyz", SYMLINK+="video-genius-meta", RUN="docker restart octoprint-genius-video"
As you can see, whenever one of the mapped devices is connected, the associated docker container is restarted. Reconnecting the camera wont hurt a running print, because each camera has its own container (as seen later).
You may be limited on your resolution by how many usb controllers you have, because by default video cameras like to reserve all the avaliable max bandwith they might need. It is possible to disable this, but i could not get that working.
If you set too high of a resolution, you may see an error like libv4l2: error turning on stream: No space left on device and only some or one camera may be working.
my (non working) uvc config:
uvc config
cat /etc/modprobe.d/uvcvideo.conf
#UVC_QUIRK_FIX_BANDWIDTH=128
#UVC_QUIRK_RESTRICT_FRAME_RATE=512
options uvcvideo quirks=640
Docker Compose
The Docker compose is comprised of:
- one printer container per printer
- one camera container per printer
- one docker container management container
- one proxy
So in my case, 6 containers in total.
I am using just another octoprint container but you can use any other container you like that gives you an mjpg stream you can access via an URL.
It is possible to only expose the proxy to a host port, while leaving everything else available only to the set of docker containers started through the compose and using docker DNS for internal communication, which may be a safer option in some places, however, I chose to not do that for now.
I achieved the plugin/data sharing by adding these mounts to each printer container:
    volumes:
      - ./octoprint-x1/:/octoprint/
      - /srv/octoprint-common/plugins:/octoprint/plugins
      - /srv/octoprint-common/octoprint/data:/octoprint/octoprint/data
      - /srv/octoprint-common/octoprint/uploads:/octoprint/octoprint/uploads
      - /srv/octoprint-common/octoprint/users.yaml:/octoprint/octoprint/users.yaml
Most of the data is shared, the reason being that all the plugins and uploaded files are located in the octoprint-common folder:
du -hd1 /srv
16M     /srv/octoprint-genius
52K     /srv/nginx
16K     /srv/lost+found
136M    /srv/octoprint-common
17M     /srv/octoprint-x1
8.0K    /srv/ha-dockermon
Every time you restart Octoprint it looks for all available plugins, so if you install a new plugin on one instance, the second / every other instance also has the files available, and upon the next reload, will load them as well.
complete docker-compose.yml
cat /srv/docker-compose.yml
services:
  octoprint-x1:
    container_name: octoprint-x1
    image: octoprint/octoprint
    restart: always
    depends_on:
      - nginx
    ports:
      - 81:80
    devices:
      - /dev/tty-x1:/dev/ttyUSB0
    volumes:
      - ./octoprint-x1/:/octoprint/
      - /srv/octoprint-common/plugins:/octoprint/plugins
      - /srv/octoprint-common/octoprint/data:/octoprint/octoprint/data
      - /srv/octoprint-common/octoprint/uploads:/octoprint/octoprint/uploads
      - /srv/octoprint-common/octoprint/users.yaml:/octoprint/octoprint/users.yaml

  octoprint-x1-video:
    container_name: octoprint-x1-video
    image: octoprint/octoprint
    restart:  always
    depends_on:
      - nginx
    ports:
      - 8081:8080
    devices:
      - /dev/video-x1:/dev/video0
    environment:
      - ENABLE_MJPG_STREAMER=true
      - MJPG_STREAMER_INPUT=-r 700x525 -f 30

  octoprint-genius:
    container_name: octoprint-genius
    image: octoprint/octoprint
    restart: always
    depends_on:
      - nginx
    ports:
      - 82:80
    devices:
      - /dev/tty-genius:/dev/ttyUSB0
    volumes:
      - ./octoprint-genius/:/octoprint/
      - /srv/octoprint-common/plugins:/octoprint/plugins
      - /srv/octoprint-common/octoprint/data:/octoprint/octoprint/data
      - /srv/octoprint-common/octoprint/uploads:/octoprint/octoprint/uploads
      - /srv/octoprint-common/octoprint/users.yaml:/octoprint/octoprint/users.yaml

  octoprint-genius-video:
    container_name: octoprint-genius-video
    image: octoprint/octoprint
    restart: always
    depends_on:
      - nginx
    ports:
      - 8082:8080
    devices:
      - /dev/video-genius:/dev/video0
    environment:
      - ENABLE_MJPG_STREAMER=true
      - MJPG_STREAMER_INPUT=-r 700x525 -f 30

  ha-dockermon:
    image: philhawthorne/ha-dockermon
    container_name: ha-dockermon
    restart: always
    depends_on:
      - nginx
    volumes:
      - /var/run/docker.sock:/var/run/docker.sock
      - /ha-dockermon/config:/config
    #ports:
     #- 8080:8126

  nginx:
    container_name: nginx
    network_mode: host
    restart: always
    image: nginx
    volumes:
      - ./nginx/ssl/:/etc/nginx/ssl/
      - ./nginx/nginx.conf:/etc/nginx/nginx.conf
      - ./nginx/www/:/var/www/
Unfortunatley, docker compose does not allow for patterning, and you cant use environment variables everywhere, which means you'd have to write a script to write your docker compose and other files if you wanted to automate the setup more.
Proxy details
I am using another https proxy to access this site, and chrome didn't like mixed content, so i set this one up to use ssl:
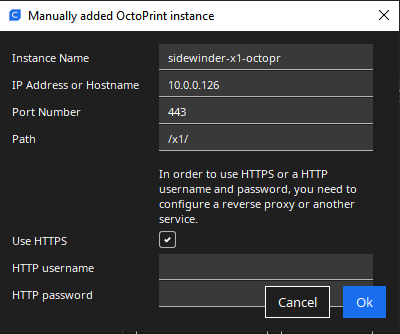
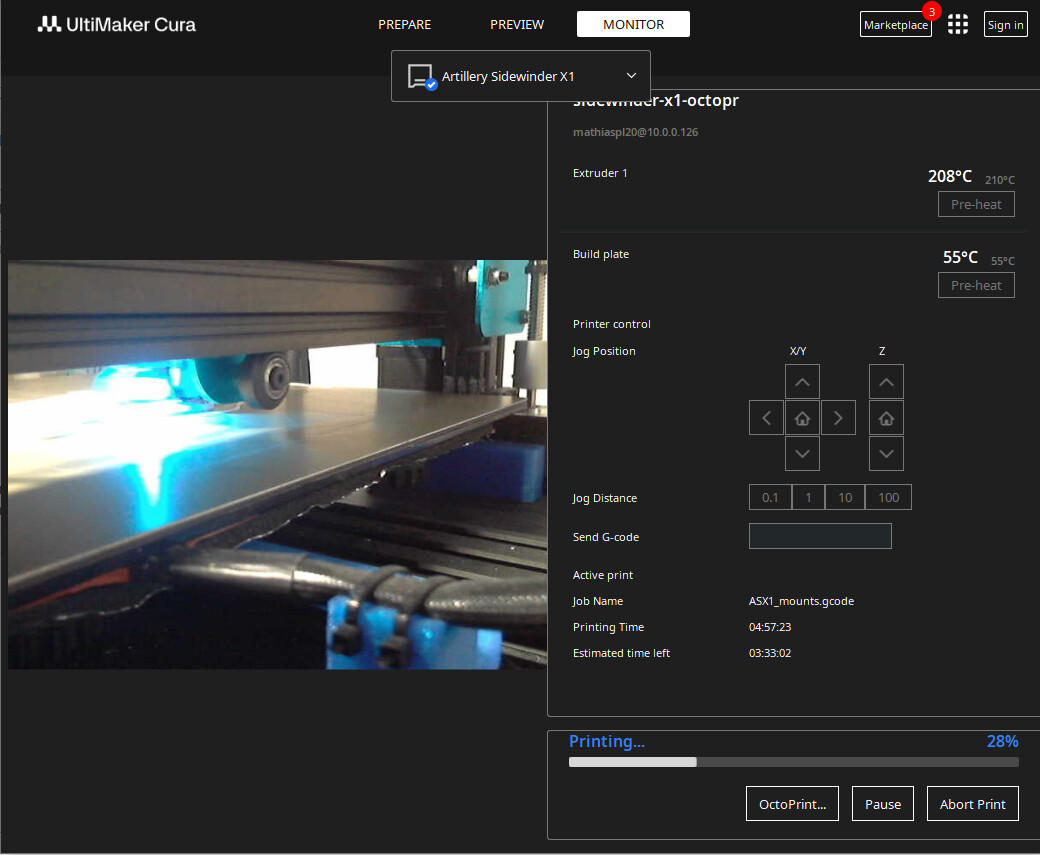
I also configured some custom locations, which work with things such as the octoprint plugin for cura!
nginx.conf
cat /srv/nginx/nginx.conf
events {

  worker_connections 1024;
}

http {

  include mime.types;
  default_type application/octet-stream;
  sendfile on;
  keepalive_timeout 65;

  map $http_upgrade $connection_upgrade {

    default upgrade;
    '' close;
  }

  server {
    listen 80 default_server;
    listen [::]:80 default_server;
    server_name _;
    return 301 https://$host$request_uri;
  }

  server {

    listen 443 ssl http2 default_server;
    listen [::]:443 ssl http2 default_server;

        ssl_certificate /etc/nginx/ssl/star.local.crt;
        ssl_certificate_key /etc/nginx/ssl/star.local.key;
        ssl_protocols TLSv1.2 TLSv1.3;
        ssl_prefer_server_ciphers on;
        ssl_ciphers HIGH:!aNULL:!MD5;
        ssl_session_cache shared:SSL:10m;
        ssl_session_timeout 10m;
        add_header Strict-Transport-Security "max-age=31536000; includeSubdomains; preload" always;


    server_name _;
    root /var/www;
    index index.html index.htm;
    location / {
       try_files $uri $uri/ /index.html;
    }
    location = /landing {
       try_files $uri $uri/ /index.html;
    }

    location /x1/ {
      proxy_pass http://127.0.0.1:81/;
      proxy_set_header Host $http_host;
      proxy_set_header Upgrade $http_upgrade;
      proxy_set_header Connection "upgrade";
      proxy_set_header X-Real-IP $remote_addr;
      proxy_set_header X-Forwarded-For $proxy_add_x_forwarded_for;
      proxy_set_header X-Scheme $scheme;
      proxy_set_header X-Script-Name /x1;
      proxy_http_version 1.1;
      client_max_body_size 0;
    }

    location /x1/webcam/ {
      proxy_pass http://127.0.0.1:8081/;
    }
    location /x1/stream/ {
      proxy_pass http://127.0.0.1:8081/?action=stream;
    }
    location /x1/snap/ {
      proxy_pass http://127.0.0.1:8081/?action=snapshot;
    }


    location /genius/ {
      proxy_pass http://127.0.0.1:82/;
      proxy_set_header Host $http_host;
      proxy_set_header Upgrade $http_upgrade;
      proxy_set_header Connection "upgrade";
      proxy_set_header X-Real-IP $remote_addr;
      proxy_set_header X-Forwarded-For $proxy_add_x_forwarded_for;
      proxy_set_header X-Scheme $scheme;
      proxy_set_header X-Script-Name /genius;
      proxy_http_version 1.1;
      client_max_body_size 0;
    }

    location /genius/webcam/ {
      proxy_pass http://127.0.0.1:8082/;
    }
    location /genius/stream/ {
      proxy_pass http://127.0.0.1:8082/?action=stream;
    }
    location /genius/snap/ {
      proxy_pass http://127.0.0.1:8082/?action=snapshot;
    }

    location /ha-dockermon/ {
      proxy_pass http://127.0.0.1:8080/;
      proxy_set_header Host $http_host;
      proxy_set_header Upgrade $http_upgrade;
      proxy_set_header Connection "upgrade";
      proxy_set_header X-Real-IP $remote_addr;
      proxy_set_header X-Forwarded-For $proxy_add_x_forwarded_for;
      proxy_set_header X-Scheme $scheme;
      proxy_set_header X-Script-Name /x1;
      proxy_http_version 1.1;
      client_max_body_size 0;
    }

    # redirect server error pages to the static page /50x.html
    error_page 500 502 503 504 /50x.html;
    location = /50x.html {

      root html;
    }
  }
}
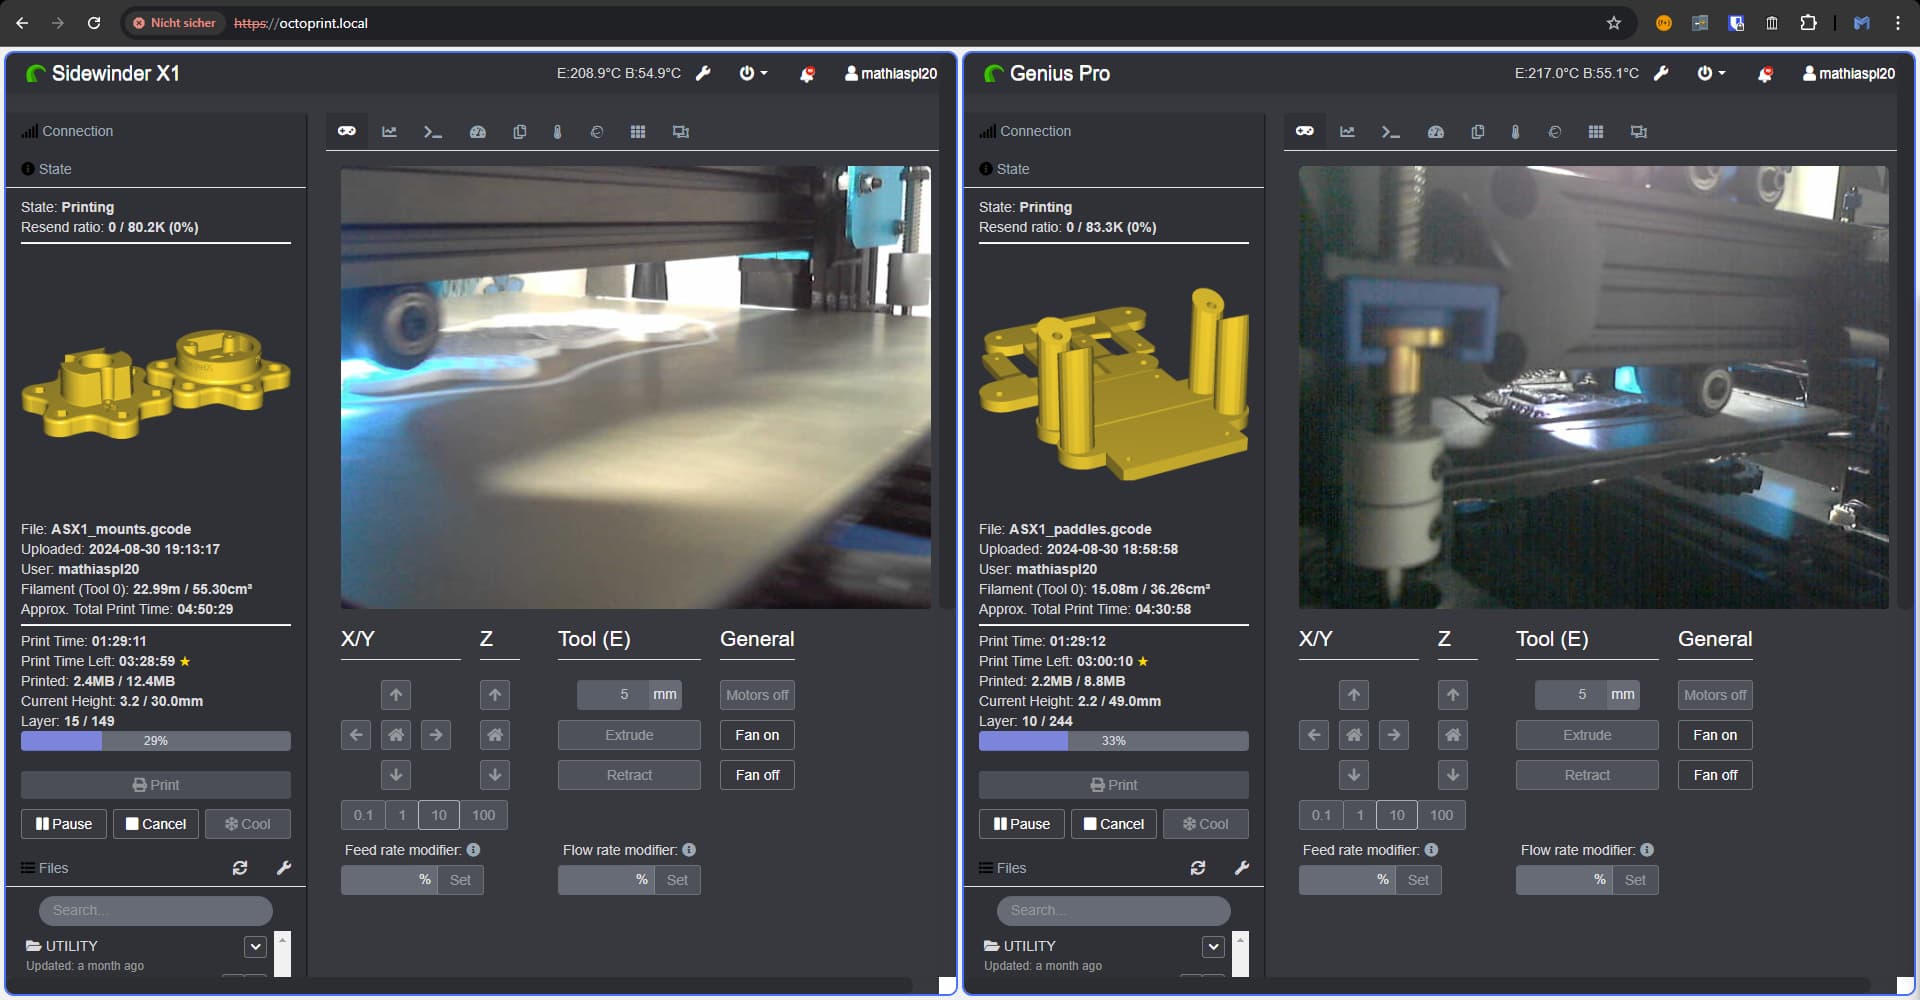
I found that two octoprint instances nicely tile next to each other on a 16:9 monitor, you could add more rows below:
index.html
cat /srv/nginx/www/index.html
<!DOCTYPE html>
<html lang="en">
<head>
    <meta charset="UTF-8">
    <meta name="viewport" content="width=device-width, initial-scale=1.0">
    <title>OctoPrint Combined Page</title>
    <style>
        body {
            font-family: Arial, sans-serif;
            text-align: center;
            background-color: #f0f0f0;
            margin: 0;
            padding: 0;
        }
        .container {
            display: flex;
            height: 100vh;
            padding: 4px;
            box-sizing: border-box;
            gap: 4px; /* Space between iframes */
        }
        .window {
            flex: 1;
            border: 2px solid #007bff;
            border-radius: 10px;
            box-sizing: border-box;
            overflow: hidden;
            background-color: #fff; /* Optional: set background color for iframe */
        }
        iframe {
            width: 100%;
            height: 100%;
            border: none;
        }
    </style>
</head>
<body>
    <div class="container">
        <iframe class="window" src="/x1"></iframe>
        <iframe class="window" src="/genius"></iframe>
    </div>
</body>
</html>
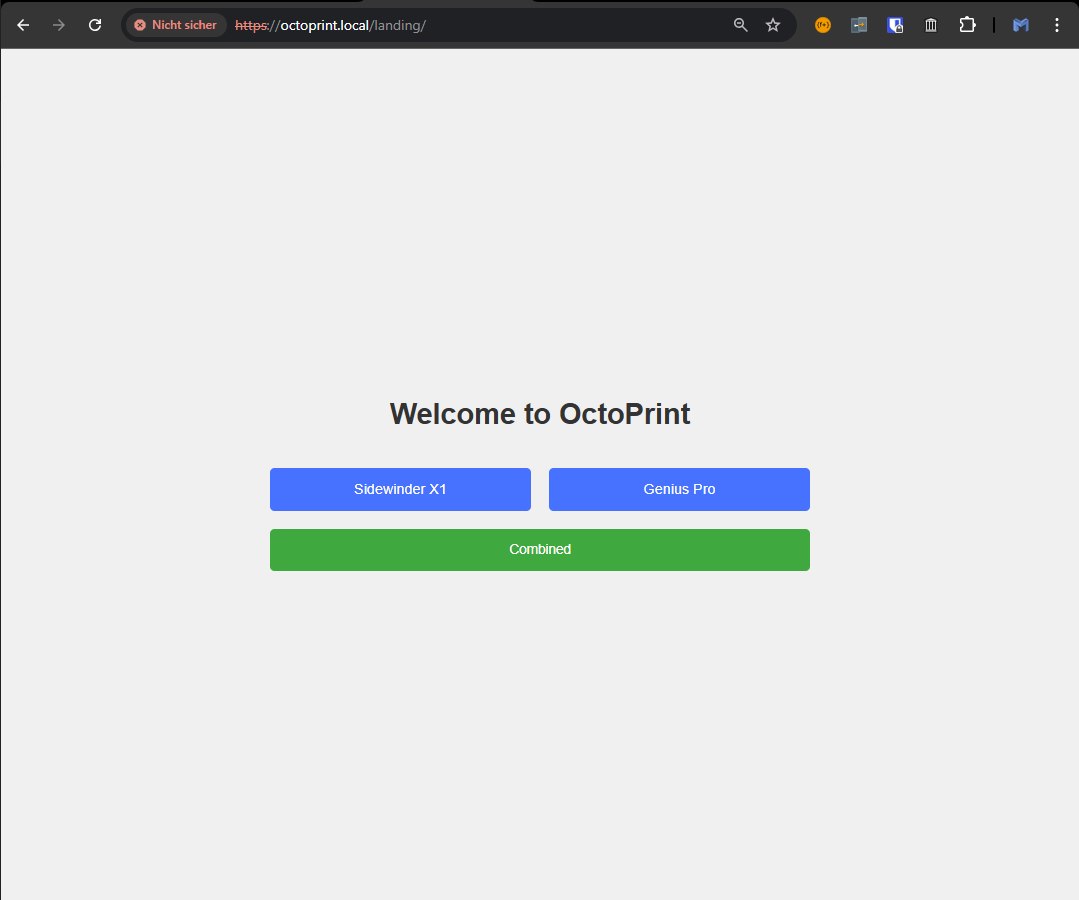
For good measure a landing page also was created:
landing/index.html
cat /srv/nginx/www/landing/index.html
<!DOCTYPE html>
<html lang="en">
<head>
    <meta charset="UTF-8">
    <meta name="viewport" content="width=device-width, initial-scale=1.0">
    <title>OctoPrint Landing Page</title>
    <style>
        body {
            font-family: Arial, sans-serif;
            text-align: center;
            background-color: #f0f0f0;
            margin: 0;
            padding: 0;
        }
        .container {
            display: flex;
            flex-direction: column;
            justify-content: center;
            align-items: center;
            height: 100vh;
        }
        h1 {
            color: #333;
        }
        .links {
            display: flex;
            flex-direction: column; /* Stack the rows vertically */
            gap: 20px;
            margin-top: 20px;
            width: 100%; /* Make the links container full width */
            max-width: 600px; /* Optional: max width for better appearance */
        }
        .link-row {
            display: flex; /* Align buttons in a row */
            gap: 20px;
            width: 100%;
        }
        .link {
            padding: 15px 20px; /* Increase padding for larger buttons */
            background-color: #007bff;
            color: #fff;
            text-decoration: none;
            border-radius: 5px;
            transition: background-color 0.3s ease;
            display: block; /* Make links block elements */
            text-align: center; /* Center text inside button */
            box-sizing: border-box; /* Include padding in width calculation */
            flex: 1; /* Ensure buttons take equal width */
        }
        .link:hover {
            background-color: #0056b3;
        }
        .large-button {
            padding: 15px 20px; /* Same padding as other buttons */
            font-size: 15px; /* Match font size with other buttons */
            background-color: #28a745; /* Different color for distinction */
        }
        .large-button:hover {
            background-color: #218838; /* Darker color on hover */
        }
    </style>
</head>
<body>
    <div class="container">
        <h1>Welcome to OctoPrint</h1>
        <div class="links">
            <div class="link-row">
                <a class="link" href="/x1">Sidewinder X1</a>
                <a class="link" href="/genius">Genius Pro</a>
            </div>
            <a class="link large-button" href="/">Combined</a> <!-- New large button -->
        </div>
    </div>
</body>
</html>
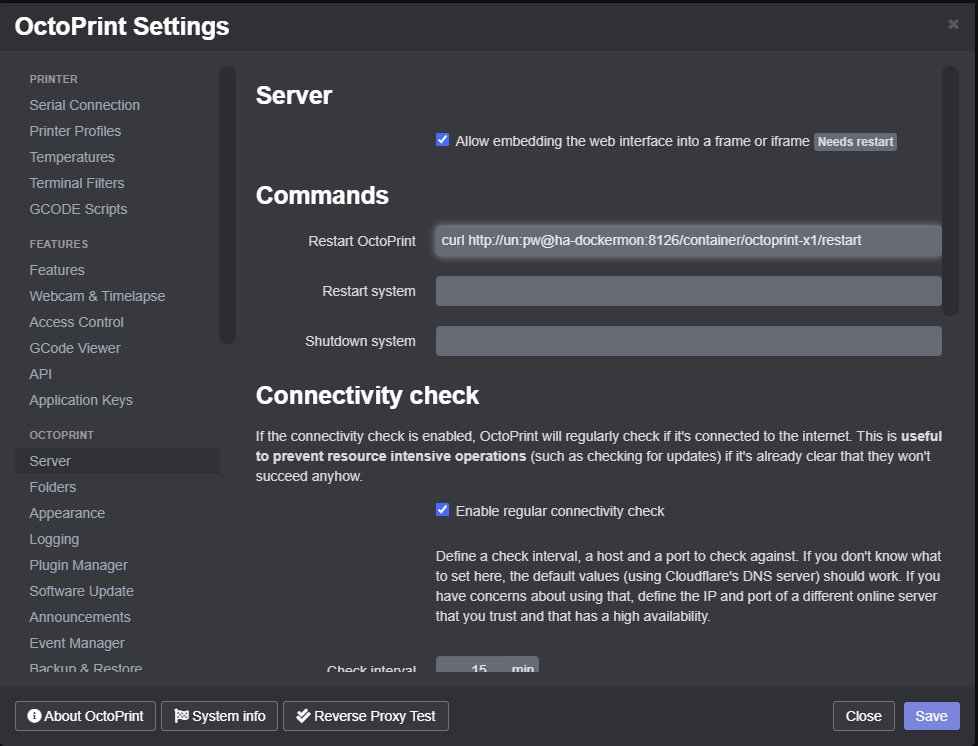
Octoprint configuration
Restarting octoprint
In order to be able to restart the printer container from the gui i added a container management container, ha-dockermon in my case. It allows to perform management actions and gather information through web requests. There are other ways to do the same thing, but ha-dockermon is simple and works well for my purpose.
Note that the curl command uses the docker DNS name instead of an external url.
ha-dockermon config
cat /srv/ha-dockermon/config
http
  username: un
  password: pw
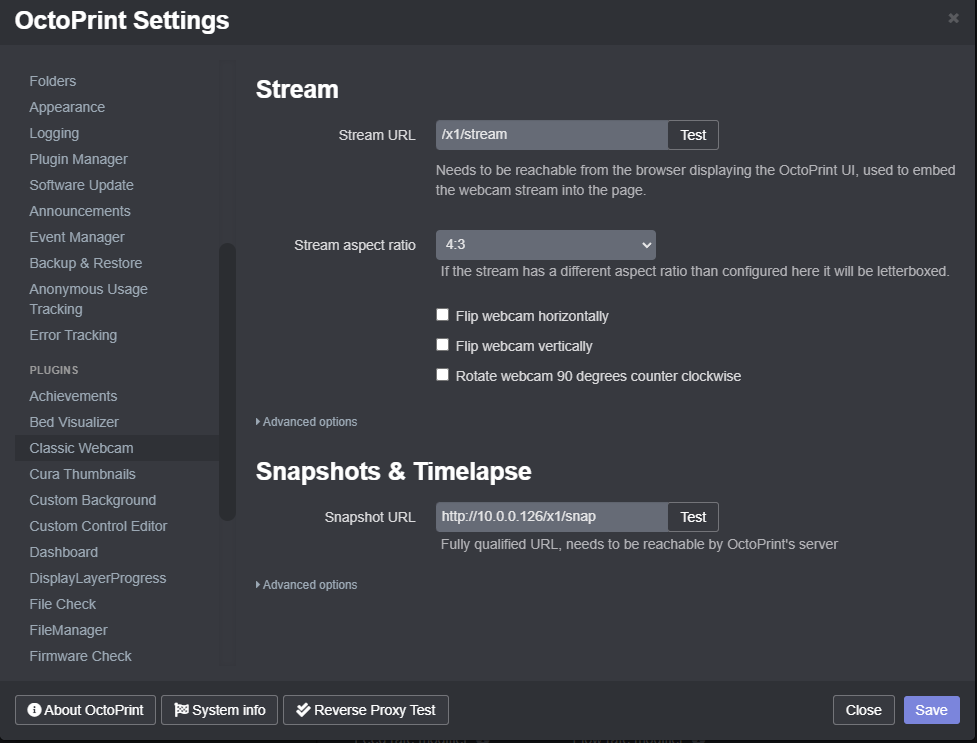
Getting a camera Stream
This just uses the external ip of the Host, so it is going through the first proxy. This will always work, no matter how I access the site.
I know that there are some similar threads already around here, but perhaps some of you may find this helpful or interesting regardless ![]()