Servo control plugin

Hey there ! :wave: :smile:
Firstly, I would like to thanks the Octoprint developpers because this platform is just so useful and very pleasant to use. Also, please pardon my english (I'm french)

My brother came recently and took his Ender 3 with him. So we now have 2 Creality Ender 3 there, this is very productive :smiley:
The thing is that my brother already used the Raspbicam using Octoprint, and since, he also connected my printer too.
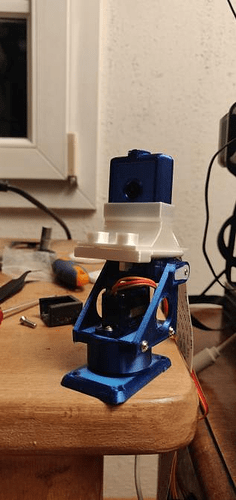
Since he only has one cam, he has got a crazy idea: mount the camera on a 2 axis arm to be able to see the two printers, and also to be able to see the print (So we can move the camera using arrows on the Octoprint interface).
So I modified a 2 axis STL file that was on thingiverse for a planner first, and also a Raspberry cam mount to fasten it on the arm, and BOOM

Next, we searched for plugins, tested all the possible ones, but none of them were usable for this.
So we searched if it was possible to create one, and it's pretty hard for us.

I personnaly followed the foosel tutorial, and could go until the "Hello world!" button that is sending to Wikipedia, but I couldn't continue with the URL modification since my plugin wasn't visible in the plugin tab (but visible and activated in the plugin manager).

My last idea was to modify the Enclosure plugin, but it is also too hard for me, even if I tried this using the old helloword from the foosel tutorial:

# -*- coding: utf-8 -*-
from __future__ import absolute_import, unicode_literals

import octoprint.plugin
import RPi.GPIO as GPIO
import time

class HelloWorldPlugin(octoprint.plugin.StartupPlugin,
                       octoprint.plugin.TemplatePlugin,
                       octoprint.plugin.SettingsPlugin):

pwm_instances = []

def on_after_startup(self):
    self._logger.info("Hello World! (more: %s)" % self._settings.get(["url"]))
    self.pwm_instances = []

def get_settings_defaults(self):
    return dict(url="https://en.wikipedia.org/wiki/Hello_world")

def get_template_configs(self):
    return [
        dict(type="navbar", custom_bindings=False),
        dict(type="settings", custom_bindings=False)
    ]

while (1) {
self.write_pwm(2, 0)
time.sleep(1)
self.write_pwm(2, 255)
time.sleep(1)
self.write_pwm(2, 0)
time.sleep(1)
self.write_pwm(2, 255)
time.sleep(1)
self.write_pwm(2, 0)
time.sleep(1)
self.write_pwm(2, 255)
time.sleep(1)
}


__plugin_name__ = "Hello World"
__plugin_pythoncompat__ = ">=2.7,<4"
__plugin_implementation__ = HelloWorldPlugin()

So that's pretty everything, don't hesitate to ask me more precisions if you need it, maybe I'm not too accurate with eveything. Thanks a lot, have a nice day ! :slight_smile:

1 Like

@FranFranI vaguely remember a plugin that would control servos to move a camera. Let me do some searching for you.

Found it...someone utilized the LED plugin to achieve the same thing. You may want to check it out as an option or starting point for your plugin. In the thread linked below there is also a mention by @FormerLurker that the Octolapse plugin may also have options relative to this operation, but he'd have to speak more to that.

Wow ! wonderful, I'll look at this closer, thanks :smiley:

Okay So I connected the servo, and it seems to move a little sometimes, but how to control it as I want now ?

I'm back, here is a easy example to use a servo motor on a raspberry pi:

#!/usr/bin/env python3
#-- coding: utf-8 --
import RPi.GPIO as GPIO
import time


#Set function to calculate percent from angle
def angle_to_percent (angle) :
    if angle > 180 or angle < 0 :
        return False

    start = 4
    end = 12.5
    ratio = (end - start)/180 #Calcul ratio from angle to percent

    angle_as_percent = angle * ratio

    return start + angle_as_percent


GPIO.setmode(GPIO.BOARD) #Use Board numerotation mode
GPIO.setwarnings(False) #Disable warnings

#Use pin 12 for PWM signal
pwm_gpio = 12
frequence = 50
GPIO.setup(pwm_gpio, GPIO.OUT)
pwm = GPIO.PWM(pwm_gpio, frequence)

#Init at 0Β°
pwm.start(angle_to_percent(0))
time.sleep(1)

#Go at 90Β°
pwm.ChangeDutyCycle(angle_to_percent(90))
time.sleep(1)

#Finish at 180Β°
pwm.ChangeDutyCycle(angle_to_percent(180))
time.sleep(1)

#Close GPIO & cleanup
pwm.stop()
GPIO.cleanup()

Ok, so with this python example you are able to run it and the servo moves as expected?

No... Since I wanted to do it on the same SD card
So I've chosen another one but I haven't been able to connect it to ssh and I don't have any other bulky SD card

Finally could make it work ! :slight_smile:
What's the next step ?

Great, so what did you end up having to do to get it to work and what is the script you used? The next step is now to just get that script into a plugin to add the buttons to the interface and decide if you want to also be able to control this via GCODE or not.

Since this is something that I assume you would do from the Control tab we can use getAdditionalControls callback from within the javascript side of the plugin to inject the buttons for us and run the GCODE/@command commands. I do this for my BLTouch plugin for example. The benefit is you can do neat sliders and such.

You'd also probably want a settings interface like the OctoPrint-Hardwarepwm plugin to set which pin the servo is connected to etc.

I just didn't entered the right password (raspberry) because I took the habit to enter the password that was registered on the other SD card... Very dumb I know :smiley:
This is a very good idea, the thing is that the Hardwarepwm library just don't work on my raspberry (I set the right pin, 50 and 50 in frequency and cycle), and my servo won't turn (but it can using the "easy" python program).
For the buttons and sliders, I'll use this for sure ! Thanks

Also, you think that I should send Gcode data, not just PWM ?

Ok, perfect. So one of the first things we need to do is create our plugin infrastructure. The bones so to say on which we add our scripts and stuff. To do this it is typically easier on a development machine, not the pi directly. Do you have a windows or linux machine?

Yes, I'm currently using my Rpi in SSH So I'm on windows with Putty and WinSCP

So I start to create the skeletton using CookieCutter

Wow what a great idea! I would deffinetly use that plugin if you get it to work!

I'm so happy that it could help more than 2 persons ! Let's get back to work :smile:
But it's like so much more effort for me since I'm beginner, but I sometimes get some results :sweat_smile:

@FranFran is making progress. I've been helping him in the Discord with it.

1 Like