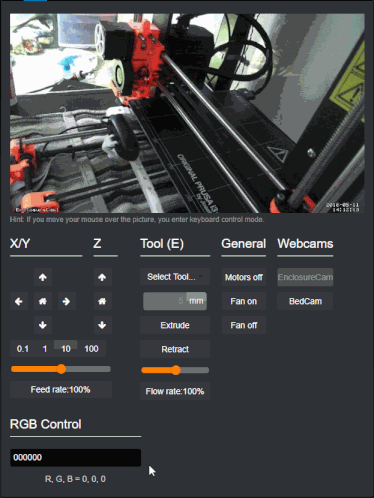
Extends the Control tab of Octoprint adding a color picker that sends M150 via LEDStripControl Plugin in real time. The idea is to create a simple way to control RGB values of your LED strips without having to use GCode. Below is a gif that shows what i have so far.
I have not listed this plugin yet in the octoprint repo, however you can install my current version using the link below. Make sure you have LEDStripControl installed and setup first though or else it will not work.
https://github.com/mikedmor/OctoPrint_RGBControl/archive/master.zip
2 Likes
If only I had that controllable LED strip, I'd be playing with that right now. All of my timelapses now are blue-tinted because of course my printer manufacturer decided to put blue-tinted windows on both sides. With your plugin, I would be able to normalize my videos. w00t
Yep, I was able to get my led strips all setup just the other day in my enclosure and it is pretty nice to have. LEDStripControl was really useful to get it all working, I just didnt like having to go into the terminal to adjust color and stuff using gcode.
Most of my leds are automated when prints start, so i probably wont use the control too much, but for showing off everything its pretty nice to have. I still need to cleanup my setup a little more though currently everything is wired into a breadboard, so eventually ill probably create a more solid version of all that.
Eventually id like to get to adding some settings to this plugin that will let you create some programmable buttons so it can be used to create light displays while the printer is not running. But for now this accomplishes what i was looking for.
The (cheap) computer case I just bought for the mining rig now comes with an automated light show on the three up-front fans and it includes customizable lighting, colors and modes of operation, much as you've described. It even includes a small remote for configuring it.
If it were me, I think I would also consider adjusting the blue-to-red scale to indicate the internal temperature of the print area itself within a tight range that I'd want to keep it in. Since I don't have a heated bed, I'm always interested in preventing temperature gradients inside the box and I keep a small 5W reptile pad heater in the bottom along with insulation. If the light show displays the temperature-as-color, then if you're babysitting a part the "temperature" of the light would be a nice indicator. But of course, so could a thermometer on the opposite wall from the camera, I suppose.
That's actually a really good idea. Once i start looking into getting the settings on this setup ill look into it. Id like to keep it open to be programmable so maybe i can add some things that would allow that to be built using the interface i have in mind.
I'd say, minimally, make sure to consider programmatically adding blink. It could remain whatever color but blink on/off every second to also indicate some condition. Blinking red could indicate power- or temp-related issues, blinking amber might indicate something else. Also, pulsing seems to be another favorite, like on this motherboard.
1 Like
OK got a quick question. I have been looking into adding some triggers for this plugin for actions such as print started and print completed/canceled but all im able to find is how to do that in the py file. Is there a way to accomplish that in the js file instead. Right now the plugin will spam the printer with M150 commands as you swipe across the colors. I want it to change that to only work after a color has been selected if a printer is currently printing, but in order to do that i need to run a small js function to change some things in my dom. Any ideas?
I'm probably not the right person to answer this, honestly. Here is the basic approach that I take in trying to understand all this. Forgive me if I don't have all the answers but this is my take on it.
You can go to school on the existing code, like looking at the existing use of data-bind within the jinja2 files: here. Without necessarily drilling into any of those, move on to the next point.
So, it's like... the view (jinja2) then binds something at the last moment since it's available to it. In some cases, it's the output of a function in JavaScript. In some cases, it's a variable available in JavaScript. In some cases, they're changing CSS style based upon some JavaScript-based litmus test.
So now, the JavaScript side of this—from what I understand—uses knockout so this is the kind of search that you might do: here.
And finally, you have to get from the __init__.py in your plugin to that JavaScript. I'm still a little fuzzy on how this happens but I think that Flask is involved. (This looks like it's the client side -> server direction of information flow where Python is asking an API route for information, however.) It's still a mystery to me how information flows from Python to JavaScript but I suspect that it's via the dictionary objects.
Fortunately, it looks like jQuery is part of the project. If you know jQuery's syntax, then this might be your best way of using JavaScript code to change your DOM. Maybe that's not the OctoPrint way of doing this but it's the way we would usually do this.
Thanks @OutsourcedGuru, that should help lead me in the right direction.
Right now im working on making my plugin update the color in the selector based on if M150 commands are ran by other tools, such as GCODE setup in the settings under GCODE Scripts. That way the color selector is always set to what ever the LEDs are set to even if you ran the command from the terminal tab. I had the idea to bind onto the terminal tab and then have a trigger update the color picker when it sees a M150 command show up, however it seems my printer does not respond to M150 or nothing is showing up in the terminal tab for it. The virtual printer works, but not my actual printer (Original Prusa I3 with custom firmware to get M150 to work). So im looking into another way to query what M150 messages are sent, currently i added the terminalViewModel to my js, but dont really know how to use this view to query for specific commands. And looking into the code for the terminal tab seems to be way more than i need, so im trying to trim it down some to understand it better.
Hi! This is slightly off-topic, but at the same time on, if that makes sense. I have a setup on my A30 that uses a standard hobby servo to deploy a brass brush over the print bed in the way of the extruder after it heats up. make a few passes over the brush to clean it, then home the brush out of the way and get on with the print. The board in the A30 does NOT have any way to connect a servo to it, so I had to get creative. I used a servo trigger from Sparkfun that handles the servo movements, and I trigger it through your RGB control. I assigned a physical pin on the Octoprint server to red only, then connected that pin to the servo trigger and ground on octopi. I then use M150 R0 to home the servo, and M150 R255 to deploy it. I have a routine set up at the beginning of my prints to do all of this after the extruder heats up to temperature which is as follows:
G1 Z30; (raise extruder to right height for cleaning)
M150 R255; (deploy the brush)
G1 X335; (extruder over brush for first pass)
G1 X300; (extruder over brush for second pass)
G1 X335; (extruder over brush for third pass)
G1 X300; (extruder past brush for last pass)
M150 R0; (home the brush back out of the way)
I have this all loaded in my startup scripts in Simplify 3D, problem is, the M150 commands are not executing, though I can execute them successfully at any time from the terminal. What might I be missing?
1 Like
This was exactly what I've been searching for! It worked flawlessly and I do not have ledstripcontrol installed... I just have a board capable of using neopixels. it worked amazingly!