What the problem is:
I am trying to configure the filament run-out sensor to work on my Artillery Sidewinder X2.
The sensor works stock/out-of-the-box, but is effectively disabled when using Octoprint (i.e., Octoprint isn't listening for a signal from the sensor by default).
I am using the Sidewinder X2 with Octoprint v1.11.5 running on a Raspberry Pi 4. I use Ultimaker Cura as my slicer.
What I've already done to try to solve it:
My wife and I had attempted to follow this guide that someone had posted on Reddit for their similar setup.
Additional note: we had not altered the LCD touchscreen ("TFT") board firmware/settings, described in the one comment on that reddit post.
The tl;dr of the instructions are to:
-
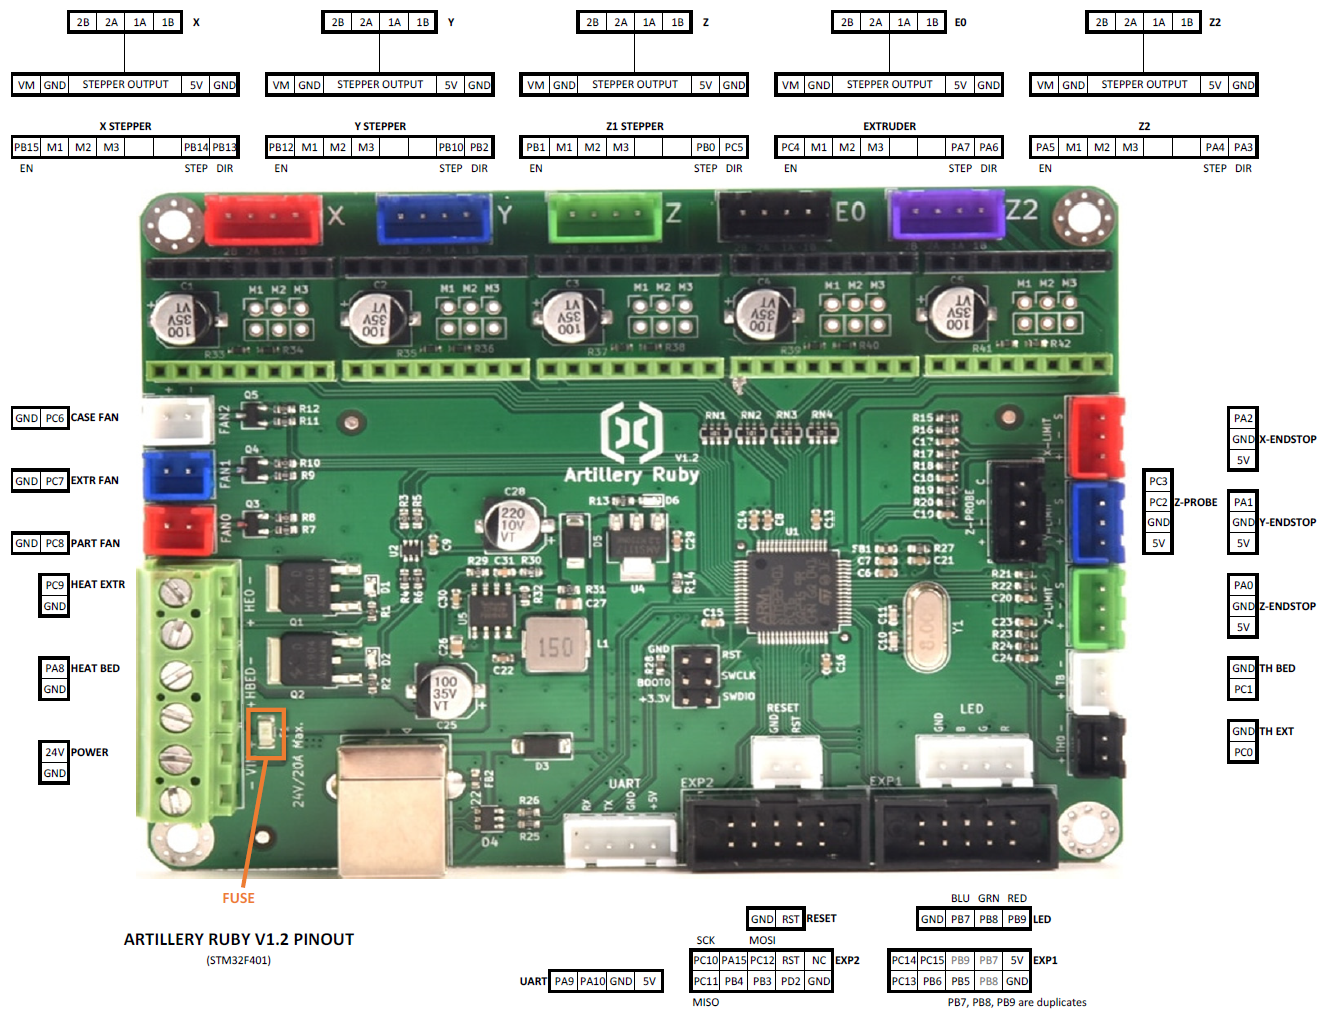
Re-route the run-out sensor wire from the LCD touchscreen ("TFT") board to the main ("Ruby") board, and insert it in the "Z-ENDSTOP" terminal, which corresponds to pin "PA0" (that's a zero). The Z-ENDSTOP terminal pins are in the bottom right of this image: Link to image of main ("Ruby") board.
-
Update the "Configuration_adv.h" and "Configuration.h" files in the stock Marlin firmware v2.0.9.1 to include Host Action commands (amongst others), and to configure the filament run-out ("FIL_RUNOUT_PIN") to be "PA0" (again, that's a zero).
-
Recompile and flash the firmware.
My wife and I have followed these instructions to the best of our knowledge/ability: the attached systeminfo bundle should reflect the date and "version" my wife made called "Dusty"
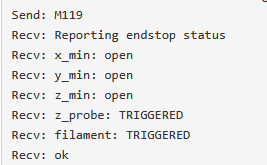
My main troubleshooting step was to put a piece of filament in the run-out sensor, run the M119 - Endstop States command, and view the result in the Octoprint terminal, then pull the piece of filament out and run the M119 command again.
The result of the M119 command is the same regardless of whether the filament is triggering the sensor or not (i.e., neither the "z-min", nor the "filament" states change), so I figure we did something wrong.
One odd thing is that the filament run-out sensor has an LED that used to turn on red when there was no filament present, and green when there was filament. Now the LED is green with filament, and off without filament. Not sure what that's about, or if that's related.
Have you tried running in safe mode?
I did try the same troubleshooting step (M119 command w/ and w/out the filament present) while running in safe mode.
Did running in safe mode solve the problem?
The terminal output of the M119 command was the same.
Systeminfo Bundle
octoprint-systeminfo-20260111144843.zip (94.3 KB)
Additional information about my setup:
- OctoPrint version: 1.11.5
- Printer: Artillery Sidewinder X2
- Firmware: Marlin v2.0.9.1, updated with the changes indicated in the above Reddit link
- Browser: Firefox 146.0.1 (64-bit)
- Operating system: Windows 11 v25H2, current w/Windows Update