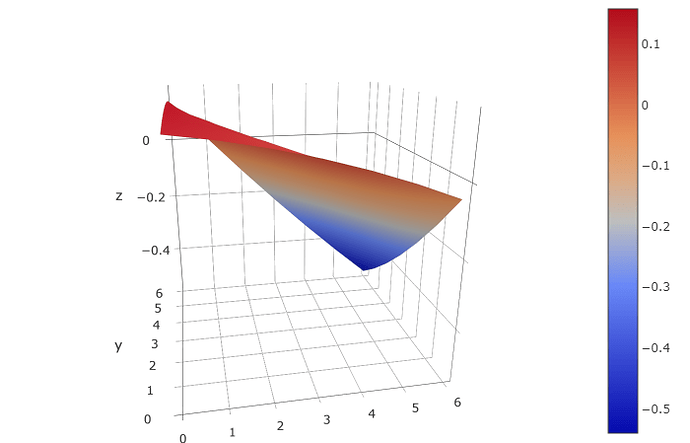
Hi! The Bed Leveler Visualizer looked like a handy plug-in...unfortunately, I am unable to determine how to use it. Would anyone be willign to tell me the Data Collector Flags and GCODE Commands I should add to the Plug-In settings? I was unable to gleam this starter information from the Developer's readme.md file.
Not all printers / firmware use the bed leveling algorithm(s) that this plugin displays. Before we can tell you the settings, we need to know what type of printer, what type and version of firmware, and what auto-leveling technique is used. The serial.log will contain most of this information or post the output of "M110 N0" and "M115".
Thanks. How is this?
2018-04-28 03:32:19,417 - Send: N0 M110 N0125
2018-04-28 03:32:20,390 - Recv: start
2018-04-28 03:32:20,400 - Changing monitoring state from "Detecting baudrate" to "Operational"
2018-04-28 03:32:20,434 - Recv: echo: 3.1.3-245
2018-04-28 03:32:20,439 - Send: N0 M110 N0125
2018-04-28 03:32:20,441 - Recv: echo: Last Updated: Mar 9 2018 15:13:33 | Author: (none, default config)
2018-04-28 03:32:20,456 - Recv: Compiled: Mar 9 2018
2018-04-28 03:32:20,462 - Recv: echo: Free Memory: 1745 PlannerBufferBytes: 1312
2018-04-28 03:32:20,467 - Recv: echo:Hardcoded Default Settings Loaded
2018-04-28 03:32:20,470 - Recv: adc_init
2018-04-28 03:32:20,746 - Recv: CrashDetect ENABLED!
2018-04-28 03:32:20,751 - Recv: tmc2130_init(), mode=NORMAL
2018-04-28 03:32:20,836 - Recv: PAT9125_init:1
2018-04-28 03:32:20,839 - Recv: FSensor
2018-04-28 03:32:20,842 - Recv: ENABLED
2018-04-28 03:32:20,845 - Recv:
2018-04-28 03:32:21,057 - Recv: echo:SD card ok
2018-04-28 03:32:21,464 - Recv: ok
2018-04-28 03:32:21,472 - Send: N1 M115*39
2018-04-28 03:32:21,495 - Recv: FIRMWARE_NAME:Marlin V1.0.2; Sprinter/grbl mashup for gen6 FIRMWARE_URL:https://github.com/prusa3d/Prusa-i3-Plus/ PROTOCOL_VERSION:1.0 MACHINE_TYPE:Prusa i3 MK3 EXTRUDER_COUNT:1
The Prusa i3 MK3 does do a 9 point bed leveling so what does a "G29 T" return? "G29 T0"? "G29 T1"?
You might have to go through the start gcode to get G28 and a G29 (without the T) executed before G29 T will return anything.
Here is my start G-Code script. Are you saying I should insert a G28, a G29 and a G29 T command somewhere in this script?
M115 U3.1.1-RC5 ; tell printer latest fw version
M201 X1000 Y1000 Z200 E5000 ; sets maximum accelerations, mm/sec^2
M203 X200 Y200 Z12 E120 ; sets maximum feedrates, mm/sec
M204 S1250 T1250 ; sets acceleration (S) and retract acceleration (T)
M205 X10 Y10 Z0.4 E2.5 ; sets the jerk limits, mm/sec
M205 S0 T0 ; sets the minimum extruding and travel feed rate, mm/sec
M83 ; extruder relative mode
M104 S[first_layer_temperature] ; set extruder temp
M140 S[first_layer_bed_temperature] ; set bed temp
M109 S[first_layer_temperature] ; wait for extruder temp
M190 S[first_layer_bed_temperature] ; wait for bed temp
G28 W ; home all without mesh bed level
G80 ; mesh bed leveling
G1 Y-3.0 F1000.0 ; go outside print area
G92 E0.0
G1 X60.0 E9.0 F1000.0 ; intro line
G1 X100.0 E12.5 F1000.0 ; intro line
G92 E0.0
M221 S{if layer_height<0.075}100{else}95{endif}
Interesting... G28 W isn't in this documentation and G80 is documented here as a CNC specific command.
According to this issue, Prusa's firmware doesn't implement G29. I found Supported G codes and it looks like a lively discussion at https://github.com/jneilliii/OctoPrint-BedLevelVisualizer/issues/4 so maybe you should jump in there.
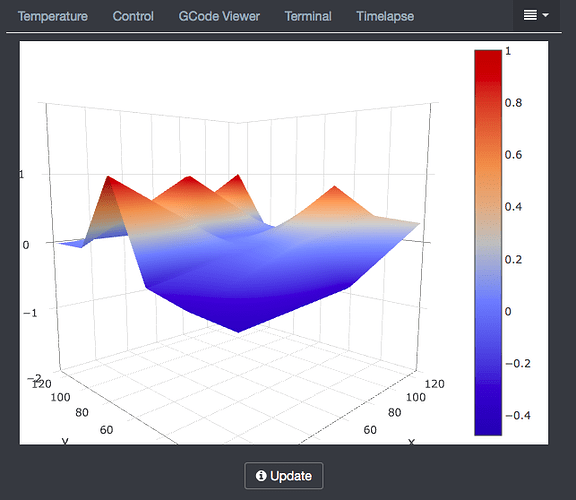
That was helpful. I used the codes in their example instead of the stock codes that loaded with the plugin. Here's what I got.
Looks good. Of course, I don't know if that's a good graph or a bad graph. I would think everything the same color would be perfect, but what do I know 
I concur! The way I'm reading it is that the back right corner is low, and left side is a little high...all within a range of .6 mm...software correction is good enough now 
This is my plugin. For Prusa firmware you need to put in the gcode script the following
G80
G81
And in your Data Collector flag settings use
Measured points:
I just pushed a 0.1.0 branch to github that you can test for an improved angle on the view of the grid based on the bed size of the printer profile settings in OctoPrint. Install from the url below in Plugin Manager.
https://github.com/jneilliii/OctoPrint-BedLevelVisualizer/archive/0.1.0.zip
Thanks. I'll load it after my current print is finished. What kind of feedback would you like?
Any and all feedback welcome.
In my humble opinion, this is the best OctoPrint plugin on the planet. The raw data is difficult for most to interpret and this puts things plainly.
In former months, I would have to babysit first-layer adhesion so I suspected what I'm now seeing from this visualizer. By "babysitting", I would have to manually lift the front of the bed (it's like a diving board) with my finger to allow adhesion around the back of the printer when I'd turned off autoleveling (necessary for multi-job prints).
Well done!
Thanks, I appreciate that. Don't scrutinize the code though, I'm not a professionally trained programmer and there's probably more efficient methods than I use.
I'm probably being dense, but what do I need to do to get this to work? I have a pruse mk3., I have these GCODE commands set:
G80
G81
The Bed Visualizer tab just has a grayed out Update button. I see with the latest version there is a @BEDLEVELVISUALIZER command I should also use?
Try making your GCODE the following:
G80
@BEDLEVELVISUALIZER
G81
And the button will only be enabled when you have a saved mesh, or if that's not enabled or never happened you're not printing.
It works!
I was looking at it while I was printing something. Once the print was done I could click update and it forced a bed level check.
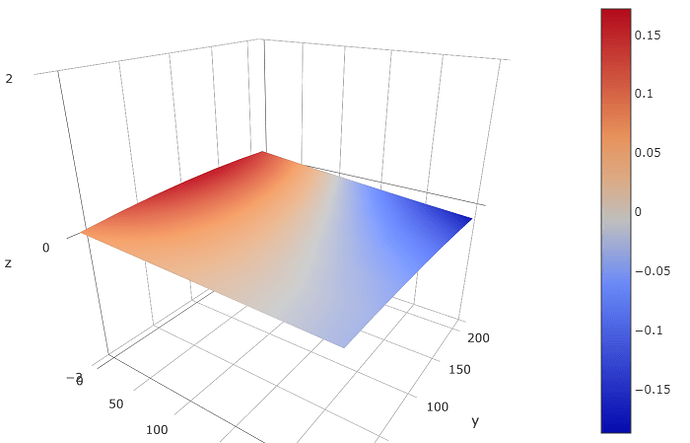
Very flat... and it has a nice gradual diagonal tilt in the front. Are there thumb screws to adjust?


