Ahh ok perfect. Thanks for the information. I misunderstood I assumed it fed the data to marlin to make minor adjustments. I was actually using it for manual leveling so I was doing it correct haha. Cheers that was very great info
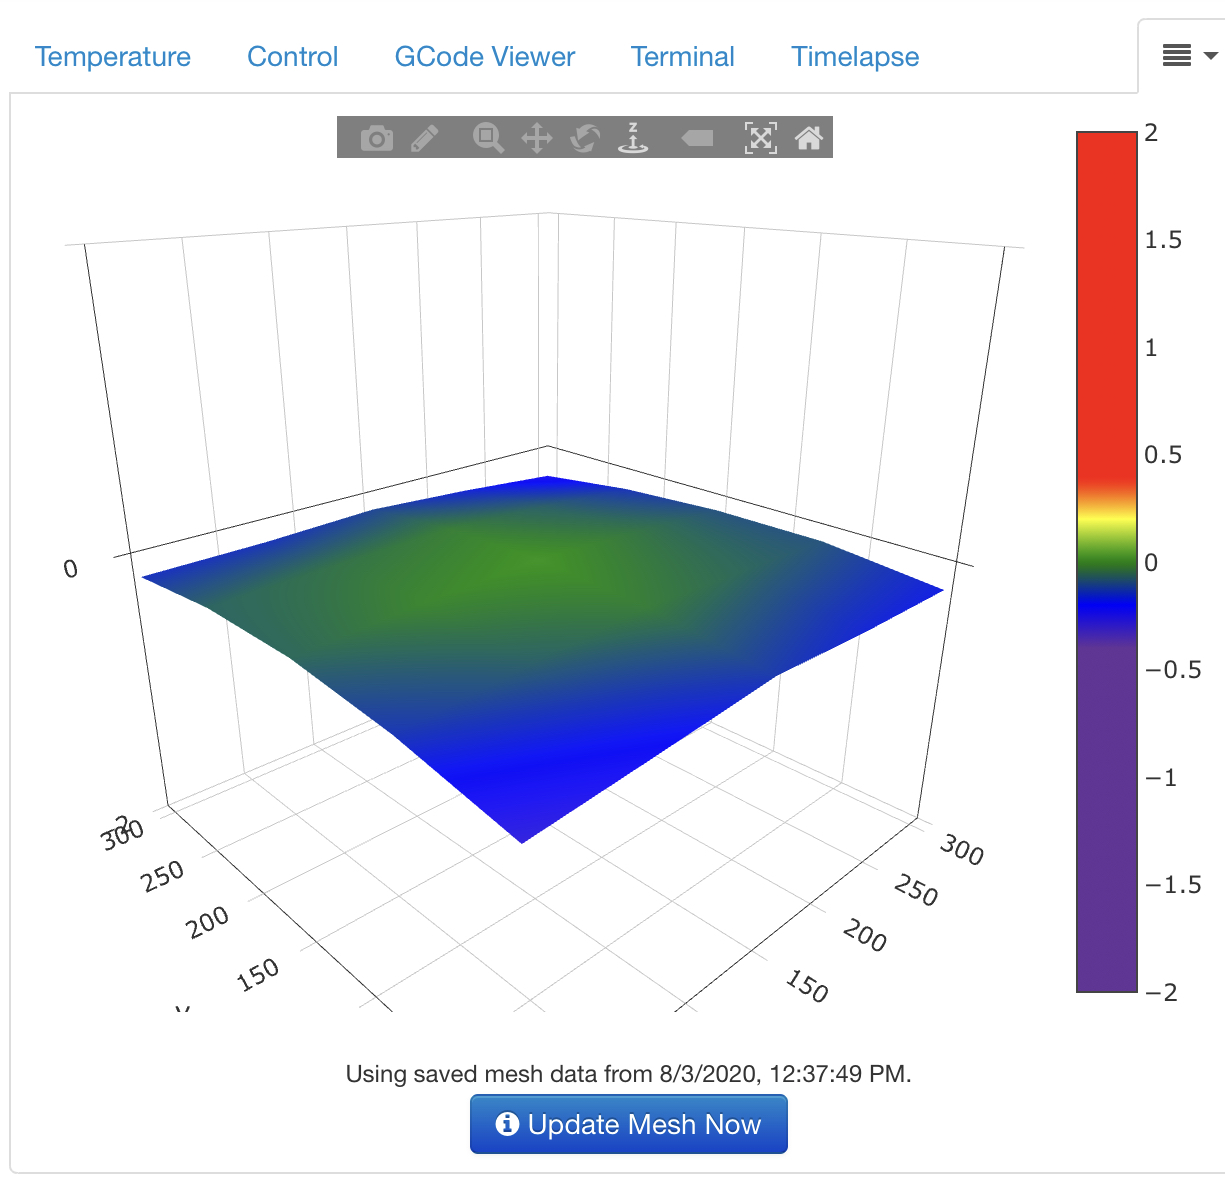
Sorry for the stupid noob question but...am I correct in assuming the low point (purple) in this image is the front left corner?

Hello @psiess!
This can't be said 100% for sure.
If you assume it is, just level up that corner a bit and run the Bed Level Visualizer again.
If it is, the value on that corner will be different, else another corner value will be higher.
1 Like
@Ewald_Ikemann is correct. The reason for all the flip and rotation options within the plugin's settings is to account for all different possible bed layouts and orientations, so you kind of have to figure it out. For the most part, if you are using a fairly new version of Marlin on your printer your assumption is correct, that purple point is X = 0, Y = 0, which generally is the front left corner of the bed when you are looking at it from the front. But again, that is a generalization.
2 Likes
Thanks @Ewald_Ikemann and @jneilliii. That was helpful. After a lot of fiddling I've now got the bed the closest to level as it has ever been. I still want to get closer but I need to add a washer to the front left corner knob to give me more adjustment room.
2 Likes
How is the Adjustment angle meant to be used? i have tried making the adjustments it recommends, but afterwards the angle is the same if not worse, i notice when you click on a tile it changes the value of the tile you click to 0 but making the adjustments suggested it just seems to make the level worse, perhaps I understand this all wrong.
For reference, im using a ender 3 pro with a BLtouch, and adjusted the screw size to M4.
TLDR: Would it be possible to get a clarification on how the Adjustment Angle tool is intended to be used to make adjustments?
Edit, I had reverse adjustment direction on the whole time, everything fine its just user error 
1 Like
Glad you got it figured out. I unfortunately did not code that part of the plugin and don't personally use it for doing adjustments.
So I had a question about logging the bed data for each print. What I would like to do is store date/time and the data into a text file.
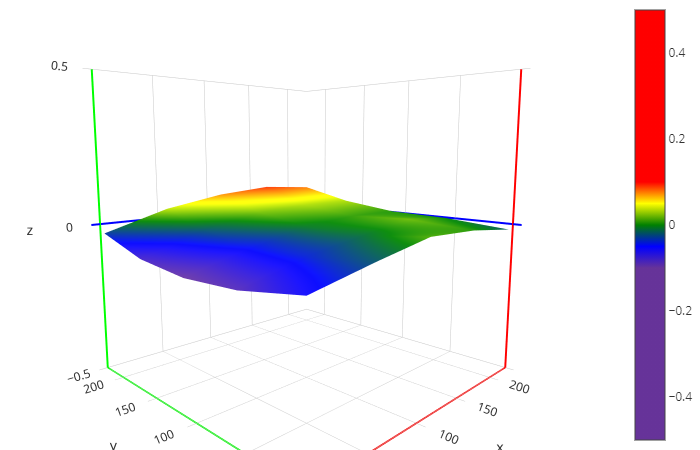
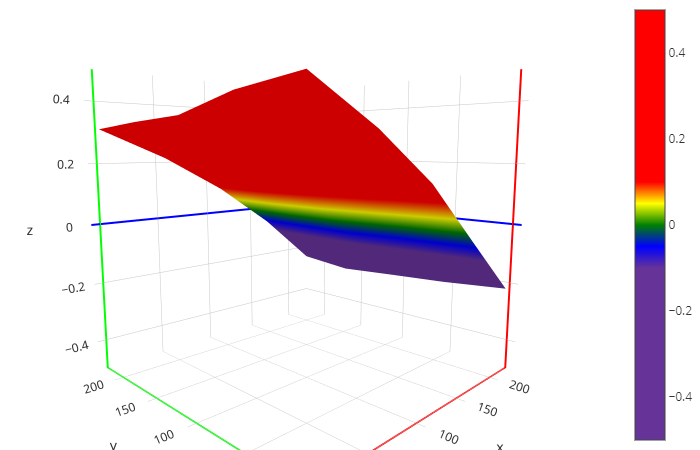
I am seeing some wild swings in my bed level print to print and I would like to log what its doing. See if I can nail down whats going on.
As an example here are 2 bed meshes a few days apart 2 prints.
Thanks
-R
So the closest thing that I have for this is the saving local snapshots when you run the leveling process. It was introduced in the last version release for this feature request here but there was discussion of logging that mesh data itself. Feel free to fill out a feature request to get that on the very long list of stuff to fix/implement, which only occurs in my spare time outside of work hours here.
I have a suggestion, Is it possible to write a g-code script that would run a bed level before each print and pause the print if the variance is above a predetermined level? I’ve had a few where a piece of plastic ended up under my bed sheet and ruined a large print.
And I have a second question, for prusa users, should we not always run a panda probe calibration prior to each leveller run? Is it possible to add this?
What I mean is shouldn’t we make sure the pinda probe is at its working temperature every time we check the bed leveller? Not just the hot end and bed upto working temp.
Based on your handle and your next question that I'll also be quoting you are using a Prusa printer. I'll respond as if this is true.
The default printer profiles in PrusaSlicer for Prusa printers should already have a mesh level command (M80 G80) in the start-up custom gcode, so it should happen at the start of every print. AFAIK, the firmware should alert and at least pause if the readings are too far from the original calibration values.
It is easy enough to do this by warming the PINDA 2 with the bed before printing by modifying the start custom gcode in your slicer. See this excellent website for a discussion about PINDA warm up:
And check out his custom start code in this page (I use a slightly modified version of this on my own MK3S):
1 Like
Hi,
since yesterday i have troubles with my Bed Vizualizer.
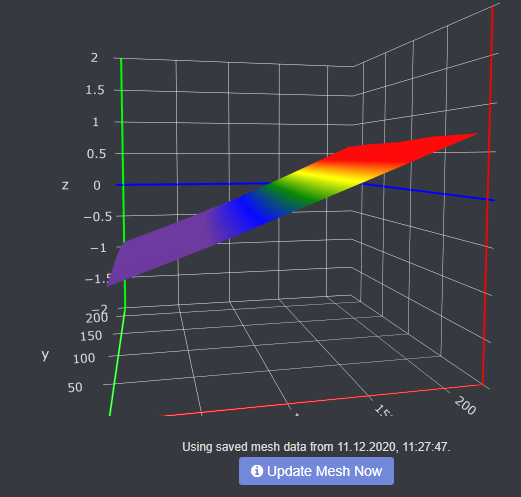
I leveled my bed manually, so that image can not be the truth.
Does Bed Visualizer does not receive any data?
The bed visualiser only reports what is sent to it by the firmware. Look at the terminal tab while it is probing, wait for the output and observe - I would say this is less a BLV issue and more your firmware. If you can't make sense of this, enable 'debug logging' in the settings, then upload it & someone will take a look
Hey, thanks for your sepsonse.
Here is my output:
[2020-12-11 19:01:08,202] DEBUG: mesh collection started
[2020-12-11 19:03:41,672] DEBUG: [u'-0.724', u'-0.403', u'-0.052', u'+0.309', u'+0.672']
[2020-12-11 19:03:41,676] DEBUG: [u'-0.735', u'-0.415', u'-0.067', u'+0.313', u'+0.685']
[2020-12-11 19:03:41,679] DEBUG: [u'-0.733', u'-0.428', u'-0.102', u'+0.271', u'+0.643']
[2020-12-11 19:03:41,682] DEBUG: [u'-0.778', u'-0.464', u'-0.135', u'+0.237', u'+0.630']
[2020-12-11 19:03:41,685] DEBUG: [u'-0.872', u'-0.561', u'-0.217', u'+0.178', u'+0.600']
[2020-12-11 19:03:41,701] DEBUG: {'z_min': 0, 'y_min': 0, 'x_max': 220.0, 'x_min': 0, 'type': 'rectangular', 'y_max': 220.0, 'z_max': 250.0}
[2020-12-11 19:03:41,702] DEBUG: stopping mesh collection
[2020-12-11 19:03:41,704] DEBUG: [[u'-0.724', u'-0.403', u'-0.052', u'+0.309', u'+0.672'], [u'-0.735', u'-0.415', u'-0.067', u'+0.313', u'+0.685'], [u'-0.733', u'-0.428', u'-0.102', u'+0.271', u'+0.643'], [u'-0.778', u'-0.464', u'-0.135', u'+0.237', u'+0.630'], [u'-0.872', u'-0.561', u'-0.217', u'+0.178', u'+0.600']]
Therefore some informations from the Terminal:
Send: G28
Recv: T:22.58 /0.00 B:22.77 /0.00 @:0 B@:0
Recv: echo:busy: processing
Recv: T:22.58 /0.00 B:22.73 /0.00 @:0 B@:0
Recv: echo:busy: processing
Recv: T:22.50 /0.00 B:22.85 /0.00 @:0 B@:0
Recv: echo:busy: processing
Recv: T:22.50 /0.00 B:22.73 /0.00 @:0 B@:0
Recv: echo:busy: processing
Recv: echo:busy: processing
Recv: T:22.50 /0.00 B:22.70 /0.00 @:0 B@:0
Recv: echo:busy: processing
Recv: T:22.50 /0.00 B:22.81 /0.00 @:0 B@:0
Recv: echo:busy: processing
Recv: T:22.58 /0.00 B:22.85 /0.00 @:0 B@:0
Recv: echo:busy: processing
Recv: T:22.62 /0.00 B:22.73 /0.00 @:0 B@:0
Recv: echo:busy: processing
Recv: T:22.54 /0.00 B:22.77 /0.00 @:0 B@:0
Recv: echo:busy: processing
Recv: T:22.58 /0.00 B:22.81 /0.00 @:0 B@:0
Recv: X:147.00 Y:117.00 Z:10.78 E:3766.20 Count X:11760 Y:9360 Z:4460
Recv: ok
Send: G29 T
Recv: T:22.66 /0.00 B:22.85 /0.00 @:0 B@:0
Recv: echo:busy: processing
Recv: T:22.58 /0.00 B:22.85 /0.00 @:0 B@:0
Recv: echo:busy: processing
......
Recv: Bilinear Leveling Grid:
Recv: 0 1 2 3 4
Recv: 0 -0.724 -0.403 -0.052 +0.309 +0.672
Recv: 1 -0.735 -0.415 -0.067 +0.313 +0.685
Recv: 2 -0.733 -0.428 -0.102 +0.271 +0.643
Recv: 3 -0.778 -0.464 -0.135 +0.237 +0.630
Recv: 4 -0.872 -0.561 -0.217 +0.178 +0.600
Recv:
Recv: X:220.00 Y:220.00 Z:10.13 E:3766.20 Count X:17600 Y:17600 Z:4460
Recv: ok
Hmm, something is up with the firmware if you truly believe you have it flat.
One thing to take into consideration is that the X axis rail may not be parallel to the bed surface. So while it is completely flat, it is not level in the printer's eyes. Because that is a fairly consistent slope, I would look at whether your printer's X gantry etc. is fully secured & lined up.
You were right.
I tightend one screw too much.
Now everything works fine
Thank you!
1 Like
Yes I am a prusa (mk3) user😀Thanks for those links, I will have a good read. Is it possible to add theextra gcode into octoprint rather than my slicer? Would make it easier to import gcode from other places, and reprint my already sliced prints who I spent ages on fiddling with slicer settings?
Difficult. The extra gcode also includes changes to gcode. It might be easier to change existing gcode by hand instead of relying on an algorithm to try to find where the change needs to happen.
Ok yeah I see what you mean.
Will have a look at the gcode and try and decide which bits to change are the easiest.
It might be possible to work out what slicer settings I settled on by examining the gcode?