What is the problem? I implemented a purge and wipe routine in my start.gcode and now Cura in OctoPrint considers this the first layer. This causes my print to start one layer too high. My start.gcode is below with my hopeful, and ineffectual fix is right above the M117 command.
What did you already try to solve it?
Tried to edit the start.gcode and added "G0 Z0" to lower the head back down so it did not do this, unfrortunately it has no effect.change has been seen.
Additional information about your setup (OctoPrint version, OctoPi version, printer, firmware, octoprint.log, serial.log or output on terminal tab, ...)
OctoPrint on OctoPi (Latest versions of both)
Monoprice Maker Select Plus https://www.monoprice.com/product?p_id=15711
ADVi3++ Version 3.0.2 (https://github.com/andrivet/ADVi3pp-Marlin/releases/tag/advi3%2B%2B3.0.2)
Start.gcode
G21        ;metric values
G90        ;absolute positioning
M82        ;set extruder to absolute mode
M107       ;start with the fan off
G28 X0 Y0  ;move X/Y to min endstops
G28 Z0     				;move Z to min endstops
G1 Z20.0 F{speed_travel};move the platform down 15mm
M190 S{print_bed_temperature} ;Uncomment to add your own bed temperature line
G29							;Preform auto-bed-level routine
M109 S{print_temperature} ;Uncomment to add your own temperature line
G0 X0 Y0 F9000 ; Go to front
G0 Z0.15 ; Drop to bed
G92 E0 ; zero the extruded length
G1 X40 E25 F500 ; Extrude 25mm of filament in a 4cm line
G92 E0 ; zero the extruded length
G1 E-1 F500 ; Retract a little
G1 X80 F4000 ; Quickly wipe away from the filament line
G0 Z0 ; Drop to bed
;Put printing message on LCD screen
M117 Printing...
I found that if I remove the following line things work perfectly.
G1 X40 E25 F500 ; Extrude 25mm of filament in a 4cm line
Any ideas on how to keep the purge and wipe function and have my print still work? Here is a gcode file that I made with an external version of Cura on my computer. In Cura on my workstation it displays the first layer correctly, meaning no layers or operations before it. When I upload the gcode file OctoPrint displays the first layer of the print as the second layer.
75x75.gcode (136.7 KB)
What happens if you append a set position command at the end?
G92 Z0
You might also check your slicer settings. If it's sliced for relative positioning, it might behave like that, I dunno.
Using the set position command had no effect. It still saw the first layer of the print as the second overall layer in the gcode.
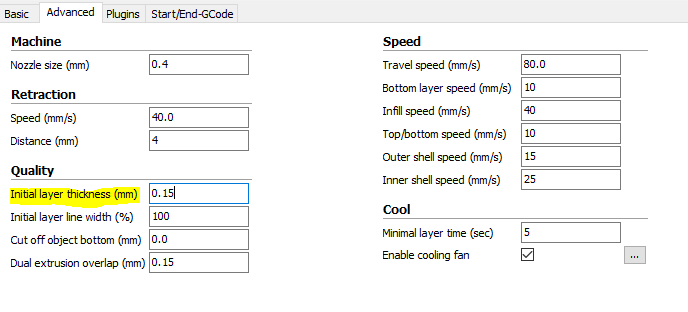
Looking over my Cura profile settings I adjusted the initial layer thickness to match my purge/wipe level at 1.5mm, it was set to 3mm. This seems to have fixed it in the gcode as now the purge/wipe and first layer of the print are showing together. I am going to try printing it out to see if it works.
1 Like
Trying that out revealed a new issue, I was under extruding the first layer by a bunch. I changed the Initial layer line width to 120% and the first layer that I am printing now with those settings looks pretty good. This may be resolved... I will report back when the print finishes what the underside looks like.
Turns out I am still fighting with my printer to put down a good first layer. It looks like the printer is still thinking the first layer of the print is the second overall layer... good grief.
I just noticed something odd in my Cura profile .ini. It lists out several different start.gcode sections. Some of these sections look like old revisions to the start.cgode that I want it to use, others look totally different. Does anyone know why these are there, I don't see them manifest anywhere in the Cura software I am using. Sample file is below:
[profile]
layer_height = 0.1
wall_thickness = 1.2
retraction_enable = True
solid_layer_thickness = 1.2
fill_density = 20
nozzle_size = 0.4
print_speed = 50
print_temperature = 215
print_temperature2 = 0
print_temperature3 = 0
print_temperature4 = 0
print_temperature5 = 0
print_bed_temperature = 70
support = Touching buildplate
platform_adhesion = None
support_dual_extrusion = Both
wipe_tower = False
wipe_tower_volume = 15
ooze_shield = False
filament_diameter = 1.75
filament_diameter2 = 0
filament_diameter3 = 0
filament_diameter4 = 0
filament_diameter5 = 0
filament_flow = 103.5
retraction_speed = 40.0
retraction_amount = 5
retraction_dual_amount = 16.5
retraction_min_travel = 1.5
retraction_combing = All
retraction_minimal_extrusion = 0.02
retraction_hop = 0.0
bottom_thickness = 0.15
layer0_width_factor = 120
object_sink = 0.0
overlap_dual = 0.15
travel_speed = 80.0
bottom_layer_speed = 10
infill_speed = 40
solidarea_speed = 10
inset0_speed = 15
insetx_speed = 25
cool_min_layer_time = 5
fan_enabled = True
skirt_line_count = 3
skirt_gap = 3.0
skirt_minimal_length = 150.0
fan_full_height = 0.5
fan_speed = 100
fan_speed_max = 100
cool_min_feedrate = 10
cool_head_lift = False
solid_top = True
solid_bottom = True
fill_overlap = 15
perimeter_before_infill = False
support_type = Lines
support_angle = 60
support_fill_rate = 15
support_xy_distance = 0.7
support_z_distance = 0.15
spiralize = False
simple_mode = False
brim_line_count = 20
raft_margin = 5.0
raft_line_spacing = 3.0
raft_base_thickness = 0.2
raft_base_linewidth = 0.8
raft_interface_thickness = 0.27
raft_interface_linewidth = 0.4
raft_airgap_all = 0.0
raft_airgap = 0.22
raft_surface_layers = 2
raft_surface_thickness = 0.27
raft_surface_linewidth = 0.4
fix_horrible_union_all_type_a = True
fix_horrible_union_all_type_b = False
fix_horrible_use_open_bits = False
fix_horrible_extensive_stitching = False
plugin_config =
object_center_x = -1
object_center_y = -1

[alterations]
start.gcode =
	;Basic settings: Layer height: {layer_height} Walls: {wall_thickness} Fill: {fill_density}
	;Print time: {print_time}
	;Filament used: {filament_amount}m {filament_weight}g
	;Filament cost: {filament_cost}
	G21        ;metric values
	G90        ;absolute positioning
	M82        ;set extruder to absolute mode
	M107       ;start with the fan off
	G28 X0 Y0  ;move X/Y to min endstops
	G28 Z0     				;move Z to min endstops
	G1 Z20.0 F{speed_travel};move the platform down 15mm
	M190 S{print_bed_temperature} ;Uncomment to add your own bed temperature line
	G29							;Preform auto-bed-level routine
	M109 S{print_temperature} ;Uncomment to add your own temperature line
	G1 X0 Y0 F9000 ; Go to front
	G1 Z0 ; Drop to bed
	G92 E0 ; zero the extruded length
	G0 X40 E25 F500 ; Extrude 25mm of filament in a 4cm line
	G92 E0 ; zero the extruded length
	G1 E-1 F500 ; Retract a little
	G1 X80 F4000 ; Quickly wipe away from the filament line
	G1 Z0 ; Drop to bed
	G92 Z0	;set z-height to zero
	;Put printing message on LCD screen
	M117 Printing...
end.gcode =
	;Printing Done, end code below
	M104 S0                     ;extruder heater off
	M140 S0                     ;heated bed heater off (if you have it)
	G91                                    ;relative positioning
	G1 E-1 F300                            ;retract the filament a bit before lifting the nozzle, to release some of the pressure
	G1 Z+2 E-5 F{speed_travel} ;move Z up a bit and retract filament even more
	G28 X0							;Home the X axis to get the head out of the way.
	G90                         ;absolute positioning
	G1 Y200 F3000		;Move bed forward to make removal easier
	M84                         ;steppers off
	M117 Feed me Seymour...
start2.gcode = ;Sliced at: {day} {date} {time}
	;Basic settings: Layer height: {layer_height} Walls: {wall_thickness} Fill: {fill_density}
	;Print time: {print_time}
	;Filament used: {filament_amount}m {filament_weight}g
	;Filament cost: {filament_cost}
	;M190 S{print_bed_temperature} ;Uncomment to add your own bed temperature line
	;M104 S{print_temperature} ;Uncomment to add your own temperature line
	;M109 T1 S{print_temperature2} ;Uncomment to add your own temperature line
	;M109 T0 S{print_temperature} ;Uncomment to add your own temperature line
	G21        ;metric values
	G90        ;absolute positioning
	M107       ;start with the fan off
	G28 X0 Y0  ;move X/Y to min endstops
	G28 Z0     ;move Z to min endstops
	G1 Z15.0 F{travel_speed} ;move the platform down 15mm
	T1                      ;Switch to the 2nd extruder
	G92 E0                  ;zero the extruded length
	G1 F200 E10             ;extrude 10mm of feed stock
	G92 E0                  ;zero the extruded length again
	G1 F200 E-{retraction_dual_amount}
	T0                      ;Switch to the first extruder
	G92 E0                  ;zero the extruded length
	G1 F200 E10             ;extrude 10mm of feed stock
	G92 E0                  ;zero the extruded length again
	G1 F{travel_speed}
	;Put printing message on LCD screen
	M117 Printing...
end2.gcode = ;End GCode
	M104 T0 S0                     ;extruder heater off
	M104 T1 S0                     ;extruder heater off
	M140 S0                     ;heated bed heater off (if you have it)
	G91                                    ;relative positioning
	G1 E-1 F300                            ;retract the filament a bit before lifting the nozzle, to release some of the pressure
	G1 Z+0.5 E-5 X-20 Y-20 F{travel_speed} ;move Z up a bit and retract filament even more
	G28 X0 Y0                              ;move X/Y to min endstops, so the head is out of the way
	M84                         ;steppers off
	G90                         ;absolute positioning
	;{profile_string}
start3.gcode = ;Sliced at: {day} {date} {time}
	;Basic settings: Layer height: {layer_height} Walls: {wall_thickness} Fill: {fill_density}
	;Print time: {print_time}
	;Filament used: {filament_amount}m {filament_weight}g
	;Filament cost: {filament_cost}
	;M190 S{print_bed_temperature} ;Uncomment to add your own bed temperature line
	;M104 S{print_temperature} ;Uncomment to add your own temperature line
	;M109 T1 S{print_temperature2} ;Uncomment to add your own temperature line
	;M109 T0 S{print_temperature} ;Uncomment to add your own temperature line
	G21        ;metric values
	G90        ;absolute positioning
	M107       ;start with the fan off
	G28 X0 Y0  ;move X/Y to min endstops
	G28 Z0     ;move Z to min endstops
	G1 Z15.0 F{travel_speed} ;move the platform down 15mm
	T2                      ;Switch to the 2nd extruder
	G92 E0                  ;zero the extruded length
	G1 F200 E10             ;extrude 10mm of feed stock
	G92 E0                  ;zero the extruded length again
	G1 F200 E-{retraction_dual_amount}
	T1                      ;Switch to the 2nd extruder
	G92 E0                  ;zero the extruded length
	G1 F200 E10             ;extrude 10mm of feed stock
	G92 E0                  ;zero the extruded length again
	G1 F200 E-{retraction_dual_amount}
	T0                      ;Switch to the first extruder
	G92 E0                  ;zero the extruded length
	G1 F200 E10             ;extrude 10mm of feed stock
	G92 E0                  ;zero the extruded length again
	G1 F{travel_speed}
	;Put printing message on LCD screen
	M117 Printing...
end3.gcode = ;End GCode
	M104 T0 S0                     ;extruder heater off
	M104 T1 S0                     ;extruder heater off
	M104 T2 S0                     ;extruder heater off
	M140 S0                     ;heated bed heater off (if you have it)
	G91                                    ;relative positioning
	G1 E-1 F300                            ;retract the filament a bit before lifting the nozzle, to release some of the pressure
	G1 Z+0.5 E-5 X-20 Y-20 F{travel_speed} ;move Z up a bit and retract filament even more
	G28 X0 Y0                              ;move X/Y to min endstops, so the head is out of the way
	M84                         ;steppers off
	G90                         ;absolute positioning
	;{profile_string}
start4.gcode = ;Sliced at: {day} {date} {time}
	;Basic settings: Layer height: {layer_height} Walls: {wall_thickness} Fill: {fill_density}
	;Print time: {print_time}
	;Filament used: {filament_amount}m {filament_weight}g
	;Filament cost: {filament_cost}
	;M190 S{print_bed_temperature} ;Uncomment to add your own bed temperature line
	;M104 S{print_temperature} ;Uncomment to add your own temperature line
	;M109 T2 S{print_temperature2} ;Uncomment to add your own temperature line
	;M109 T1 S{print_temperature2} ;Uncomment to add your own temperature line
	;M109 T0 S{print_temperature} ;Uncomment to add your own temperature line
	G21        ;metric values
	G90        ;absolute positioning
	M107       ;start with the fan off
	G28 X0 Y0  ;move X/Y to min endstops
	G28 Z0     ;move Z to min endstops
	G1 Z15.0 F{travel_speed} ;move the platform down 15mm
	T3                      ;Switch to the 4th extruder
	G92 E0                  ;zero the extruded length
	G1 F200 E10             ;extrude 10mm of feed stock
	G92 E0                  ;zero the extruded length again
	G1 F200 E-{retraction_dual_amount}
	T2                      ;Switch to the 3th extruder
	G92 E0                  ;zero the extruded length
	G1 F200 E10             ;extrude 10mm of feed stock
	G92 E0                  ;zero the extruded length again
	G1 F200 E-{retraction_dual_amount}
	T1                      ;Switch to the 2nd extruder
	G92 E0                  ;zero the extruded length
	G1 F200 E10             ;extrude 10mm of feed stock
	G92 E0                  ;zero the extruded length again
	G1 F200 E-{retraction_dual_amount}
	T0                      ;Switch to the first extruder
	G92 E0                  ;zero the extruded length
	G1 F200 E10             ;extrude 10mm of feed stock
	G92 E0                  ;zero the extruded length again
	G1 F{travel_speed}
	;Put printing message on LCD screen
	M117 Printing...
end4.gcode = ;End GCode
	M104 T0 S0                     ;extruder heater off
	M104 T1 S0                     ;extruder heater off
	M104 T2 S0                     ;extruder heater off
	M104 T3 S0                     ;extruder heater off
	M140 S0                     ;heated bed heater off (if you have it)
	G91                                    ;relative positioning
	G1 E-1 F300                            ;retract the filament a bit before lifting the nozzle, to release some of the pressure
	G1 Z+0.5 E-5 X-20 Y-20 F{travel_speed} ;move Z up a bit and retract filament even more
	G28 X0 Y0                              ;move X/Y to min endstops, so the head is out of the way
	M84                         ;steppers off
	G90                         ;absolute positioning
	;{profile_string}
support_start.gcode =
support_end.gcode =
cool_start.gcode =
cool_end.gcode =
replace.csv =
preswitchextruder.gcode = ;Switch between the current extruder and the next extruder, when printing with multiple extruders.
	;This code is added before the T(n)
postswitchextruder.gcode = ;Switch between the current extruder and the next extruder, when printing with multiple extruders.
	;This code is added after the T(n)
To be honest, I slice in the stand-alone version of Cura and mine doesn't have .INI files so I can't help you much on that.
You might try the new stand-alone version of Cura and see if the problem goes away. You could then choose to port the new settings back into the embedded version of Cura or to keep it that way.
I tried to slice the model and upload just the gcode, it does the same thing. It starts printing at double the height of where it should be causing the first layer to fail.
I am trying a new start.gcode that prints a blob on the edge of the bed, just to see how that does and the print is still the same, it starts way too high to stick down.
;Basic settings: Layer height: {layer_height} Walls: {wall_thickness} Fill: {fill_density}
;Print time: {print_time}
;Filament used: {filament_amount}m {filament_weight}g
;Filament cost: {filament_cost}
G21        ;metric values
G90        ;absolute positioning
M82        ;set extruder to absolute mode
M107       ;start with the fan off
G28 X0 Y0  ;move X/Y to min endstops
G28 Z0     				;move Z to min endstops
G1 Z20.0 F{speed_travel};move the platform down 15mm
M190 S{print_bed_temperature} ;Uncomment to add your own bed temperature line
G29							;Preform auto-bed-level routine
G1 X0 Y0 F9000 ; Go to front
G1 Z5.0 F9000 ;move the head 5mm up for CYA clearance
G92 E0 ;zero the extruded length
M117 Cleaning...;Put Cleaning message on screen
G1 X100 Y0 F4000 ; move half way along the front edge
G1 Z1 ; move nozzle close to bed
M109 S{print_temperature} ;Uncomment to add your own temperature line
G4 P10000 ; wait 10 seconds for nozzle length to stabilize
G1 E10 ; extrude 10 mm of filament
G1 z15 F12000 E5 ; move 15 mm up, fast, while extruding 5mm
G92 E0 ; reset extruder
;Put printing message on LCD screen
M117 Printing...
Do we know if you have a Before start of print gcode script defined in OctoPrint -> Settings -> Gcode scripts?
I do not have anything defined there except for the "After print job is cancelled" field.
You might want to review the first ten lines of your gcode file to see what it's up to.
Taking another look at this, I adjusted my printer nozzle height and ensured that it is 0.15mm above the bed when homed.
I started another print and the z-height for the wipe is exactly correct at 0.3mm, however, the print itself is still too high. Stopping the print I measured where it was and the nozzle is 0.7mm above the bed when it should be 0.3mm. Checking my gcode confirms what I think it should be doing (attached). Then I had a thought, when does the auto level code take effect? I am wondering if my BL Touch z-offset is not tuned correctly. If after my purge and wipe in the gcode.start section, if then the auto-bed level, being off, could cause this?
Ok, I think I fixed this issue. It seems my z-offset math with my BL Touch was incorrect. Below is my experience in figuring this out and the math I used.
With this setting I am now printing within 0.15mm of the bed every time. I will print a few things over the weekend and report back to ensure that the issue has gone away entirely.
I measued the BL Touch offset using the built in function in my firmware [here].(https://github.com/andrivet/ADVi3pp-Marlin)
- To start this process I sliced and started a print. My print has a configured zero layer of 0.3mm, which it was nowhere close to.
- I stopped the failed print while it was still in its zero layer, cleaned the bed, then measured the actual height that the nozzle was at.
- Then I used the built in BL Touch z-offset function in my firmware.
3(a) This homes the nozzle in the middle of the print bed for manual adjustment in which I used a 0.15mm feeler gauge.
3(b) After getting that spot on, I triggered the firmware to probe using the BL Touch sensor in the same spot. This caused the printer to put the BL Touch probe in the same spot the nozzle was in and probe the bed quickly, then slowly to find the height.
3(c) Completing that process the firmware then presents a number that it thinks is the offset of the nozzle to the BL Touch sensor.
- Knowing the current offset that the print was using, and the height of the feeler gauge that I was using, I employed the following equation: "Presented_Offset + Feeler_Gauge_height - (actual_zero_height - Configured_zero_height) + 0.1mm" = New_ZHeight_Offset"
4(a) For my particular readings my numbers were as follows: -0.48mm + 0.15mm - (0.74mm - 0.3mm) + 0.1mm = -.67mm
This seems to be a very strange way to find the real offset for my BL Touch, if anyone has a better idea, let me know, I am open to ideas if I ever need to adjust it.
For now, I am happy with the results. My print looks like it will have a glass like first layer without any flaws, and that makes me very pleased as it is something I have struggled with for quite a while.
1 Like
Nicely done. I myself went through perhaps six months of hating my Robo C2 printer's attempts at firmware and an OctoPrint fork. To top that off, they then tried some crazy action of adding a new gcode command to umbrella all the autoleveling behavior. I really couldn't believe that they'd do this so I ditched their software and started over.
I designed a way of manually adjusting the print bed and then used two of the available plugins (Visualizer and another one that allows you to do manual adjustments). And finally, I just tweaked it over the next few prints until it was perfect.
But it really feels good to get your printer where it will lay down a first layer correctly.