"Two roads diverged in a wood, and I ...
I took the one less traveled by,
And that has made all the difference." ~Robert Frost
One road is to use the full buster image. Install OctoPrint onto that. The other road is to use the lite buster image that already has the print server installed. I took the first road, and the second road using a second SD card.
On my Pi 4, I hosted OctoPrint onto a full buster image. It allows freedom to run the Pi 4 either way, with GUI and all applications, OR if the HDMI monitor, mouse, and keyboard are not present the same Pi 4 will automatically boot and start the print server in a headless networked mode.
Foosel has a nice write-up that is easy to find explaining how to put OctoPrint onto the full buster.
I will write some of what I remember about making the "lite" image work. It is important to start fresh with a completely blank SD card. Then, do this:
Use a PC to download the octopi-buster-lite-0.17.0.zip file.
Use Balena Etcher on Windows to burn the .img file onto an SD card.
Etcher can use the zip file directly.
It will go faster if the .img file is already unzipped.
Install the SD card into a Pi 4 that is not powered.
Pi can be headless later using SSH remotely, but not at first.
Connect Pi to an HDMI monitor input.
Connect Pi to a USB keyboard.
Connect Pi to a USB mouse.
Connect Pi to a wired internet port on the same router providing network to the PC.
Do not use WiFi to connect the Pi to the router, not yet.
Power on the Pi. Allow it to boot.
Do not attempt to use the PC internet browser to access OctoPrint, not yet.
On first run, OctoPrint will initate a wizard.
We want that to happen after we do some important bookkeeping.
Login to the Pi 4 using the local hard-wired Raspberry Pi 4 console.
The first login prompt will not be blue.
At the prompt that says "login" respond pi [Enter].
Default password is raspberry with no punctuation or caps.
New prompt will be blue.
At the blue console prompt, type passwd to change the password.
Raspbian buster lite from this image will connect via SSH, but refuse to authenticate the pi user account if the password for the account remains the default password.
On the PC, login to the router's administration utility using favorite internet browser.
Ask the router to list the IP addresses of all things connected.
Each router can do this differently.
Note the IP for the system with "octopi" name.
Start PuTTY on the PC.
Use PuTTY and the IP address to SSH into the Pi.
Verify that SSH works and allows remotely logging in as the "pi" user.
Fix the pi user account to allow passwordess sudo:
sudo nano /etc/sudoers
Sudo is a text editor.
This edits the "sudoers" file in the "/etc" directory.
Add this line to the end of the file:
pi ALL=(ALL:ALL) NOPASSWD:ALL
If you are new to using the nano text editor, stop and go read about it using Google and study examples before continuing. Use it. Make the modification. Later, after all printing connectivity is working, you can come back and edit this file to turn off passwordless sudo as a security provision. It just makes things easier to switch modes temporarily while doing a lot of configuring.
With the sudoers file modified and saved, install pip:
Why?
Pip is not installed by default.
Pip is needed before running the OctoPrint plugin manager.
The OctoPrint plugin manager will need to install a plugin.
A plugin can be installed to fix an issue with MonoPrice model 15365 connecting.
All of that should be fixed prior to starting the OctoPrint setup wizard via a PC browser.
At the pi@octopi prompt, type this:
sudo apt update
sudo apt install python-pip
Allow this to finish, and then restart the Pi gracefully.
sudo reboot
Now use a PC internet browser to navigate to the OctoPrint server page.
Do this by entering the Pi's IP address as the browser URL.
The OctoPrint user interface page appears, and runs an OctoPrint configuration wizard.
Answer the wizard's many questions by using your printer's manual and specifications.
Suppose you have a MonoPrice model 15365.
I will not write (or remember) all the settings for that printer here.
It is just useful as an example of why we need to have pip already available to allow OctoPrint to install plugins.
In the OctoPrint UI, click the wrench icon for configuring.
Set Serial Port to AUTO.
Set serial connection Baudrate to 115200.
Check Auto-connect to printer on server start.
Check Request exclusive access to the serial port.
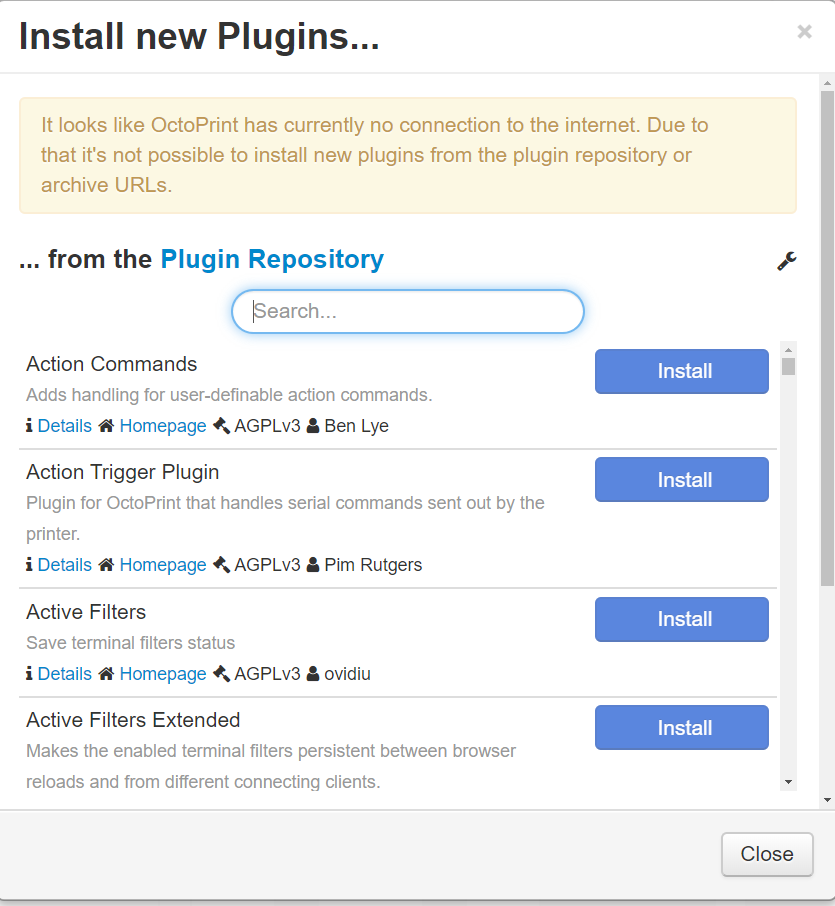
Click on "Plugin Manager."
Click "Get More."
In the box for ... from URL enter this link:
https://github.com/OctoPrint/OctoPrint-MalyanConnectionFix/archive/master.zip
Click "Install."
After installation success, click on "Save."
I recommend enabling access control when the wizard asks.
To save time when testing this plugin, I ran the test with access control disabled.
You can do it without access control, in order to exactly duplicate my steps,
and then manually activate access control later after verifying connection success.
It should be OK, and it is safer to start immediately using access control.
Bill Triplett
Blue Heron Scientific, LLC.