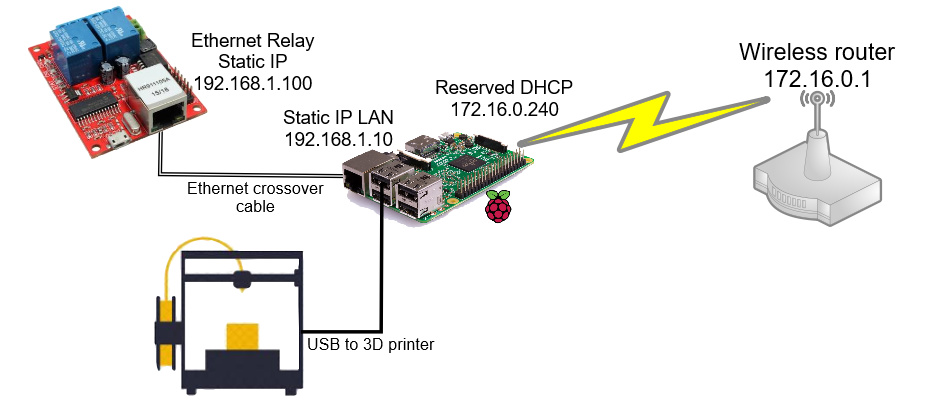
I have the latest stable version of Octopi set up on a raspberry PI 3 B+. Wireless is working fine. I have an Ethernet controlled relay (controlled by telnet) with a static IP address of 192.168.1.100. I am going to network it with my raspberry PI via an Ethernet jack. I already have a working python script that turns the relay on and off using my PC.
Q1: How do I set a static IP address of 192.168.1.2 on the Raspberrry's ethernet port (keeping wirless access for the OctoPi web application) considering that the OctoPi uses the file octopi-wpa-supplicant.txt for networking.
By far, the easiest way to do this is to reserve the selected IP address on the Ethernet side of things with your Internet router itself (using the MAC address of the Ethernet card in the Raspi). Rebooting the Raspi would then receive the expected IP address because of the reserved lease from your router and you won't have to adjust anything on the Raspi.
You can get the MAC address of the Raspi by connecting the Ethernet cabling, remoting into the Raspi via ssh and running ifconfig eth0|grep ether|awk '{print $2}'.
So I have all the wireless worked out. The relay is stuck with 192.168.1.100 and the whole set up is not near the wireless router where I could plug the relay into the router (via ethernet cable). So I need to work out assigning a static IP to the LAN port of the raspberry pi
I'm also seeing a potential bridging issue here with one device with two ip's
According to the description for that board, it says...
"Descriptions: You can configure the module through the network parameters, such as the module IP address, default gateway, etc."
So, if the description is correct, is there some reason you're married to that IP address ? Because if you are, then you'll still have to deal with network bridging
@Spyder I don't believe there will be a problem with this configuration. The routing tables generated by the configuration will automagically route 192.168.1.0 addresses to the eth0 port and everything else to the wireless port.
I do this with my laptop all the time. Its wireless adapter is connected to my LAN but I can plug in things on the ethernet adapter like routers, firewalls, etc. that I am configuring for clients and set the ethernet adapter to whatever IP address is needed to talk to the device I am configuring.
What you can't do (without additional work) is have some other device on the wireless network talk to the 192.168.1.0 network. For that to work, you need to enable routing on the Raspberry Pi and then play with the routing tables of those systems on the wireless network that want to talk to the 192.168.1.0 network.
And that is exactly the part I'm questioning. The control in the web browser, whatever that might be that sends the signal to the relay, is going to be on the wifi side of the network, sending a signal to the wired side to control the relay
Does it count that the Pi is what it's connected to ? Or is the browser being looked at as part of a different network ? If it turns out to be a different network, that's when the question of routing tables vs bridging should come in. Don't get me wrong, editing the routing tables will work, but, at the cost of computing power due to the fact that each packet must be inspected and delivered to the proper address, whereas with bridging, you basically just link the two networks together
I guess we need @hgoodric to tell us what the relay is for and what machines need to talk to it.
If it is the Raspberry Pi only, then the configuration is simple and the solution that @OutsourcedGuru suggested should work.
If other machines on the wireless network want to control the relay directly, then additional configuration is necessary. Bridging, Routing, or a custom program running on the Raspberry Pi which can listen on the wireless network and then relay commands to the ethernet network. This custom program could be part of the HTTP server on the Raspberry Pi (or a plugin for OctoPrint).
I think we both need more information before we can determine what additional configuration is required.
The relay will control the heat lamp that I use to keep the temperature of abs plastic consistent between the bottom and top layers. Using the heat lamp, I've been able to print long thin parts out of abs without edge curling. It also lessens the current draw on the heated bed because the bed has help to keep temperature. I currently use a mechanical timer and estimate when the print will finish so the heat lamp automatically turns off after the print is complete.
I want to have octopi control the relay. The add-in I am creating for this will add some enabling buttons in the web ui that will interact with python scripts. The python script use python's telnet library to telnet into the relay and interact with it. There is no direct relationship between the IP address on the wireless side and the IP address on the relay side. The only entity interacting with the relay are the python scripts on the raspberry pi, no no bridging or network translation are required.
When I type "sudo nano /etc/dhcpcd.conf" I get "Command not found". I don't see an "etc" folder or a dhcpd.conf file. Was this replaced by octopi-wpa-supplicant.txt?