So... can you confirm that all of these combinations definitively work for you (at the command line) without unwanted side-effects?
NZS1 on:
sudo uhubctl --loc=1-1.1 --ports=2 --action=on
NZS1 off:
sudo uhubctl --loc=1-1.1 --ports=2 --action=off
NZS2 on:
sudo uhubctl --loc=1-1.1 --ports=3 --action=on
NZS2 off:
sudo uhubctl --loc=1-1.1 --ports=3 --action=off
Arduino on:
Probably not do-able
Arduino off:
sudo uhubctl --loc=1-1 --ports=2 --action=off
Webcam on:
sudo uhubctl --loc=1-1 --ports=3 --action=on
Webcam off:
sudo uhubctl --loc=1-1 --ports=3 --action=off
Ultimately, you could run sudo lsusb -vvv and search for the word "ganged". This will tell you a lot about how things are going to work on one of the hubs.
From what I see, that port that you've got the Arduino plugged into is on a ganged set of four ports and it's behaving like the Raspi3B. You might ultimately re-arrange things so that the Arduino can be better controlled. It could be the limitation that this author was referring to.
sudo lsusb -t
/:  Bus 01.Port 1: Dev 1, Class=root_hub, Driver=dwc_otg/1p, 480M
    |__ Port 1: Dev 2, If 0, Class=Hub, Driver=hub/5p, 480M
        |__ Port 1: Dev 3, If 0, Class=Vendor Specific Class, Driver=smsc95xx, 480M
        |__ Port 5: Dev 5, If 0, Class=Vendor Specific Class, Driver=ftdi_sio, 12M
And here is where the printer's MCU is connected.
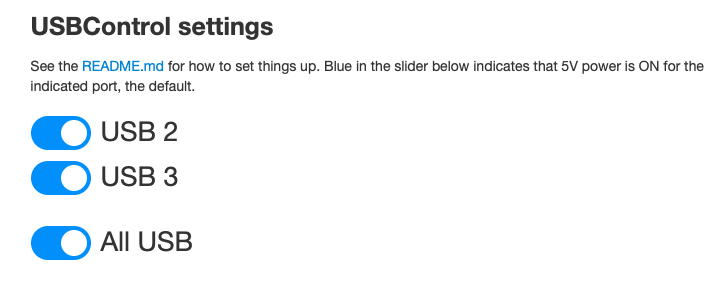
After running few more tests I need to take back part of my earlier statement. Disabling either port 2 or 5 terminates connectivity between RPI and MCU. The difference is - LCD goes off only when USB2 is powered off and UI switches from Connected to Disconnected state in sync with port 5.
Looks like disabling USB port(s) does not play well with Klipper. If both - MCU power supply and USB power are turned off, re-establishing communication between Klipper host and MCU, after bringing power back on, is not possible unless you reboot RPI :(.
Nice plug-in. It is just what I needed. I already added the TP-Link outlet to turn off the power supply to the printer. But then the USB powered the computer in the printer so that was on. Now with this plug-in I can toggle off the power from the USB so when the power supply is off everything but the PI is off. Which is the way I wanted it to work.
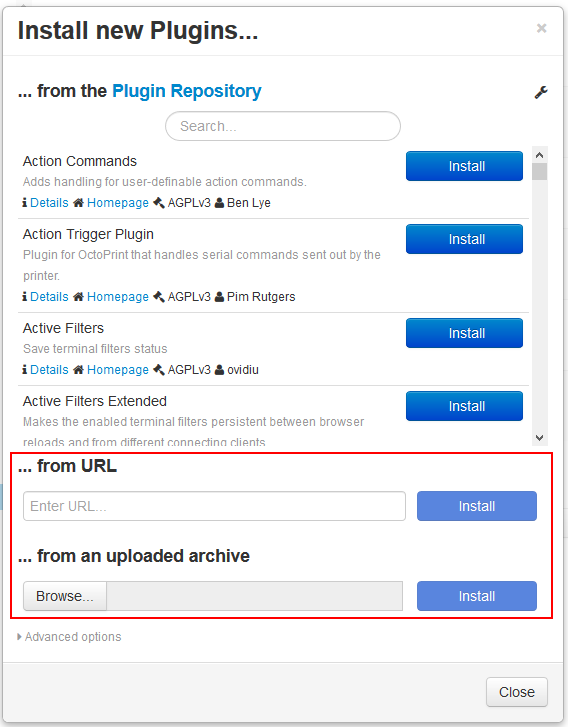
I am new to OctoPrint and was going to play with the plugin. I have only installed plugins from the OctoPrint repository. Am I missing where it is or do I need to down loaded and side load?
So should I see it in the repository or do I need to sideload it? Sorry, for the Andriod terminology, just how I think of manually loading something that is not in an official repository for that product.
At the top it has the stuff from the repository. But at the bottom it also allows you to "sideload"
And the docs tell you what URL to put there:
Admittedly that phrasing can be read both ways - that's my fault as it originates from the plugin template. Happy to take rephrasing advice from native speakers
No biggie, it is just me being new. If there would have been something wrong then I wanted to bring it to someone attentions.
BTW, as I said, new to 3D Printing and I love OctoPrint.
I am waiting for my 3v relays to come in for the PSU. Right now I have a ton of 5v and I tested with a logic leveler and all seemed to work. I also have a PI 3B+ somewhere that I can test the USB with, I just need to dig it up. Sometime it might be cool to combine the PSU and the USB power controls into one toggle.
Before I saw this, my plan was to relay the 5v out of the USB, but that would require hacking the cable and could cause com issues by messing with shielding and such.
If you've got an ATX style of power supply, feel free to search the forum here for that term. I recall many posts where people have done programmatic control in a number of ways.
I've got both a Raspberry Pi 3B+ and an A+ on order now with Adafruit. I should be able to test things directly myself for these two models. You've got to love their Spartan email notification:
Products
------------------------------------------------------
1 x Raspberry Pi 3 - Model B+ - 1.4GHz Cortex-A53 with 1GB RAM
1 x Raspberry Pi Model 3 A+
1 x Raspberry Pi Zero W
1 x Raspberry Pi Zero WH (Zero W with Headers)
1 x PN532 NFC/RFID controller breakout board (v1.6)
2 x 13.56MHz RFID/NFC Card - Classic 1K
3 x 13.56MHz RFID/NFC White Tag - Classic 1K
3 x Micro NFC/RFID Transponder - NTAG203 13.56MHz
1 x Premium Female/Female Jumper Wires - 40 x 6"
1 x Adafruit Perma-Proto Half-sized Breadboard PCB - Single
I am both happy to report that the box from Adafruit arrived today and yet sad that the Raspberry Pi 3A+ is not at all compatible with the underlying uhubctl program; it can't see the single hub that's inside this new computer. Presumably it can't because it's not even a smart hub.
v1.0.5 of OctoPrint-USBControl now supports the Raspberry Pi 3B+.
If you've previously installed it and have the Raspberry Pi 3B+, I'd suggest removing the plugin from Settings -> Plugin Manager, letting that restart. Then manually edit your ~/.octoprint/config.yaml to remove any lines in the plugins section related to usbcontrol.
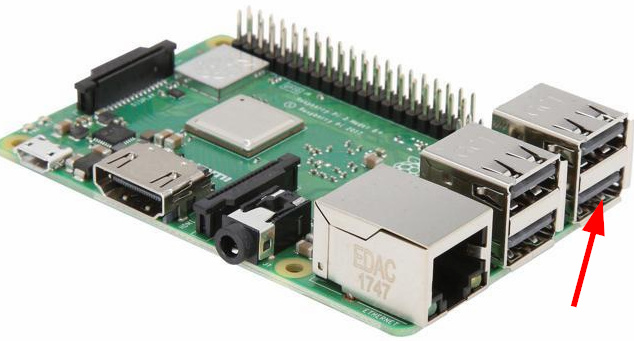
The 3B+ is odd in that it has control over the network devices (USB1), then programmatic control over the next two smart devices (USB2/USB3) and then everything else is lumped together on a separate ganged hub. It's slightly better than the Raspberry Pi 3B but only marginally.