I use Continuous Print plugin and I've installed OctoRelay to run a cooling fan when individual prints are done. I saw in the documentation that a gcode exists to activate / deactivate the fan. Can this be added within end gcode? Per OctoRelay, this is as follows:
By sending GCODE command @OCTORELAY r#.
Where # is relay index from 1 to 8.
I am wondering if I can place this line of text into the end gcode within Prusaslicer along with all the other code I have there to eject the part (nozzle runs a course to bump the part off when nozzle temp = 78C. Strong fan helps to blow the part off).
Do I need to type "G0" or anything else in front of "@OCTORELAY r1" (I will be using relay #1).
Sorry, I am still new at gcode lines so I'm not sure. Also, the plugin has "fan on" and "fan off" options for initiating at beginning or ending of the print, but since I'm using Continuous Print, I presume the fan would only come on at the end of a series of prints.
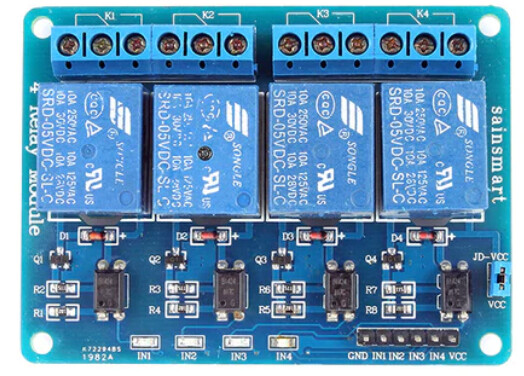
I ordered the SainSmart 4-Channel Relay Module. I will use this to activate another relay that can handle 115V (the OONO F-1050 which I have familiarity with). This in turn activates a high-speed, strong 115V blower.
It would be great to be able to combine these two options, because with this blower I've been using, I'm down to three minutes in-between prints!
What did you already try to solve it?
I didn't try adding the "@OCTORELAY r1" line of code yet to end gcode in Prusaslicer. I think it must need more info or maybe "@OCTORELAY r1" is not intended for use in end gcode.
So if I can just figure out how to write the commands in the end gcode to turn the peripheral fan relay on/off, I think that would do it.
Have you tried running in safe mode?
No and/or n/a
Did running in safe mode solve the problem?
n/a
Systeminfo Bundle
You can download this in OctoPrint's System Information dialog ... no bundle, no support!)
browser.user_agent: Mozilla/5.0 (Windows NT 10.0; Win64; x64; rv:109.0) Gecko/20100101 Firefox/114.0
connectivity.connection_check: 1.1.1.1:53
connectivity.connection_ok: True
connectivity.enabled: True
connectivity.online: True
connectivity.resolution_check: octoprint.org
connectivity.resolution_ok: True
env.hardware.cores: 4
env.hardware.freq: 1800.0
env.hardware.ram: 3971350528
env.os.bits: 32
env.os.id: linux
env.os.platform: linux
env.plugins.pi_support.model: Raspberry Pi 4 Model B Rev 1.4
env.plugins.pi_support.octopi_version: 1.0.0
env.plugins.pi_support.octopiuptodate_build: 1.0.0-1.8.6-20230222095002
env.plugins.pi_support.throttle_check_enabled: True
env.plugins.pi_support.throttle_check_functional: True
env.plugins.pi_support.throttle_state: 0x0
env.python.pip: 22.3
env.python.version: 3.9.2
env.python.virtualenv: True
octoprint.last_safe_mode.date: unknown
octoprint.last_safe_mode.reason: unknown
octoprint.safe_mode: False
octoprint.version: 1.8.6
printer.firmware: Prusa-Firmware 3.12.0-BETA1 based on Marlin
systeminfo.generated: 2023-09-25T20:48:30Z
systeminfo.generator: zipapi
Additional information about your setup
OctoPrint version, OctoPi version, printer, firmware, browser, operating system, ... as much data as possible
Prusa MKS3+ combined with Quinly VAAPR continuous printing release bed overlay and machine placed at angle for 3D part discharge.
You should be fine to just add the @OCTORELAY r# to your startup and/or end gcode in the slicer. It's pretty much exactly why it is there. No need for anything other than the text stated "@OCTORELAY r#" on its own line in the startup or end script.
Thank you! This did in fact work. I replaced the "#" with "3" to link it to the on-screen fan option. I did employ the SainSmart 5V relay, which worked with my continuous print setup for about a day. However that eventually failed to actuate the F-1050 relay (connected to 115V & blower). So now I am thinking of connecting the F-1050 directly to my RPi. I did do this once, and it worked, but I didn't want to ruin my RPi, so I waited for the SainSmart relay to arrive. However I've been struggling with that relay so much, I'm probably going to go back to the direct connection and cross my fingers. Another matter. Thanks for your help!
I'm thinking that your issue with the smaller rely is due to inductive feedback from the larger relays coil. If you don't shunt that when you de-energize the relay, it will cause arcing that will deposit carbon on the contracts of the smaller relay. This can build up pretty quick on something that actuates a lot. Separating the larger line level relay from the Pi as you did is a good idea. I suggest you replace the small relay with a new one and add a shunt diode across the larger relays coil.
If you connect the larger relay with no isolation and no shunt you will be adding a lot of electrical noise and feedback into your pi IO. It may work for a while but you likely start to see really random things happen when you turn off the relay.
First of all, thanks again for your help and super-fast response! I really appreciate this. Yesterday I ordered another SainSmart 5V relay, but this time with just two relays, as I don't really need four. All I have to do is figure out what diode I need and how to add that. I think there are some images via google search, and further info. If you have any more suggestions though, I'm all ears!
Best, Rog
I am wondering if the other unused relays on the 4x relay board may have been spared the arcing deposits. Yesterday I was improving connections and wiring, and tried relay IN2, but with same result: one tap with a chopstick on it's surface permits current to travel to the F-1050 and actuate the fan circuit. Definitely going to add the flyback diode though on this next board! I did try external 5V 700ma power supply I picked up at a secondhand store. I seem to get the same result no matter whether I use RPi 5V + 3.3V versus external 5V + RPi 3.3V an no matter which VCC connection is used. I connected the negative of the external 5V to GND on the relay board. Didn't have the RPi ground connected because I didn't know where I could do that, I don't think there's another grounding pin on the SainSmart 4x relay. Also increase wire(s) diameters on certain lines thinking maybe there could have been voltage drop or some sort of electrical constraint caused by too small wiring. -R
You will need to power that board with 5v.. not 3.3v from the Pi. Otherwise it may not have enough power to energize the relay coils. VCC needs to be 5v and gnd should be connected to both the source for the 5v and the Pi ground or your trigger levels may not be high enough to fire the relay. All grounds for your DC levels should be connected together .
Hope that helps. I still think you should put in a diode as well on the contacts across the larger relay coil. Note that they are in place on the sainsmart board. D1-D4
I missed you question on the diode.
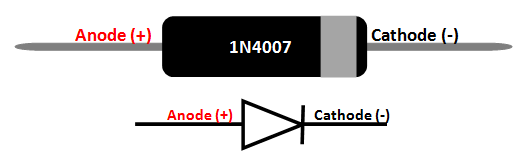
Just get a 1n4007. They are really common and easy to get.
Put it across the coil of the larger relay. Side with the stripe goes to the side you connect the positive voltage.if you put it in the wrong direction it is essential a short. So be sure.
Hi, Thanks again! I am using both 3.3 and 5V's, in the appropriate locations. 5V on JD-VCC, and 3.3V on VCC. 5V coming from external source, 3.3V coming from Pi. The only reason I went to an external source for the 5V is because I had read that it is possible the relay draws more current than the Pi can deliver, hence the relay may be hesitant or not throw. However in my case this didn't make an observable difference. RR
Will definitely find this and use it as you have indicated. Also I just found some YouTubes on placing this, with very similar info, so that should help. Thanks for identifying the diode I need though, because that part might have taken me forever!!!