I have a Raspberry Pi 4 (4GB) with Octoprint 1.6.1 installed. OctoPrint boots up just fine, and so does the printer -- however, the pi has been unable to initiate a serial connection no matter what I do.
What did you already try to solve it?
I've tried:
editing ~/boot/config.txt with the following:
enable_uart=1 dtoverlay=pi3-disable-bt
as well as:
dtoverlay=pi3-miniuart-bt
manually attempting to connect to /dev/ttyS0
manually adding /dev/ttyAMA0 to available serial ports and attempting to connect to it
manually switching between baudrates
disabling and re-enabling the hardware serial interface in raspi-config
Have you tried running in safe mode?
Yes, I tried running OctoPrint on my Pi 4B in safe mode.
OctoPrint 1.6.1 (Webcam connected), OctoPi 0.18.0, Raspberry Pi 4B (connected to Buck Converter for power), Prusa i3 Mk3S+, Google Chrome 91.0.4472.114, Windows 10
Note: prior to this, I had a Raspberry Pi 3B connected to my printer with no webcam, and didn't run into any serial connection issues. I replaced it after the power and USB ports broke off due to mishandling of my printer by another party. After all the setup, this is the only issue preventing my new Pi from fully running OctoPrint.
Some more details about what I see:
When I try to connect to ttyS0, I get the following error:
Unexpected error while connecting to serial port /dev/ttyS0, baudrate <insert baudrate here> from hook default: SerialException: 'Could not configure port: (5, 'Input/output error')' @ comm.py:_open_serial:3699
And when I try to connect to ttyAMA0, this is what happens:
Trying port /dev/ttyAMA0, baudrate <insert baudrate here>
Connecting to port /dev/ttyAMA0, baudrate <insert baudrate here>
Handshake attempt #1 with timeout 2.0s
Connected to: Serial<id=0xa48fbe30, open=True>(port='/dev/ttyAMA0', baudrate=<insert baudrate here>, bytesize=8, parity='N', stopbits=1, timeout=2.0, xonxoff=False, rtscts=False, dsrdtr=False), starting monitor
Send: N0 M110 N0125
Handshake attempt #2 with timeout 2.0s
Send: N0 M110 N0125
Handshake attempt #3 with timeout 2.0s
Send: N0 M110 N0*125...
...it continues like that until it times out for all baudrate combinations.
Errors I've gotten include:
could not configure port (5 'input/output error')
error while connecting to serial port: /dev/ttyS0 error: '(22, 'Invalid argument')'
How are you trying to connect to your printer? Are you doing it via the GPIO pins or USB? It sounds like you might be trying to do it hardwired to the GPIO, since all the troubleshooting steps lead to that. Have you checked the 'RPi Port' setting on the printer is enabled?
Indeed, I'm using the GPIO on the Pi, and the RPi port is enabled on the printer. I've tried disabling and re-enabling it, but that doesn't seem to change anything.
You can take the printer out of the equation by bridging TX and RX on the Pi. Then use something such as minicom. You should be able to receive the exact same data sent(loopback).
I’ll give that a try when I visit the printer, another forum post with similar issues did result in the deduction that it was a bad board. I sure hope that’s not the case, though. Thanks for the suggestion!
Ok, sorry for the lack of competence but I don't know if I'm doing this right.
After a fresh reboot, I did the following:
Edited ~/boot/config.txt to have the options enable_uart set to 1 and dtoverlay set to pi3-disable-bt
Rebooted again
Shorted pins 8 & 10 (rx & tx)
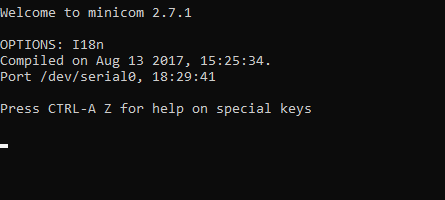
Ran minicom -D /dev/serial0
When in the minicom terminal, nothing appeared when I typed. The screen remained the exact same and none of the characters I typed appeared even once. I had to toggle local echo to get at least something to show up, but there weren't duplicates. /dev/ttyS0 and /dev/ttyAMA0 as well as /dev/serial1 also had the same happen when I tried them. The screen command yielded nothing different. My terminal when typing characters in minicom
So would this indicate a bad board, or is there another potential issue at play? One thing to note is that the hciuart service is loaded, but inactive (dead) when I perform these actions.
# For more options and information see
# http://rpf.io/configtxt
# Some settings may impact device functionality. See link above for details

# uncomment if you get no picture on HDMI for a default "safe" mode
#hdmi_safe=1

# uncomment this if your display has a black border of unused pixels visible
# and your display can output without overscan
#disable_overscan=1

# uncomment the following to adjust overscan. Use positive numbers if console
# goes off screen, and negative if there is too much border
#overscan_left=16
#overscan_right=16
#overscan_top=16
#overscan_bottom=16

# uncomment to force a console size. By default it will be display's size minus
# overscan.
#framebuffer_width=1280
#framebuffer_height=720

# uncomment if hdmi display is not detected and composite is being output
#hdmi_force_hotplug=1

# uncomment to force a specific HDMI mode (this will force VGA)
#hdmi_group=1
#hdmi_mode=1

# uncomment to force a HDMI mode rather than DVI. This can make audio work in
# DMT (computer monitor) modes
#hdmi_drive=2

# uncomment to increase signal to HDMI, if you have interference, blanking, or
# no display
#config_hdmi_boost=4

# uncomment for composite PAL
#sdtv_mode=2

#uncomment to overclock the arm. 700 MHz is the default.
#arm_freq=800

# Uncomment some or all of these to enable the optional hardware interfaces
#dtparam=i2c_arm=on
#dtparam=i2s=on
#dtparam=spi=on

# Uncomment this to enable infrared communication.
#dtoverlay=gpio-ir,gpio_pin=17
#dtoverlay=gpio-ir-tx,gpio_pin=18

# Additional overlays and parameters are documented /boot/overlays/README

# Enable audio (loads snd_bcm2835)
dtparam=audio=on

[pi4]
# Enable DRM VC4 V3D driver on top of the dispmanx display stack
dtoverlay=vc4-fkms-v3d,disable-bt
max_framebuffers=2

[all]
gpu_mem=128
disable_splash=1
start_x=1
enable_uart=1
There are some additional options but note the overlay and uart options and where they are.
So, after changing the order in ~/boot/config.txt the issue remains the same. Minicom gets no output and doesn't read my keystrokes.
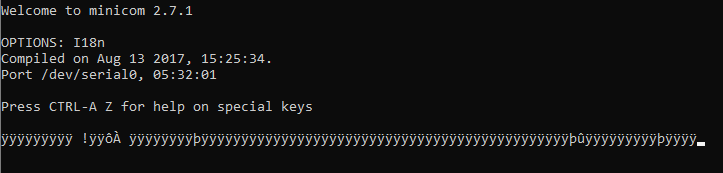
One thing, I'm shorting the GPIO pins using a screwdriver, and when it moves around a bit, then some ASCII characters appear. I think this has to do with the small amount of current generated when it moves around, but could it indicate anything?
Oh, I've been editing /boot/config.txt. Somehow I just subconsciously typed ~ in this post.
Here's what all the cats result in. config.txt:
# For more options and information see
# http://rpf.io/configtxt
# Some settings may impact device functionality. See link above for details

# uncomment if you get no picture on HDMI for a default "safe" mode
#hdmi_safe=1

# uncomment this if your display has a black border of unused pixels visible
# and your display can output without overscan
#disable_overscan=1

# uncomment the following to adjust overscan. Use positive numbers if console
# goes off screen, and negative if there is too much border
#overscan_left=16
#overscan_right=16
#overscan_top=16
#overscan_bottom=16

# uncomment to force a console size. By default it will be display's size minus
# overscan.
#framebuffer_width=1280
#framebuffer_height=720

# uncomment if hdmi display is not detected and composite is being output
#hdmi_force_hotplug=1

# uncomment to force a specific HDMI mode (this will force VGA)
#hdmi_group=1
#hdmi_mode=1

# uncomment to force a HDMI mode rather than DVI. This can make audio work in
# DMT (computer monitor) modes
#hdmi_drive=2

# uncomment to increase signal to HDMI, if you have interference, blanking, or
# no display
#config_hdmi_boost=4

# uncomment for composite PAL
#sdtv_mode=2

#uncomment to overclock the arm. 700 MHz is the default.
#arm_freq=800

# Uncomment some or all of these to enable the optional hardware interfaces
#dtparam=i2c_arm=on
#dtparam=i2s=on
#dtparam=spi=on

# Uncomment this to enable infrared communication.
#dtoverlay=gpio-ir,gpio_pin=17
#dtoverlay=gpio-ir-tx,gpio_pin=18

# Additional overlays and parameters are documented /boot/overlays/README

# Enable audio (loads snd_bcm2835)
dtparam=audio=on

[pi4]
# Enable DRM VC4 V3D driver on top of the dispmanx display stack
dtoverlay=vc4-fkms-v3d,disable-bt
max_framebuffers=2

[all]
#dtoverlay=vc4-fkms-v3d
# enable raspicam
start_x=1
gpu_mem=128
enable_uart=1
Alright, so when you are typing in minicom the two pins need to be shorted. Not sure if you are using a screwdriver then but that won't work very well. You'll need to use a jumper.