I am a person who has recently started using OctoPrint, so I have doubts and lacks of foundation because I am learning little by little.
The issue is that:
Before using Octoprint, I would print a part and before starting, BL-Touch would analyze the bed, adjust errors and print.
After that print, if I made another part, BL-Touch would analyze the bed again, adjust variations again, and print.
With this mechanic, I had no printing errors or problems.
Now, with OctoPrint:
I start a print, and directly, without analyzing the bed or errors, it starts printing
The print ends, I make a new print and there is no analysis of the bed. And I make mistakes, and no second impression turns out to be correct.
So...
How can I make sure that always, before a print (be it the first, second or fifth), my bed is analyzed and the variations are saved so that the print is the same as WITHOUT OctoPrint?
Thank you so much!
What did you already try to solve it?
I'm reading and looking for information.
I'm not sure how to get what I need.
Have you tried running in safe mode?
No
Did running in safe mode solve the problem?
No
Systeminfo Bundle
[octoprint-systeminfo-20240102151811.zip|attachment](upload://Lwg69yqbE0nqvcibLR6iuzEbcc.zip) (362.0 KB)
can download this in OctoPrint's System Information dialog ... **no bundle, no support!**)
OctoPrint version, OctoPi version, printer, firmware, browser, operating system, ... as much data as possible
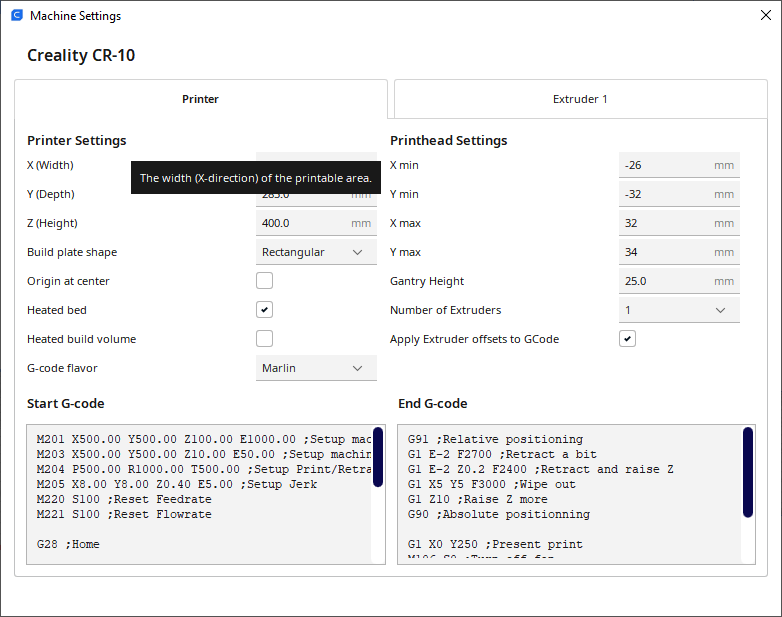
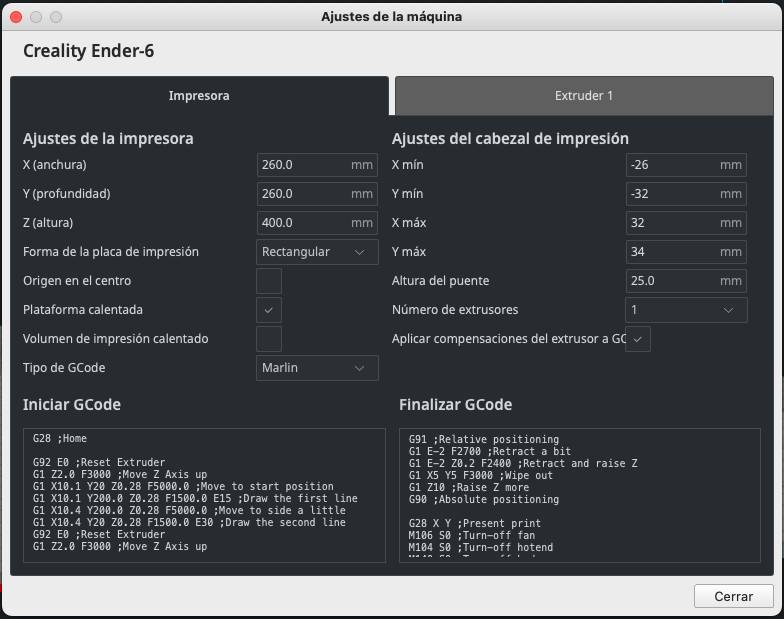
OctoPrint Version: 1.9.3 Bed Visualizer Settings Version: 1.1.1 Printer: Creality Ender 6 Firmware: Marlin2.0.1-HW-V4.3.1-SW-V1.0.4.9-BLTouch Browser: Google Chrome (I have tried in Firefox, and in Safari) Operation System: MacOS Monterey (12.6.8 (21G725))
Oh, sure. Logical. thanks for the comment. She hadn't noticed or thought about it.
Ultimaker Cura
I am not clear (due to lack of knowledge) from OctoPrint how I have to modify the start GCODE.
Could you help me with this point?
Is it a plugin? Is it some specific point in the OctoPrint configuration?
OK.
I just saw that in Settings there is "GCODE Scripts"
And inside there are blocks for "moments".
I sense then that I should put it in "Before print job starts"
I have it empty. There is nothing
Although there is nothing in those boxes, every time I print, my printer prints:
A line on the side 2 times when a print starts.
Those lines... are they made by default by Cura's configuration?
If in that "Before print job starts" box I put only "G29 G28" will it level each print and paint that line 2 times? Or is it just going to level?
G28 ;Home

G92 E0 ;Reset Extruder
G1 Z2.0 F3000 ;Move Z Axis up
G1 X10.1 Y20 Z0.28 F5000.0 ;Move to start position
G1 X10.1 Y200.0 Z0.28 F1500.0 E15 ;Draw the first line
G1 X10.4 Y200.0 Z0.28 F5000.0 ;Move to side a little
G1 X10.4 Y20 Z0.28 F1500.0 E30 ;Draw the second line
G92 E0 ;Reset Extruder
G1 Z2.0 F3000 ;Move Z Axis up
End Gcode
G91 ;Relative positioning
G1 E-2 F2700 ;Retract a bit
G1 E-2 Z0.2 F2400 ;Retract and raise Z
G1 X5 Y5 F3000 ;Wipe out
G1 Z10 ;Raise Z more
G90 ;Absolute positioning

G28 X Y ;Present print
M106 S0 ;Turn-off fan
M104 S0 ;Turn-off hotend
M140 S0 ;Turn-off bed

M84 X Y E ;Disable all steppers but Z
Exactly, this is missing G29 after the G28 in the start gcode. This is handled differently when printing directly from your printer I suppose and the printer itself is running the probing commands when you start it. Just add the G29 command on the next line after G28, slice a file, upload it to OctoPrint and print that one and you will see that it will do the probing.
I just tried it. I added G29 after G28 in Ultimaker Cura.
I have generated the GCODE file and started printing from OctoPrint.
And indeed, it is doing bed analysis with BL-Touch!
Thank you very much for the help!!
I would like to know if what I have asked for and you have helped me with is correct to print, or if there are really more optimal and better ways to do it.
And on the other hand, I need to comment on something else.
When I printed without OctoPrint (from the printer directly) after calibrating the bed and starting printing, I could, using the touch screen and added BL-Touch functionalities, adjust "hot" (while printing) the Z axis (in case there was some error).
From OctoPrint, I have a plugin (OctoPrint-BLTouch) that has enabled some controls with which I can move and adjust the height of the bed.
But when the print starts, it doesn't let me interact. So I can't adjust "hot" like I can when trying to print just with the printer.
Do you know why this plugin won't let me interact with the Z axis during the printing process? (buttons appear disabled)
This is called baby stepping. That plugin isn't really designed for that. There is an approach discussed over here that would give you the functionality from OctoPrint's control tab.
OK. I feel calmer knowing that I'm not trying to do anything wrong. And that is "normal."
Thanks for the reply.
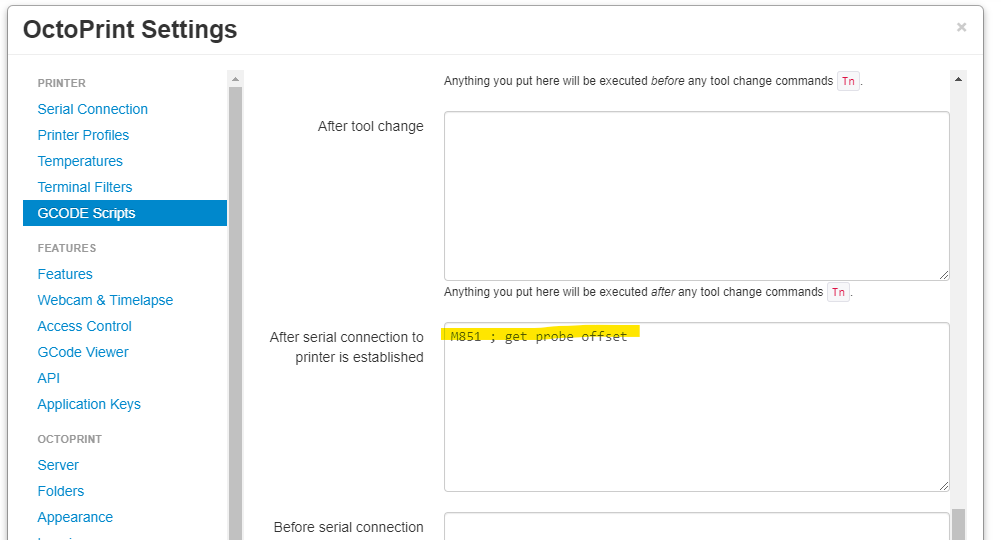
Reading the answer, it is not clear to me if what is indicated by entering in "After serial connection to printer is established" really achieves the objective of "hot moving the Z axis."
Is it tested and does it really work?
Is it as simple as copying the entire block and putting it in that box?
From what I understand, that block will make some controls (Z-probe) appear in OctoPrint.
You can click on the arrows to raise and lower the bed
And that moved value can be saved in the EEPROM memory using a "Save to EEPROM" button.
It's right?
And... if we don't click on "Save to EEPROM" what would happen? That in the next print, would there be that gap again?
that is only one part of the solution, in order for the current offset to be displayed it wants you to put that command in the box in GCode Scripts settings.
The user wouldn't have posted it if it didn't work I don't think.
As stated above, there is only the single line added in settings. The rest you need to manually add to OctoPrint's config.yaml file. To do this you would SSH to the pi and run the command nano ~/.octoprint/config.yaml which will open a text editor. You then can copy/paste the large block into that file. Then press ctrl+s to save and ctrl+x to exit. After saving restart OctoPrint and on the control tab you will have the new buttons.
Correct
The settings should remain until the printer is power cycled. Best to just save it once it's where it needs to be.
apologies for being late to the game here, but I can answer any questions you may have given the custom control config.yaml and startup gcode snippet from the referenced post.
The approach I took takes advantage of a little known built-in feature where you can embed custom commands within the Control tab.... I then do some font trickery to get them to show up as buttons.
I use this to this day on my Ender 3 S1Pro. For something so simple, it was a game changer for managing my Ender without having to dork around with the touchscreen.