Setting up OctoPrint on TrueNAS 13 server inside iocage Jails
I have a TrueNAS server setup which I use to run a lot of services and also use it to run my OctoPrint instances to save resources instead of using multiple small single-board computers since i already have the server running anyway.
UPDATED 29/04/2024.
Since I didn’t find any documentation regarding setting up and running OctoPrint on FreeBSD (much less FreeNAS), I thought it was a good idea to post a guide describing how I did it and save some time for anyone else trying to accomplish the same. I plan to update and correct this guide from time to time, i’m open to suggestions as this is my first guide.
I won’t cover how to install FreeNAS or setup iocage as it is already well covered in the FreeNAS User Guide.
Creating a Jail for OctoPrint
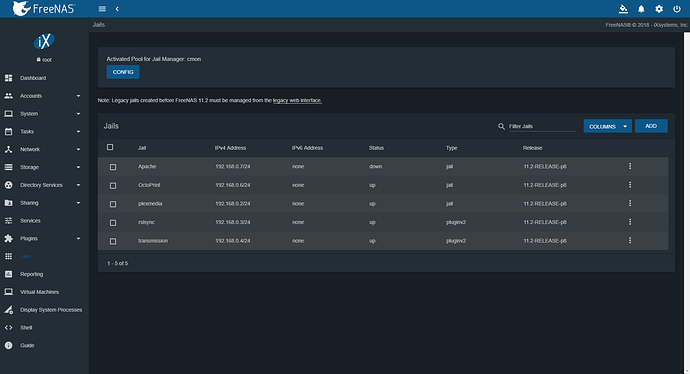
Open your FreeNAS server dashboard on your browser, select Jails in the left-side drop-down list:
The Jails menu will open, now select add in order to create a new Jail:
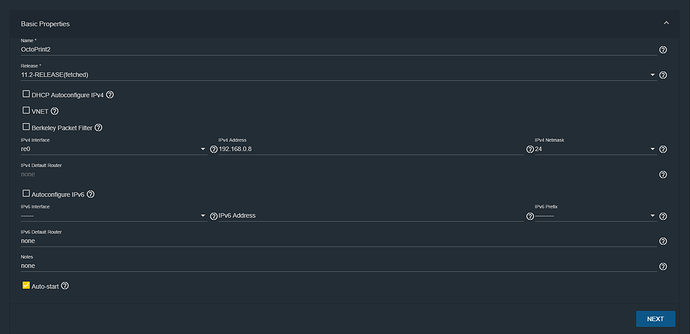
Select advanced Jail Creation :Give the Jail a recognizable name, select 12.3 (or the newest possible version) for Release, select your NIC in IPv4 Interface, give it an IP address(we’ll use it to access the OctoPrint interface later) and an according Netmask. Mark Auto-start then click NEXT:
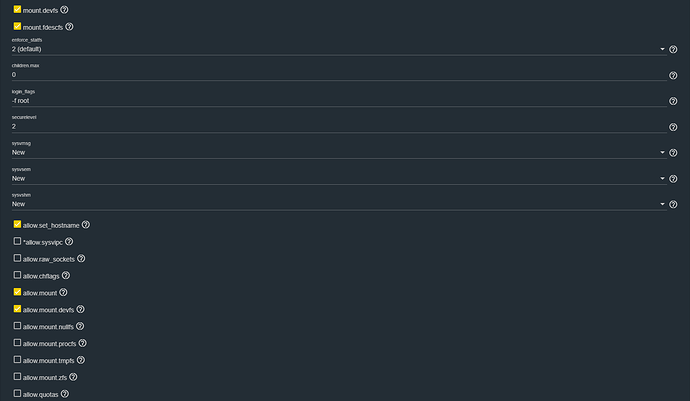
Now in Jail properties, change devfs_ruleset to 3, this will allow the Jail to access the /dev folder and consequently talk to USB devices, that wouldn’t be possible if you left it as default (ruleset 4), and the Jail wouldn’t be able to talk to your 3D Printer.
Mark mount.devfs, allow.mount and allow.mount.devfs You don’t need to mess with anything else here, press SAVE, we’re done setting up the Jail.Installing necessary packages
You need to install python, pip and other packages for OctoPrint to run on the Jail, for that we need to start a shell inside the Jail. There’s 2 ways you can go about it:
You can just click the 3 dots and start a Shell from the WebUI:
Or you can SSH into your FreeNAS server (you have to enable and setup SSH beforehand for that) and only then start a Shell inside the Jail using the commands:
iocage list
will list active Jails, useful for seing the Jail ID and name
 root@freenas[~]# iocage list

 +-----+------------+-------+--------------+----------------+

 | JID | NAME | STATE | RELEASE | IP4 |

 +=====+============+=======+==============+================+

 | 8 | Octo1 | up | 12.3-RELEASE | 192.168.0.6/24 |

 +-----+------------+-------+--------------+----------------+

 | 2 | Octo2 | up | 12.3-RELEASE | 192.168.0.8 |

 +-----+------------+-------+--------------+----------------+

 | 9 | Octo3 | up | 12.3-RELEASE | 192.168.0.9 |

 +-----+------------+-------+--------------+----------------+

 | 3 | Reslilio | up | 12.3-RELEASE | 192.168.0.3 |

 +-----+------------+-------+--------------+----------------+

 | 4 | Trans | up | 12.3-RELEASE | 192.168.0.4 |

 +-----+------------+-------+--------------+----------------+

 | 5 | mineserver | up | 12.3-RELEASE | 192.168.0.12 |

 +-----+------------+-------+--------------+----------------+

 root@freenas[~]# iocage console Octo2
iocage is the default Jail manager used in FreeNAS 13, use this command with the respective name of your Jail.
root@freenas[~]# iocage console NameOfYourJail

...

root@OctoPrint2:~ #
Now that you have a shell as root inside the Jail, let’s install pkg, python, pip and everything else
root@OctoPrint2:~ #pkg install pkg nano python python3 git bash py39-pip
now we can create a folder and download OctoPrint:
root@OctoPrint2:~ #mkdir /OctoPrint
root@OctoPrint2:~ # python3 -m venv /OctoPrint
root@OctoPrint2:~ # /OctoPrint/bin/pip install OctoPrint
root@OctoPrint2:~Print # /OctoPrint/bin/python3 -m pip install --upgrade pip
You should then be able to manually start the OctoPrint server, if you want to, if you followed all the steps correctly until now, you won’t need to:
[venv] root@OctoPrint2:~/OctoPrint # ./OctoPrint/bin/octoprint serve --iknowwhatimdoing
OctoPrint should start without issues, press Ctrl + c to close it.
USB Connectivity
Connect your 3D Printer to an USB port on your FreeNAS server and run usbconfig inside the Jail and note wich serial device is your 3D Printer:
[venv] root@OctoPrint2:~/OctoPrint # usbconfig
ugen4.2: <FTDI FT232R USB UART> at usbus4, cfg=0 md=HOST spd=FULL (12Mbps) pwr=ON (90mA)

 ugen2.2: <Generic Mass Storage> at usbus2, cfg=0 md=HOST spd=HIGH (480Mbps) pwr=ON (200mA)
Here we can see that my 3D Printer is connected to usbus4 and is listed as ugen4.2 in FreeNAS.
Creating a Start script for OctoPrint in the Jail
Thanks to user James_Burnett for this rc.d init script, i take no credit for this script, i’m adding it as part of this guide to increase functionality for the users, i take no credit for this script.
Let’s create the script using nano:
[venv] root@OctoPrint2:~ # nano /etc/rc.d/octoprint
copy and paste this in the file and press Ctrl + o to save it:
#!bin/sh

# PROVIDE: octoprint
# REQUIRE: DEAMON NETWORKING

. /etc/rc.subr

base_path="/root/OctoPrint"

name="octoprint"
rcvar="octoprint_enable"
pidfile="${base_path}/octoprint.pid"

command="/usr/sbin/daemon"
command_args="-p ${pidfile} -f -c ${base_path}/bin/octoprint serve --iknowwhatimdoing"

procname="${base_path}/bin/octoprint"
command_interpreter="/root/OctoPrint/bin/python3"

run_rc_command "$1"
Add octoprint_enable="YES" to rc.conf and everything should just work.
Once you have the file saved, grant it running permissions:
[venv] root@OctoPrint2:~ # chmod +x /etc/rc.d/octoprint
Now we need to add octoprint_enable=”YES” to the rc.conf file.
root@OctoPrint2:~ # nano /etc/rc.conf

cron_flags="$cron_flags -J 15"

# Disable Sendmail by default

sendmail_enable="NO"

sendmail_submit_enable="NO"

sendmail_outbound_enable="NO"

sendmail_msp_queue_enable="NO"

# Run secure syslog

syslogd_flags="-c -ss"

# Enable IPv6

ipv6_activate_all_interfaces="YES"

hostname="OctoPrint2"

octoprint_enable="YES"
Don’t copy this and put into your file, just add the last line: octoprint_enable=”YES”
Press Ctrl + c to save, exit out of the jail and restart it:
root@OctoPrint2:~ # exit
root@freenas:~ # iocage restart OctoPrint2
Now check the Jail assigned IP using port 5000 in your browser to access octoprint, it should be running at this point. rc.d is a little sketchy on FreeNAS Jails, if you try using the normal “service octoprint start/restart” commands, it will error out, but somehow rc.d manages to run the script when the Jail boots, for that sole reason, put “service octoprint onerestart” in “Restart OctoPrint” on the “Commands” tab when you start setting it up.


