What to do with / how to apply Bed Visualizer data?

Printer: Maker Select v2.1
Sensor: 3dtouch clone from aliexpress
Firmware: Marlin 1.1.9.1

Is it frowned upon to tag the creator? @jneilliii

HERE are my Bed Visualizer settings for reference.
HERE is the relevant auto-level section from my Marlin config

Hello all! Longtime lurker, finally posting after I ran through tons of test runs with Bed Visualizer. So after a number my finally got my mesh visualization to look like THIS, which seems pretty good even for the weird middle kink and visualized wide v-shape it shows.

Now I've seen a lot of people reference 'Save to EEPROM', and I swear I saw that setting at one point, but now I don't see it anymore. I also read in another thread the addon's creator mention not every printer allows that so it's not there? Is that an M501 command I need to put into my GCODE?

My problem is that even with it looking like this, I still tend to get a bunch of under extrusion on one side and then the printed filament starts bunching up . Now correct me if I'm wrong, but I'm under the impression that if you run a 9-pt auto-level at the beginning of the print, the printer can use that info to make corrections during the print to account for the calculated differences. Is this true?

I have Bed Level Visualizer utilizing the following code for 'GCODE Commands for Mesh Update Process' in the 'Bed Visualizer' Settings:

M155 S30			; set temperature reporting delay, use a value longer than the time it takes for your leveling command to complete.
@BEDLEVELVISUALIZER	; instruct plugin to start recording responses from printer.
G29 T				; report the bed leveling mesh points.
M155 S3				; set the temperature reporting delay back to a shorter time span.

I then took some of that syntax and reused it for my 'Before print job starts' GCODE in the Octoprint settings:

M140 S65			; set bed temp
M104 S160			; begin preheating extruder temperature
M190 S65			; wait for bed temp
G28					; home all axes
@BEDLEVELVISUALIZER	; instruct plugin to start recording responses from printer.
M420 V				; ?
G29 T				; level bed & report to bed visualizer
G4 P200				; wait 0.2 seconds
G1 X0.0 Y0.0 F2000	; return to front left corner
G1 Z1				; moves Z up so nozzle does not touch bed
G4 P200				; wait 0.2 seconds
M109 S215 T0		; wait for extruder to heat before creating purge line
G92 E0				; zero the extruded length
G1 X50.0 F500 E25.0	; start purge line and extrude 35mm
G92 E0				; zero the extruded length again

Now, some of this is piecemealed together from multiple sources - some being the forums here - but I'm trying to figure out why it seems like none of this code actually takes into consideration the bed level calcualtions.

Some questions after all that info:

  • Do I need to add an M500 & M501 to reset and save?
  • Does adding '@BEDLEVELVISUALIZER' to Octoprint's pre-print GCODE allow for this stuff to get calculated, or do I just use G29 for that?
  • Is the M420 command the one that should hypothetically take the calculations and load them for use during the print?

I appreciate any and all help and if more info is needed, please don't hesitate to ask!
If running Marlin firmware, which gcodes you use is dependent on which kind of bed leveling is used. You can read exactly how the firmware responds for Marlin here. Note that there are multiple G29 definitions. You can get into the terminal of OctoPrint and do an M420 V1 you will see something like this:

Send: M420 V1
Recv: Bilinear Leveling Grid:
Recv: 0 1 2 3 4
Recv: 0 +0.193 +0.361 +0.337 +0.223 +0.035
Recv: 1 +0.048 +0.240 +0.291 +0.198 -0.023
Recv: 2 +0.019 +0.162 +0.108 -0.045 -0.113
Recv: 3 +0.037 +0.096 +0.104 +0.035 +0.060
Recv: 4 +0.041 +0.053 -0.025 -0.171 -0.028
Recv:
Recv: echo:Bed Leveling ON
Recv: echo:Fade Height 4.00

Note that it says I am using Bilinear leveling. So the G29 for Bilinear is relevant for this printer. FWIW I generally don't level every print. I heat the bed and manually run the leveling if something changes or my prints seem off. Then I do an M500 (store settings). My print startup has an M420 S1 which turns on the bed leveling stored in the default leveling slot.

Besides using M420 with no parameters to see if leveling is on and whether you are using z-height fade, you can watch the z-rod coupler as things are printing. You should see it move slightly if your bed is not perfectly level (which is darn near everybody).

There are a number of ways to accomplish leveling, using, saving, etc. So you will likely hear others doing it differently. You will want to work out what is best for your situation.

Edit. I didn't see that @michaeldvinci had posted his Marlin setup. Sorry if I was over-descriptive for the stated problem. Here is a snip for startup with auto leveling every print:

G28 ;Home
M420 S1 Z4 ; Set bed leveling on with a 4 layer fade out

If you want to level every print:

G28 ;Home
G29 ; Level

The @BEDLEVELVISUALIZER is only for use in the plugin setup
The M420 V just spits out the current leveling numbers

The nice thing about the visualizer is that you can use it for getting your bed as level as possible by doing the @jneilliii home/level/capture/store cycle in the plugin setup. Then you can choose to level/not-level each print, knowing that you have your bed tuned in.

1 Like

The save to EEPROM command is M500

This is the command that will report the mesh data if it exists in EEPROM. Should probably be removed from your slicer settings.

The plugin does nothing but visualize the data reported by the firmware. It will not make corrections, that's what G29 is supposed to do.

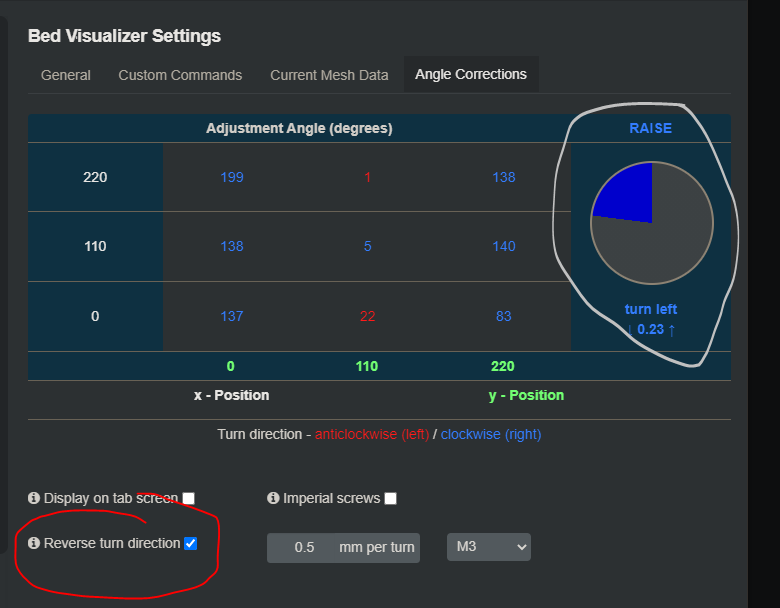
The turn direction points seem to be for looking at the bed from the back of the printer instead of the front. Or I'm I doing something wrong?

There's a couple of options for flipping in both the mesh tab and corrections tab. I assume you just need to flip the corrections tab. Sorry, that part of the plugin was not added by me, so I don't know much about how it works.

[and @TxBillbr]

Thank you for this info! I've cleaned up my startup script a bit to get a better pre-print set of instruction.

Mind explaining the benefit of setting the Z layer fade layer ? I get that it lessens the correction up to the defined Z, but is that just because it's assuming everything should be level by that height?

My Print bed looks to be even more level now (even with that weird kinked angle) but I'm still getting under extrusion in some places and places where it seems to barely adhere to the board. you can see below, the values are getting stored correctly after adding M500 to my Bed visualizer setting.

Send: M420 V1
Recv: Bilinear Leveling Grid:
Recv:       0      1      2
Recv:  0 -0.190 +0.030 -0.115
Recv:  1 -0.192 -0.007 -0.195
Recv:  2 -0.277 +0.002 -0.192
Recv: 
Recv: echo:Bed Leveling On
Recv: echo:Fade Height 4.00
Recv: ok

mesh data in settings ***fixed link

I also rearranged the before print gcode, as I saw I was doing M420 V and it was before G29, which even though that was the wrong 420 flag anyway, now that I understand it better it was still the wrong order for them to begin with.

I updated it to:

M190 S65			; wait for bed temp
G28					; home all axes
G29					; bilinear level
M500				; save info
M420 S1				; grab & enable bed level info
M420 V1				; print bed level info to term to verify

[for the time being], but like I said -- I'm still seeing under extrusion and a lack of adhesion [filament settles like a wave almost, usually think of this as the extruder is too high] with my prints which I just do not understand.

I tested out the visualizer by trying to stop the sensor early and see if it's correctly listing the correct point at the correct plane, but strangely it never seemed to actually notice if I stopped the 3dtouch multiple mm higher than it should have been or not. Is there any way to trick this properly to verify the data is formatted correctly?

I see. The mesh direction is accurate and I can use it to make manual corrections. The angle corrections cannot be flipped. In any case I can just use those by adjusting the orientation mentally, or simply do iterative corrections manually.

The option you're looking for is 'Reverse turn direction. Heads up as it won't change the 'Turn direction' text at the bottom, but it will change the text below the circle

Oh I see I'll try it. Thanks.

sidenote, if you mean the 0 -> 220 point labels on the chart, I had to use 'Descending y axis' on the 'Current Mesh Data' tab to get them to look like it does below on both charts

220

110

0
     0      110     220

Yes that's what I mean. Thank you.

That worked. I'm also having issues similar to yours. I'm wondering if the correction is actually being applied. I'm still printing with adjusting the bed as flat as possible manually. Also the glass bed in my case is being warped by too tight clips. However I believe it should be able to correct for a warped bed.

I generally don't save settings in my startup. Also in testing if you do a G29 in your startup, the leveling is automatically on. So if doing the leveling for every print, you could just leave off the M500, and the M420 commands.

As to the z fade, you are correct. it gradually changes the impact of unlevelness in however many layers you specify. If M420 Z is not set, then it just follows the bed contours for the whole print.

It is always a good thing to try to get your bed as level as possible before the leveling. I have a CR10 clone that goes wonky once in a while and the left side goes way out. I see in your numbers you have a layer height difference between your center and one corner. So getting the bed corners at the same height will minimize the "tilt". ABL fixes lots of things but seem to struggle on the stuff that is way out. Some of the variance you see could be your ABL sensor. There is a calibration test that you can run (it may have to be enabled in the firmware) Take a look at the M48 command. It does a probe accuracy test.

I did a M503 and saw everything is running fine and the results reflect that. If anything it was my fault when I set "set origin at center" and "set relative positions". Reverting yielded a very interesting first bed probing result where it looked like there was a "black hole" in the center of the bed. It corrected on the second probing. It was actually pretty funny! Amazing plugin!

1 Like

Thanks, I appreciate it.

Question: after running the above GCODE should I add an M500 to store the bed level data for next session (restart of printer)?

Yes, if you have EEPROM enabled that's not a bad idea.

Hello. New to Octoprint. I read the instructions above but I am somewhat lost. I have a PRUSA MK3S 320. When I try and use Octoprint, the bed seems to be unlevel. From the SD card it prints OK not great. Is there a way to use Bed Visualizer and save the results so Octoprint can make minor corrections during the print? What would you need me to do to gather information to help me figure this out? I saw mention of saving to EEprom but I have no idea how to do that. Can I add GCODE to my slicer settings to make sure the bed is level before a print? I am currently using PRUSASLICER. Any info you need, please tell me how to find it and I will promptly provide it. Thank you for any replies.

The plugin does not do that, and never unless someone forks the plugin and maintains their own branch.

In marlin, that's typically an M500 gcode command, but I'm not sure if PrusaFirmware uses the same or not.

I would think so. Adding the start gcode to run a probe I would assume would activate the leveling correction. You may want to check out this guide, which uses OctoPrint and the PrusaMeshMap plugin, might be easier to follow, although it requires the nylock mod to your bed.

I tried the nyloc bed fix and never got it right. Had to go back to factory set up.

Medic433

Hello! I just started dabbling with your bed visualizer. First off, what a fantastic plugin. I have the data, but now don't know how to apply it to my G-codes when I print. is it as simple as putting a G29 in the before print starts Gcode section? or an M500? Using a CR 6 SE

Here's what I get from running the plugin
Recv: 0 1 2 3
Recv: 0 +0.153 +0.144 +0.175 +0.150
Recv: 1 +0.062 +0.053 +0.051 +0.016
Recv: 2 -0.051 -0.065 -0.085 -0.116
Recv: 3 -0.135 -0.161 -0.181 -0.213
Recv:
Recv: echo:No EEPROM.
Recv: X:205.00 Y:30.00 Z:2.82 E:17.61 Count X:16400 Y:2400 Z:1190
Recv: echo:busy: processing
Recv: ok
Send: M155 S3
Recv: ok
Send: M500
Recv: echo:No EEPROM.
Recv: ok