What follows here is a set of assorted guides related to OctoPrint that used to live on the wiki of the OctoPrint Github project. The guides are preserved here for historical reasons and make no claim to still being up to date, correct and maintained!
by @bladykast and @sashalex007 on Github
Installation on Android through Debian Kit
Debian Kit installation on Android
Notices, Disclaimers and Tips:
-
You need your device rooted.
-
***2019 update: Depending on your printer's board, more likely than not your android device lacks the necessary drivers to be recognized by OctoPrint. Unfortunately, opening a connection with your printer in a serial terminal app is not a valid way of testing your drivers! The drivers need to function at the kernel level. You will need to compile a custom kernel and driver module and flash it to your device. Theoretically this should work for any android device. More on this later.
-
This is an OctoPrint server install. That means you are installing the server itself on your phone (so use a spare phone!). I recommend an OTG cable to connect your phone directly to your printer.
-
If you're planning to run this for any decent amount of time, and you're actually seriously considering this to use, I would recommend a USB hub (4 ports or higher, powered!!), and either a wireless charging solution or a hub that can charge the phone while using OTG functionality. (**Many android devices disable OTG functionality while charging, if you are compiling a custom kernel for your device, you can disable this)
-
This has the potential to screw a ton of things up in your device. Due to the nature of this install, if you go out of your way and try to mess with something, you can completely and irreplacebly damage your phone. Don't go poking around in the EFS partitions or modifying system files that actually turn out to be your IMEI.
-
If you didn't notice, this is experimental, and a work in progress! I don't think anyone has ever tried this before, so really, it's just me writing this guide. If you need better help, PM me on reddit or something.
Installation Guide
###This page goes over everything you'll need to do to get started.
Here is the repository for the files: http://sven-ola.commando.de/repo/
Note: the guide is a bit outdated; the debian-kit-1-6-testing.shar file allows you to install much newer distributions than the guide goes over.
For this guide, you will install the jessie distribution of Debian. I recommend the 2GB size (max) just to have enough room to install everything comfortably and have ~1GB of space free. However, installation on an SD Card (32GB max) is also possible.
If anything goes screwey during the installation (which I know it will...), Google and the Known Issues page are your friends.
OctoPrint Installation
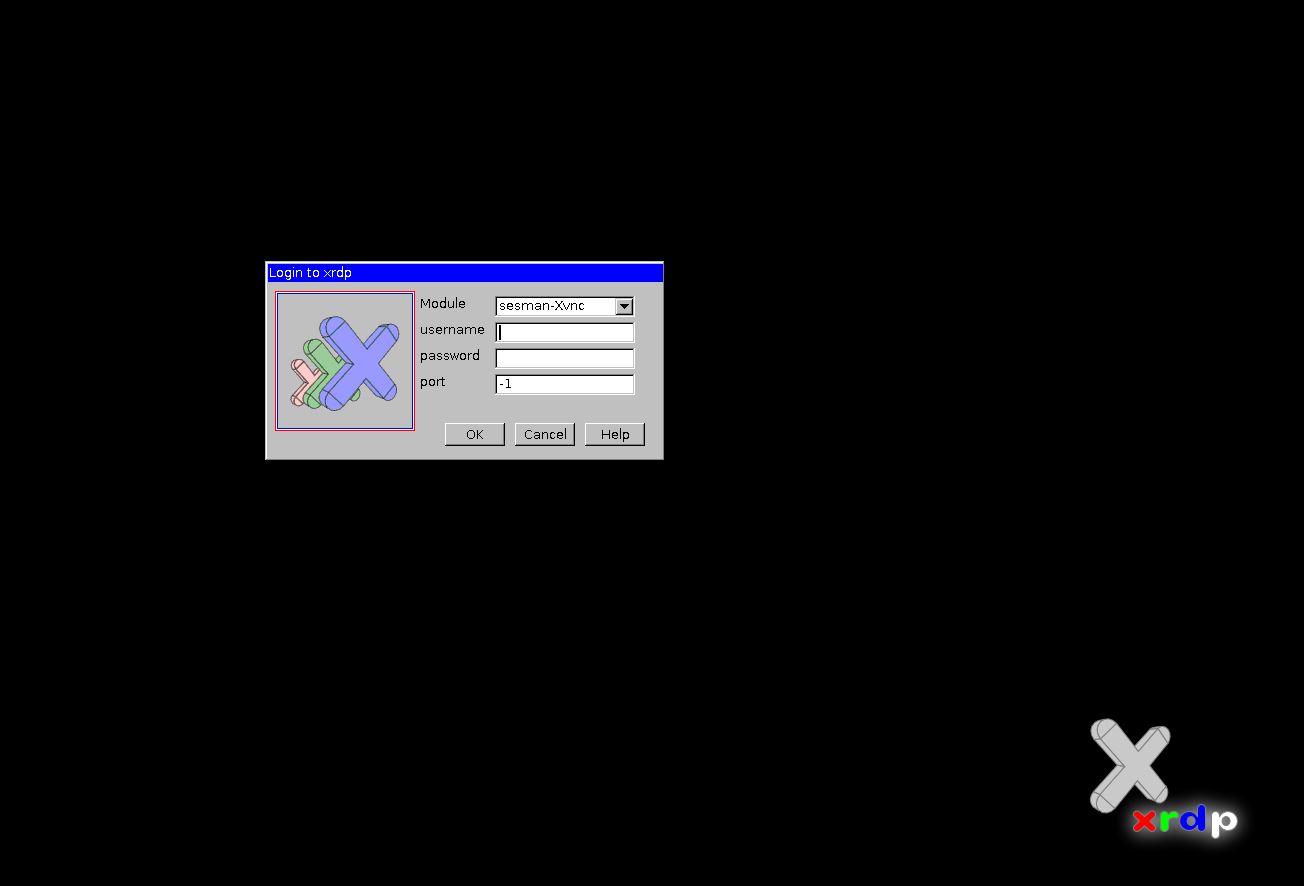
What you'll see after Debian Kit installation
Custom kernel update 2019
This a good time to test your drivers. Connect your printer to your android device and type "dmesg" into your shell. If your drivers are working correctly, you will see some kind of tty assignment in the driver output (ex. ttyUSB0). You can also check manually for it by entering "ls /dev". If there is no tty assignment, you need to compile and flash a custom linux kernel for your android device. This isn't for the faint of heart, but I can give you a good head start. There are numerous ways of doing this, but I'll share what worked for me.
-
Get yourself familiar with what a linux kernel is and why it needs to be compiled.
-
You will be compiling a custom linux kernel from source code, so you need to find sources of a kernel thats compatible with your device and build version. If your device manufacturer makes kernel sources available, you can use those but since I had trouble finding mine (Nexus 7 2013), I used sources of an ElementalX kernel for my device and build version.
-
Find out which driver you need. I have an Ender 3 so I needed the ch341 driver. Get your product and vendor ID from dmesg output and search for your driver. There is no need to download anything because drivers are compiled.
-
You need to be on a linux machine. I tried to compile from a Mac but it just kept failing. Easiest way is to run ubuntu from a virtual machine. There are many guides on how to do this.
-
To compile a kernel for an arm/arm64 device (or other), you need a toolchain for cross-compilation. I used the prebuilt toolchain provided in android-ndk package for linux, but others should work too.
-
You are now ready to compile. Your ubuntu installation is probably missing a bunch of packages you need so google your errors as they happen and install the right packages. Follow guide #1 and add drivers with guide #2. In guide #2 the author is compiling the FTDI_SIO driver, but instructions are valid for any driver. Even after compiling a functioning kernel with the correct driver, it still wasn't working so I had to separately compile the driver and side-load the module with "insmod" (more details in guide #2) NOTE: If you are using elementalX sources, the correct config file is Elementalx_defconfig (or the like), not the config file that corresponds to your device name.
-
If your build was successful (shouldn't take more than 30minutes), create a flashable kernel with the AnyKernel2 method (guide #1) and flash the kernel. Since my kernel was just a modified ElementalX build, I used their installation instructions but this method should work for any kernel.
-
Test your driver by looking for tty assignment in dmesg output. You may need to side-load your driver manually like I did.
I am not the original author of this guide, so if you have questions about this section you can pm me on reddit
Once you have finished installing Debian Kit (and checked out the Known Issues page, finished installing your DE, added a new user, and logged in remotely, you can now install OctoPrint. I followed Setup on a Raspberry Pi running Raspbian and the process was extremely smooth.
Make sure to install it in your home directory, otherwise OctoPrint will complain about running as root and refuse to run.
Webcam Setup (IP Webcam)
You're gonna need to download something like IP Webcam to run as an app in Android. Then you would just substitute the stream IP address into your config.yaml instead of using mjpg-streamer.
However, this comes with some very obvious cons.
- Lower powered phones tend to turn into potatos after a while (read: you literally can't open some types of apps), so this would be kinda risky, as one of the first things to be pushed out of memory would likely be this.
- This takes up much more CPU usage than
mjpg-streamer. And more memory. If you care about resources (again, with a low-powered device), you can experiment with this, but I would recommend an external webcam for best results.
Since I feel like people would value their camera access, I wouldn't really recommend method this unless you have a moderately powerful phone.
mjpg-streamer Setup
Alright, this one should be a little easier. To my knowledge, it's extremely hard to get the in-built cameras (front facing or rear) running though this method. (There's a french Debian discussion board that tried it, but no luck). So, this section will concern running a USB webcam, through a hub.
Once you remote in to your Debian installation, run lsusb and ls /dev/video* with only an OTG cable or hub attached. You are looking for the differences of when you plug in a webcam.
Example of readouts without webcam attached
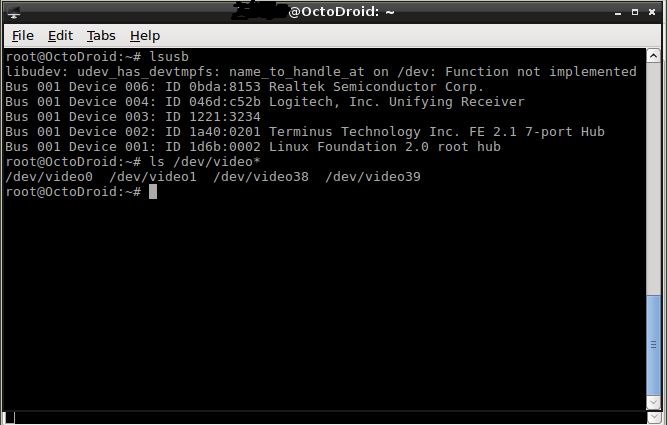
Example of readouts with webcam attached
The sample mjpg-streamer arguements should look something like:
./mjpg_streamer -i "./input_uvc.so" -o "./output_http.so".
Howver, the sample configuration will not suit us. So, using the /dev/video* device we found earlier, we will modify the argument to look something like this:
./mjpg_streamer -i "./input_uvc.so -d /dev/video3 -r 640x480 -f 30 -q 85" -o "./output_http.so".
This is just standard config for any UVC MJPG webcam, streaming at 480p 30fps at 85% quality. For a more comprehensive list of tweaks, workarounds, and for other arguments, see the Webcams Known To Work and the MJPG-Streamer configuration page.
You're finished!
If you successfully get OctoPrint and mjpg-streamer working, you're basically done.
For the more advanced user, you could just set this up as a headless configuration running two separate instances of screen. However, being that the CPU usage on my Galaxy S3 (d2spr) only peaked at 20% running OctoPrint, LXDE, and mjpg-streamer at the same time, the overhead on the phone from the DE was simply negligible enough to keep it. And it makes installation much easier, being you can remote in through a desktop and finish it just like a regular Linux install.
Victory Screen!
Known Issues
These are the known workarounds and troubleshooting steps for installing OctoPrint on Android through Debian Kit.
If Google and the installation pages can't help you, PM me on reddit.
Dead Repos (andromize/andromize-lxde won't install)
Run 'sudo apt-get install nano'
After installation is complete run 'sudo nano /etc/apt/sources.list.d/sven-ola.list'
Edit /etc/apt/sources.list.d/sven-ola.list to only have these two lines:
deb http://sven-ola.commando.de/repo jessie main
deb-src http://sven-ola.commando.de/repo jessie main
Afterwards, run apt-get update && apt-get upgrade && apt-get install andromize andromize-lxde
Upstart issues (Precise only..?)
If you get "initctl: Unable to connect to Upstart: Failed to connect to socket /com/ubuntu/upstart: Connection Refused", run these:
sudo dpkg-divert --local --rename --add /sbin/initctl
ln -s /bin/true /sbin/initctl
Passwd issues, Cannot change user password (Precise only...?)
If you get something like "passwd: u:r:init:s0 is not authorized to change user password", temporarily set SELinux to permissive by running:
echo 0 > /sys/fs/selinux/enforce.
When running dpkg or apt-get, you get "Cannot get security labeling handle: no such file or directory"
Again, SELinux issue. Just bypass it through mount -o remount,ro /sys/fs/selinux.
Cannot access system properties via ANDROID_PROPERTY_WORKSPACE
This should just be a harmless error code during startup (related to the androresolvd package), ignore it.
Useradd: group 1004 does not exist (when installing andromize-lxde)
Came in handy: http://android-dls.com/wiki/index.php?title=Android_UIDs_and_GIDs
- Edit /etc/group
- Find the line
input:x:101:(or whatever it might be, just find the "input" group line) - Change it to
input:x:1004:
No access to the internet when not running as root (Squeeze/Precise only...?)
Add yourself to group inet by running adduser <your username> inet.
Can't access XRDP after rebooting
- Add yourself to group
xrdpby runningadduser <your username> xrdp. - Run
echo lxsession -s LXDE -e LXDE > ~/.xsession
You get a grey screen after logging in through XRDP
- Run
echo lxsession -s LXDE -e LXDE > ~/.xsession.
If this doesn't fix the grey screen, your can follow this guide to use vncserver instead and even connect to the instance from your desktop (vnc client required). .bashrc modifications are not required, just run 'vncserver' from your user shell (not root!). A GUI is a luxury, not a necessity, you can actually complete this entire guide through the shell.
"Failed to open connection to 'system' message bus" (when installing dbus or avahi-daemon)
Run sudo apt-get --reinstall dbus avahi-daemon
"OctoPrint requires python 2.7.9"
If you follow the sven-ola guide, your python version will be 2.7.3. OctoPrint needs at least 2.7.9. Follow this guide to update python version and create a new virtualenv like this 'virtualenv -p python2.7'. Check python version in your virtualenv before installing octoprint.
ttyUSB0 (or other) permission denied
I was unable to fix this with udev rules, although that might work for you. I ended up writing small script that continuously checks for tty connection and fixes permissions accordingly (permissions reset every time devices is connected). Here is my script, you will need to adjust to your device name (put it at the end of /root/.bashrc)
while :
do
  if [ -e /dev/ttyUSB0 ]; then
      if [ `stat -c %A /dev/ttyUSB0 | sed ''` == "crw-------" ]; then
          sudo chmod 666 /dev/ttyUSB0
          echo "Device connected"
      fi
  fi
  sleep 1
done
IF YOU'RE USING EXTERNAL SD CARD OR USB STORAGE, make sure to unmount them first in Settings>Storage.
To completely restart XRDP/TightVNC:
./bootdeb
service xrdp stop
xrdp -kill
vncserver kill :1
vncserver kill :2
rm -f /var/run/xrdp/*.pid
rm -f /root/.vnc/*.log
rm -f /tmp/.X1-lock
rm -f /tmp/.X11-unix/X1
vncserver
service xrdp start
Or Just reinstall it.
mount -o remount,ro /sys/fs/selinux
sudo apt-get purge andromize andromize-lxde
sudo apt-get install andromize andromize-lxde
by @patrickelectric, @Williangalvani, @sysr-q, @ngdio, @Jakeler and @HailStorm32 on Github
Setup on a Raspberry Pi running ArchLinux
Arch User Repository
octoprint-venv virtualenv package
The dependencies from the official Arch Repos are too new for octoprint, therefore it is recommended to install in a python virtualenv, which just contains the correct/required dependency versions.
Instead of going through the manual installation, you can use the octoprint-venv AUR package to do this.
It will automatically install into a virtualenv placed in /opt/octoprint, create an specific octoprint user with the needed permissions and the systemd octoprint.service.
octoprint package using system python dependencies
If you want to install OctoPrint without an virtualenv, you can use the octoprint AUR package
Please keep in mind that this is not the officially supported way, this AUR package uses patches to support newer versions of dependencies that the stable version of OctoPrint would not support just yet.
Instructions
If you are using an AUR helper like yay, simply install the octoprint-venv or octoprint package. If not, proceed as follows:
-
Install the
base-develgroup and thegitpackage:pacman -S base-devel git -
Clone the
octoprintAUR sources:git clone https://aur.archlinux.org/octoprint.git -
Enter the cloned repository:
cd octoprint -
Start building and installing the
octoprintpackage:makepkg -si
For more detailed information take a look at the Arch Wiki.
Manual installation
Basic setup
For the basic package you'll need Python 2.7, VirtualEnv, and GCC (pacman -Sy python2 python2-virtualenv gcc). OctoPrint's dependencies will be installed by the setup.py script:
$ cd ~

($ means user shell, # means root shell)
Download source:
$ git clone https://github.com/foosel/OctoPrint.git
or
$ wget https://github.com/foosel/OctoPrint/archive/master.zip
$ mkdir OctoPrint
$ unzip master.zip OctoPrint
Install:
$ cd OctoPrint
$ virtualenv2 -p /usr/bin/python2 venv
$ ./venv/bin/python setup.py install
You may need to add the your user to the group uucp so that the user can access the serial ports (you will need to re-login):
# gpasswd -a YOURUSER uucp
You should then be able to start the OctoPrint server:
$ ~/OctoPrint/venv/bin/octoprint
Running on http://0.0.0.0:5000/
Running after boot.
Create a service:
# nano /etc/systemd/system/octo.service
Add to the file:
[Unit]
    Description=OctoPrint service

[Service]
    User=youruser
    ExecStart=full/path/to/bin/octoprint

[Install]
    WantedBy=multi-user.target
And enable:
# systemctl enable octo
# systemctl start octo
Setup BeagleBone Black Rev C (Jessie)
OctoPrint on BeagleBone Black Debian
This installs the testing Jessie Debian image from eLinux.org and then walks through setup of OctoPrint on that image.
Download Debian from the official source and install
http://beagleboard.org/latest-images
You can select any of the debian (with or without graphical desktop) distribution for BeagleBone and PocketBeagle via microSD card.
Unpack (with Windows use 7zip) or unxz file_downloaded.tar.xz followed by tar -xf file_downloaded.tar if you are using unix.
Write to SD Card (with Windows use Win32DiskImager) or dd if=file_downloaded.img of=/dev/sdb (or of=/dev/sdc)
If you prefer to use the image on the microSD card instead of the internal flash memory, instead the microSD card into your computer (after ejecting) and then delete the MLO file located in boot > uboot directory.
Insert SD Card into BBB
If you want to use the internal flash memory of the beaglebone, then power the beaglebone with Boot Switch (switch located closed to the microSD card) pressed until LEDS flash. When Cylon pattern is complete, remove microSD card and restart the beaglebone black. Please note that this may take up to 45 minutes to complete.
You can either use PuTTy (Windows) or ssh debian@192.168.7.2 (unix) to log into 192.168.7.2 since this is generally the default IP address of the beaglebone black. The default username/password of the debian distribution is debian/temppwd
Please change the password using passwd. Once connected, you will see debian@beaglebone:~$
Setup BBB to run in performance mode
Optional step (but be sure to check as the cpufreq is set to performance by default), highly recommended since this will avoid stuttering of your 3D printer.
nano /etc/init.d/cpufrequtils
Update
I highly recommend to update the system for overall stability. To achieve that sudo apt-get update && apt-get upgrade has to be issued and pressing Y (or simply enter) when prompter to do so.
Internet Connectivity
If you are using an ethernet cable, please skip the following and move on to Get OctoPrint. For wifi, issue connmanctl
connmanctl> scan wifi
connmanctl> services
connmanctl> agent on
connmanctl> connect wifi_dc85de828967_38303944616e69656c73_managed_psk
connmanctl> quit
Install pip and OctoPrint
sudo apt-get update
sudo apt-get install python-pip python-virtualenv
mkdir ~/OctoPrint
virtualenv ~/OctoPrint/venv
source ~/OctoPrint/venv/bin/activate
pip install --upgrade pip
pip install --upgrade setuptools
pip install --upgrade distribute
pip install OctoPrint
To test that everything is working well, issue, octoprint serve and you will see that octoprint is starting and the ip address will be given on the last time. Mine was looked like ...'base_url': 'http://192.168.7.2:5000/'
In your browser, navigate to http://192.168.7.2:5000/
To setup OctoPrint to automatically start at boot
On beaglebone, Ctrl-C to stop octoprint server is it is running. Download the following files from the creator's github page.
wget https://github.com/foosel/OctoPrint/raw/master/scripts/octoprint.init && sudo mv octoprint.init /etc/init.d/octoprint
wget https://github.com/foosel/OctoPrint/raw/master/scripts/octoprint.default && sudo mv octoprint.default /etc/default/octoprint
sudo nano /etc/default/octoprint and change all instances of pi to debian since this is our default username. An alternative option is to create user pi and then leave this file as is.
DAEMON=/home/debian/OctoPrint/venv/bin/octoprint is the path of the octoprint executable and should be changed to reflect that. Please note that the # in front of DAEMON has to be removed.
sudo chmod +x /etc/init.d/octoprint
sudo update-rc.d octoprint defaults
Startup Check
sudo service octoprint start
There should be no error when the above command is issued.
reboot to restart the beaglebone and have octoprint automatically start when booting. Connect your 3D printer to the USB port of the beaglebone black and proceed. If you need to know the ip address of the beaglebone, issue ifconfig -a and the ip address of the beaglebone will be under either eth0 (ethernet port) or wlan0 (wifi) and the keyword to look for is inet.
In your browser, navigate to <ip address>:5000/ (eg 192.168.1.9:5000)
Updated Jan 2019. Please send me a message is something is not clear (https://github.com/zafff)
by @TopherMan, @wildcardfox, @dushyantahuja, @IdefixRC and @XneddyX on Github
Setup OctoPrint with Smoothie
Since this guide was originally written, traditional SD streaming commands were added to Smoothie, so it is no longer necessary to do this to use the SD card. However, it is much, much faster to transfer using the USB mass storage device functionality of Smoothie, so this suggests two methods.
Safe Method
The premise of this method is to create a script that auto-mounts, transfers files from the upload folder, and unmounts Smoothie. This assumes you are using the default uploads folder: ~/.octoprint/uploads.
- Install OctoPrint on your server. The devel branch has been tested and works, presumably the master branch will work as well.
- Flash Smoothie with a new build of the edge branch--the master branch and older copies of edge will fail.
- Create a folder for Smoothie to mount at.
sudo mkdir /media/Smoothie
- Create an upload script. In this example, I created it in the folder ~/scripts.
nano ~/scripts/SmoothieUpload.sh
- Copy and paste the following text into SmoothieUpload.sh. Note that I am assuming the name of the SD card is 'Smoothie'. Either rename your card, or change /dev/disk/by-label/Smoothie to /dev/disk/by-label/<YOUR_CARD_NAME>.
#!/bin/bash
# This will mount Smoothie, copy Octoprint's upload folder to the SD card, and then unmount.

sudo mount -tvfat -onoexec,nodev,noatime,nodiratime,gid=pi,uid=pi,dmask=0002,fmask=0113 /dev/disk/by-label/Smoothie /media/Smoothie

cp /home/pi/.octoprint/uploads/*.g* /media/Smoothie

sudo sync
sudo umount /media/Smoothie
Then save file ^X, Y (for yes), and then click enter to save under the name.
- Make the file executable.
chmod +x ~/scripts/SmoothieUpload.sh
- Add the following to your config.yaml file by typing: sudo nano ~/.octoprint/config.yaml
system:
  actions:
  - action: copy
    command: /home/pi/scripts/SmoothieUpload.sh
    confirm: You are about to copy files to SD
    name: Copy to SD
- Restart OctoPrint.
- To upload files to Smoothie, first use the Upload button. NOTE: DO NOT use the "Upload to SD" button--it won't break anything, but it defeats the purpose of all this work.
- Once the file or files are uploaded, press System -> Copy to SD.
- You will be notified when the upload is complete. This usually takes a minute or two for large (>10Mb) files.
- Refresh SD files, and you're ready to print! I recommend you delete the locally-stored copies of the files so later on you don't continually re-upload them.
Troubleshooting:
If you get an error when you try to save that says "No such file exists", save the SmoothieUpload.sh to home/pi by typing:
-
nano ~/SmoothieUpload.sh
-
Then insert the text in #4 as mentioned above ^.
-
Then execute with chmod +x ~/SmoothieUpload.sh
-
When you config.yaml file... make the command: /home/pi/SmoothieUpload.sh
If you receive a sudo error after executing "Copy to SD" from the system menu inside Octoprint then try and add script commands (mount, umount and sync) to the sudo password exclusion list for the user pi as follows:
-
SSH into the pi
-
sudo visudo
-
add the following line to the end of the file: pi ALL = NOPASSWD: /bin/mount, /bin/umount, /bin/sync
-
save the file and reboot (sudo reboot now)
Optional folder handling:
Note: Now with Folder support in Octoprint, you can create a folder called SD and move all files in the SD folder to the SD card by changing the following line in SmoothieUpload.sh
cp /home/pi/.octoprint/uploads/.g /media/Smoothie
to
mv /home/pi/.octoprint/uploads/SD/.g /media/Smoothie
This would allow you to keep some gcode files in Octoprint and move only the ones you want to the SD card. Also, this would ensure that files are not copied multiple times to the SD card (which would simply take a long time). This is specially useful for large gcode files with a lot of small moves - that may slow down the printer if streamed through Octoprint.
Risky Method
This is the method I originally used, which mounts the SD card automatically and uploads files directly to it by using it as OctoPrint's uploads folder. Slightly faster, and eliminates a button click, but it has two downsides. First, it means your server and your microcontroller both have access to the card at the same time, which could be dangerous (don't edit files while you're printing!), and second, it makes Octoprint a bit sluggish.
-
Install OctoPrint on your server. The devel branch has been tested and works, presumably the master branch will work as well.
-
Flash Smoothie with a new build of the edge branch--the master branch and older copies of edge will fail.
-
Install usbmount on the server.
sudo apt-get install usbmount
-
Open /etc/usbmount/usbmount.conf as superuser.
-
In the MOUNTOPTIONS line, remove sync.
NOTE: this prevents extremely slow writes to the SD card, but can cause data loss if you do not perform a sync before removing or resetting your Smoothieboard. -
replace the FS_MOUNTOPTIONS with the following line:
FS_MOUNTOPTIONS="-fstype=vfat,gid=<USER>,uid=<USER>,dmask=0002,fmask=0113"
Note that <USER> should be replaced with the groupid and userid of the user under whom OctoPrint runs. On a standard installation on Rasbian, <USER>=pi for both.
-
Attach your Smoothieboard to the server. Make sure that under /media/usb0 you see a config file, and it is owned and editable by you. If you have multiple USB devices attached, there may be issues if the numbering changes, I do not yet know a way to ensure that Smoothieboard is always usb0 if there are multiple mass storage devices.
-
Either through the Settings pop-up or through editing config.yaml, make sure OctoPrint has SD support enabled and set the Upload folder to /media/usb0.
-
Restart OctoPrint.
-
To upload a file, use the Upload button.
NOTE: DO NOT use the "Upload to SD" button--it won't break anything, but it defeats the purpose of mounting the card. -
Once the file is uploaded, click on the SD card icon, and click "Refresh SD". If the newly-uploaded file does not appear, wait a few seconds and try again. If it still does not appear, confirm that the upload folder is set correctly. If it is, perform the command "sudo sync" on your server to force a sync.
-
You can now print the file. Each file will appear twice, since the local file system and the SD card are the same thing, so either set the file tab to only show files stored on SD, or be sure to select the copy of the file with "n/a" as the size.
by @jakevossen5 and many contributors on Github
Using an Android phone as a webcam
Prerequisites
- Octoprint up and running on a device such as the Raspberry Pi.
- An old Android phone.
- WiFi/LAN for the Android phone.
- Constant power for the Android Phone.
Android setup
Getting a Static IP
- For most phones, go to Settings > Wifi > Long hold [YOURSSID] > Advanced options > IP settings > Static
Setup
- Connect your android phone to a wireless network and a charger.
- Install IP webcam.
- [Optional] Under Power management, enable "Deactivate display" which will turn of the phones display when you aren't connected.
- [Optional] Under MISC, disable Audio mode.
- [Optional] Under MISC, enable Stream on device boot.
- [Optional] Under Video Preferences, change the Main camera and Secondary camera depending on the which camera will be facing you printer.
- Select Start Server at the bottom of the screen.
Getting your IP
- Select How do I connect? On the top left.
- Select Connect Directly.
- Select I'm Using a Wifi Router.
- Write down/remember the IP address. You will need this later.
OctoPrint setup
- Go to your OctoPrint Server.
- Open Settings.
- Select Webcam & Timelapse on the left hand side
- Next to Stream URL, enter
http://[androidPhoneIP]:8080/videoreplacing androidPhoneIP from the IP you got earlier. - Next to Snapshot URL, enter
http://[androidPhoneIP]:8080/shot.jpgreplacing androidPhoneIP from the IP you got earlier. If you get "Could not retrieve snapshot URL, please double check the URL" tryhttp://[androidPhoneIP]:8080/photo.jpginstead. You can also usehttp://[androidPhoneIP]:8080/photoaf.jpg- this would focus the camera before taking a photo. - Change the orientation/rotation to suite your needs.
Getting it to work outside your network
This is beyond the scope of this tutorial, but here is how you would go about doing it. You would buy a domain(I use Google domains) and set up a subdomain(such as webcam.yourdomain.com) and have it forward to a port, that you set up with your router to forward it to your android phone. This would then not work in your local network, so you would have to set up a DNS server to point it to where you want. You could use pi-hole, or a custom DNS server (you can look it up on google for guides) and then point it to your phone. The port for outside the network will have to be the same port you access it from inside the network to the device, because you can only have one URL.
Controlling the Camera using adb (Optional)
This section is optional - it allows you to switch on and off the camera using system commands. Keeps the phone cool and doesn't over-heat the camera for no reason.
Enable ADB over Wifi on your phone
http://codetheory.in/android-debug-bridge-adb-wireless-debugging-over-wi-fi/
- Connect your phone using a usb cable to your main computer / laptop
- In a terminal window:
adb devices
adb tcpip 5556
adb connect [androidPhoneIP]
Once this works - your phone would enable adb over IP. Unfortunately, this needs to be done every time the phone restarts. I have not been able to get adb over usb working on raspbian. If anyone knows - that may be an easier way.
Install ADB on Raspberry Pi
SSH into your octopi instance and run the following commands in terminal:
sudo apt-get update
sudo apt-get install -y android-tools-adb android-tools-fastboot
Controlling IP Webcam through Octoprint:
Got the following to work with help from Pavel Khlebovich (develope of IP Webcam). You can control the IP Webcam using the following commands (and these can be setup as a system menu item in octoprint):
Start IP Webcam: adb connect [androidPhoneIP] && adb shell am start com.pas.webcam/com.pas.webcam.Rolling
Stop IP Webcam: adb connect [androidPhoneIP] && adb shell am force-stop com.pas.webcam
You can also add these commands to the scripts section in Octolapse (dev release) so that the camera is switched on automatically before the timelapse starts and is switched off automatically after the timelapse ends.
Other
Tested Devices
Add yours if you do this and it works.
- Samsung Galaxy S4 - jakevossen5, kurtjacobson
- ZTE Speed - anoldguy
- HTC M7 - lfried-ndd
- SONY Xperia Z3 Compact (D5803) - magiske
- Samsung Galaxy S7 - magiske
- Samsung Galaxy Ace S5830 - antigreen
- Nexus 6 - mparka
- Samsung Galaxy A3 (old) - R0dri
- Ulefone Power - D-e-k-k-i-a
- Ulefone S8 - unixb0y
- HTC Desire C (With CyanogenMod 10) - D-e-k-k-i-a
- Motorola Droid MAXX 1 - axstepko
- Motorola MOTO G 4G 1st gen. - freerom
- Huawei P9/P9 Plus - Gremson
- Samsung Galaxy Tab A
- Xiaomi Redmi 4A - Sparticle
- Xiaomi Mi III
- OnePlus 6T
- Samsung Galaxy S7 Edge (3DIY Original)
- Samsung Galaxy Note 4 - kkoscielniak
- Sony Xperia L2
- Samsung Galaxy A5(2016) - FranciscodeMaussion
- Samsung Galaxy S5 Active - Fillicia
by various contributors on Github
This guide assumes you have your OpenWrt Platform setup to:
Run the Chaos Calmer version of OpenWrt (Also tested with Lede 17.01.2)
Connect to the internet through your home wifi network and allow access from other computers on your home wifi
Have external storage setup (extroot)
You also need a build tree of Chaos Calmer which has been > compiled with python, libyaml, and python-yaml enabled. You don't have to be running the image this produced but
you will need some files from the sources. Your platform needs to be supported by
gcc on OpenWrt.
Important: This guide expects you to have a more than basic grasp of the Linux command line. In order to follow it you'll need to know:
- how to issue commands on the shell,
- how to edit a text file from the command line,
- what the difference is between a user account (e.g.
octoprint) and the superuser accountroot, - how to SSH into your OpenWrt platform,
- how to use Git and
- how to use the Internet to help you if you run into problems.
This is not a "Linux for Beginners guide", those can be found for example here and here. For some Git basics please take a look here.
Basic setup
OpenWrt will need some extra packages but most of OctoPrint's dependencies will be installed by the setup.py script:
-
ssh into your OpenWrt platform and install some packages:
# opkg update # opkg installpython-setuptools python-pip gcc wget unzip tar picocom libyaml git diffutils shadow-groupaddshadow-useradd shadow-su sudo ca-bundle python-dev -
Setup a group that can access the serial port (replace
ttyS1with the port you will be using below) and add a user for OctoPrint in this group:# groupadd dialout # chown root:dialout /dev/ttyS1; chmod a+w /dev/ttyS1 # useradd -G dialout -m -d /home/octoprint -s /bin/ash octoprint # passwd octoprint -
Add some symlinks that python wants to find and install virtualenv:
# ln -s /usr/bin/gcc /usr/bin/ccache_cc # ln -s /usr/lib/gcc/mipsel-openwrt-linux-uclibc/4.8.3/libc.so.0 /usr/lib/libc.so.6 # pip install virtualenv -
From your desktop in the base of your build tree transfer some files to your OpenWrt platform:
$ scp -r staging_dir/target-mipsel_24kec+dsp_uClibc-0.9.33.2/usr/include/python2.7 staging_dir/target-mipsel_24kec+dsp_uClibc-0.9.33.2/usr/include/yaml.h root@<your openwrt device's ip address>:/usr/includetarget-mipsel_24kec+dsp_uClibc-0.9.33.2will vary according to the cpu your OpenWrt platform uses, just enterstaging_dir/targetand use tab completion to find the right value. -
Logout of your ssh session to the OpenWrt platform as root and log back in as octoprint (use the password you set at the end of step 2)
-
Download Octoprint and switch to the branch you want to use (1.3.4 is what I tested):
cd /home/octoprint git clone https://github.com/foosel/OctoPrint cd OctoPrint git checkout 1.3.4 git checkout -b 1.3.4 -
Setup the virtual environment for OctoPrint:
virtualenv venv source venv/bin/activate -
python will use all available memory and choke when it tries to install Babel so install it separately:
(venv) $ cd /home/octoprint (venv) $ wget https://github.com/python-babel/babel/archive/v2.4.0.tar.gz (venv) $ tar xvf v2.4.0.tar.gz (venv) $ cd /home/octoprint/babel-2.4.0/ && python setup.py install && python setup.py import_cldr && python setup.py install -
You are finally ready to install Octoprint:
(venv) $ cd /home/octoprint/OctoPrint (venv) $ python setup.py install -
webassets ends up without any filters installed so uninstall and reinstall it:
(venv) $ pip uninstall webassets (venv) $ pip install webassets -
Give it a whirl:
(venv) $ octoprint serveIt will take a few minutes to start up and then you should be able to connect to
<your openwrt device's ip address>:5000and get the OctoPrint webpage. -
Set up /etc/rc.local to start OctoPrint when you reboot, rc.local likely has only 4 lines of placeholder text but if there are any commands leave them in place and put these commands before the placeholder text:
chown root:dialout /dev/ttyS1; chmod a+w /dev/ttyS1
sudo -u octoprint /home/octoprint/OctoPrint/venv/bin/octoprint daemon start
leave this at the end, MAKE SURE rc.local ends with exit 0
# Put your custom commands here that should be executed once
# the system init finished. By default this file does nothing.
exit 0