When I end a 3D-print, the Z-axis is put as high as possible on my printer to prevent the nozzle hitting the printed object when moving the bed in X- and/or Y-position.
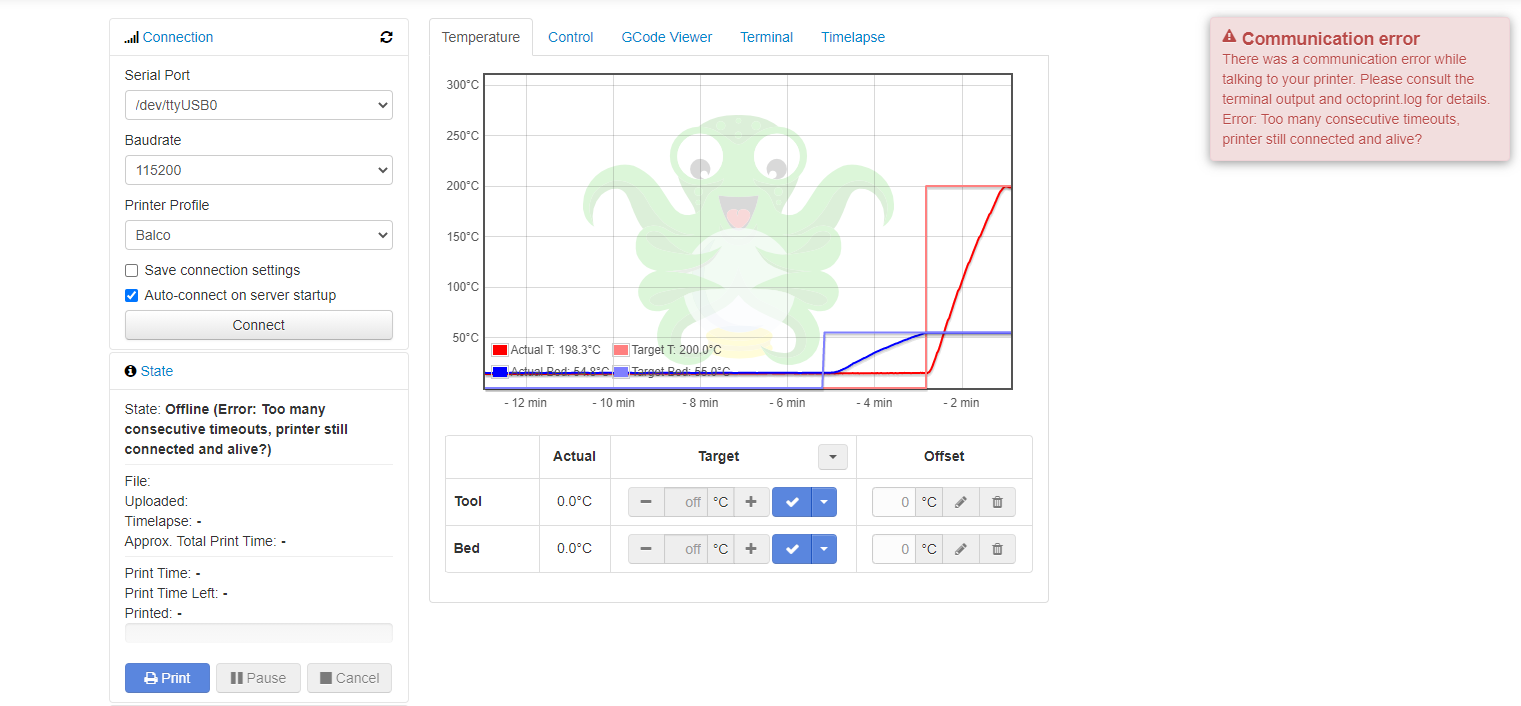
As a consequence, when a new print is started the print head/nozzle has to move down all the way again to its home position. For the X- and Y-movements, that goes quick. However, for the Z-movement that takes a while (approx. 15-20 seconds, not timed yet) and because of that long time before the print head/nozzle reaches its home position, OctoPrint is giving me a communication error, abandoning all settings (bed and nozzle heating are switched off) and also disconnects from my printer.
I have to reconnect the printer ASAP and also re-select my object to print ASAP to avoid cooling down too much both the bed as well as the nozzle.
Can this communication error be avoided? Is there some timeout that is set too short and that I can extend to overcome this issue?
You can configure long running commands in the serial connection settings. (Settings > Serial Connection > Firmware and Protocol. Scroll to Protocol Fine Tuning > Advanced then Long Running Commands). G28 should be there by default I think, but if not go ahead and add it. Or maybe your firmware has a different homing command?
I'm having to make assumptions here, since you haven't provided any logs. When you opened the post, there would have been a template that asked you to upload the log. Please do so if this issue is not solved, and in future, always include logs.
@Charlie_Powell
You're absolutely right. I should've added the necessary logs but I simply forgot. My bad and sorry for this.
I've taken the two latest log files from the logs directory, since there was a "roll-over" happening today. I've attached them to this message. octoprint.log is the current log file, octoprint1.log is the previous log file that contains the communication error messages (you'll find more than one).
I had to rename the original file (octoprint.log.2020-11-14) since the "date" extension is not accepted by the file upload process.
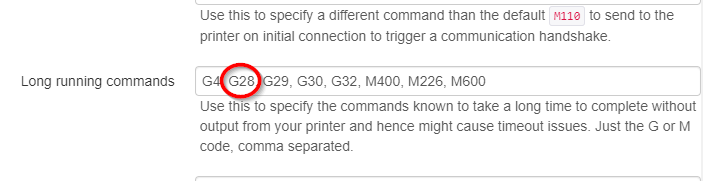
In the mean time, I also looked to the settings as per your advice and indeed, G28 is already part of the "Long running commands" as can be seen below:
I think the homing command is correctly generated by Cura (using version 3.4.1, was part of the software that was delivered with the printer). This is the start of the generated G-code:
;FLAVOR:Marlin
;TIME:17698
;Filament used: 20.8815m
;Layer height: 0.3
;Generated with Cura_SteamEngine 3.4.1
M190 S55
M104 S200
M109 S200
M82 ;absolute extrusion mode
;Sliced at: Sun 15-11-2020 08:53:57
;Basic settings: Layer height: 0.3 Walls: 0.8 Fill: {fill_density}
;Print time: 04:54:59
;Filament used: [20.88]m [62.2801140625]g
;Filament cost: [0]
;M190 S55 ;Uncomment to add your own bed temperature line
;M109 S200 ;Uncomment to add your own temperature line
G21        ;metric values
G90        ;absolute positioning
M82        ;set extruder to absolute mode
M107       ;start with the fan off
G28 X0 Y0  ;move X/Y to min endstops
G28 Z0     ;move Z to min endstops
G1 Z15.0 F{travel_speed} ;move the platform down 15mm
G92 E0                  ;zero the extruded length
G1 F140 E30              ;extrude 3mm of feed stock
G1 X20 Y0 F140 E30
G92 E0                  ;zero the extruded length again
G1 F{travel_speed}
;Put printing message on LCD screen
M117 Printing...
G92 E0
G1 F1500 E-6.5
;LAYER_COUNT:55
It uses the Marvin code, which is quite common, I guess (know that I just took my first steps in the world of 3D printing, so lots is new stuff to me...)
As you can see, for both the X/Y as well as the Z displacements the code G28 is used.
I'm going to guess that the move to maximum Z is part of the end gcode in the slicer. If I am correct, then changing that to a switch to relative mode, move Z up 5mm, switch back to absolute mode would clear the object on the bed but put Z a lot closer to where it needs to be on the next print.
Post your end gcode and we can fix it for you. Alternatively, we could move Z closer in the start gcode (or we could do both).
If you want us to take a look at a failure case, then enable the serial.log, do the experiment, and then post the serial.log and we should be able to see exactly where things go wrong.
One last thought (edit)... I believe there is a timeout that could be extended. Not sure which one until I can look as the serial.log of a failure.
I've activated the serial logging right now and once I'm in that situation again, I'll give you all the info you need (full logs of octoprint as well as serial) + also the G-code I've used to start the printing.
I wanted to add lots of information to this reply, including all the necessary info asked. However, I got this silly message, forcing me to give my information in bits and pieces.
Sorry for that...
Pls. find all the requested info in the next 6-7 replies (this is silly...).
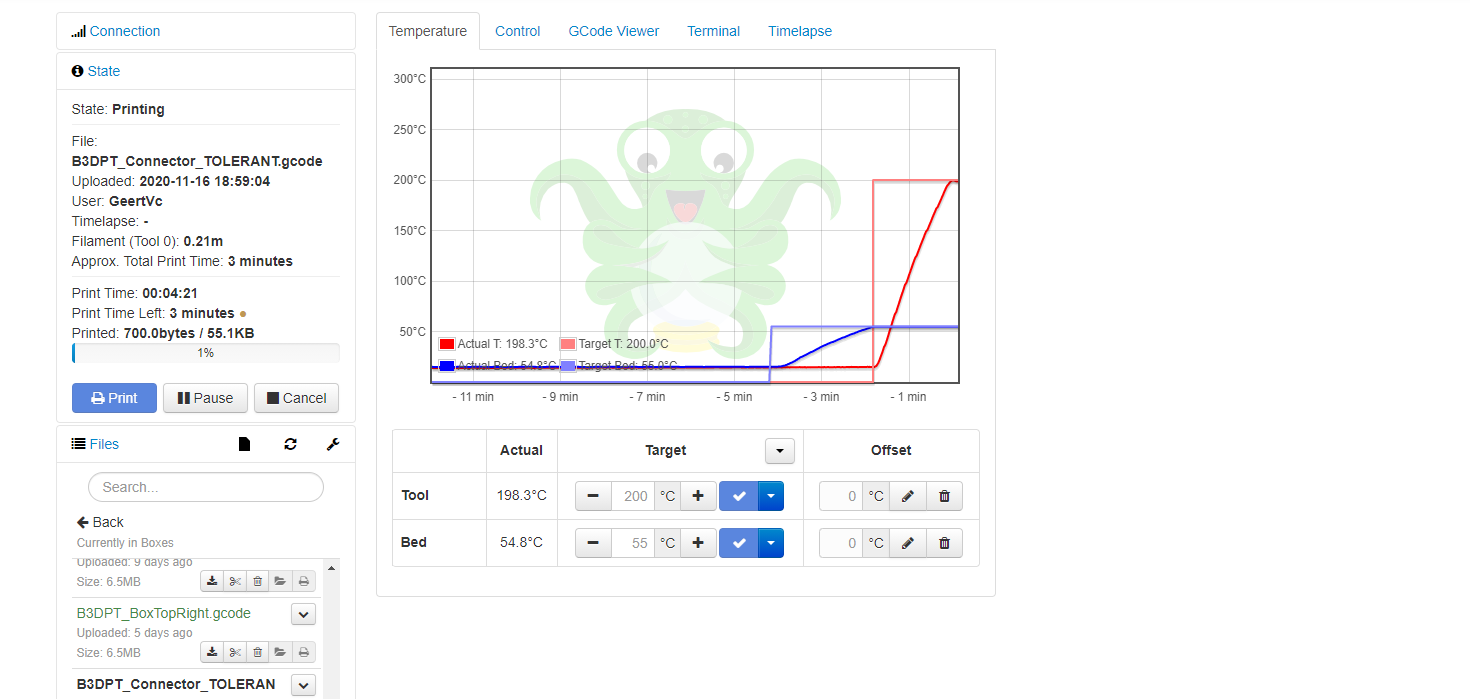
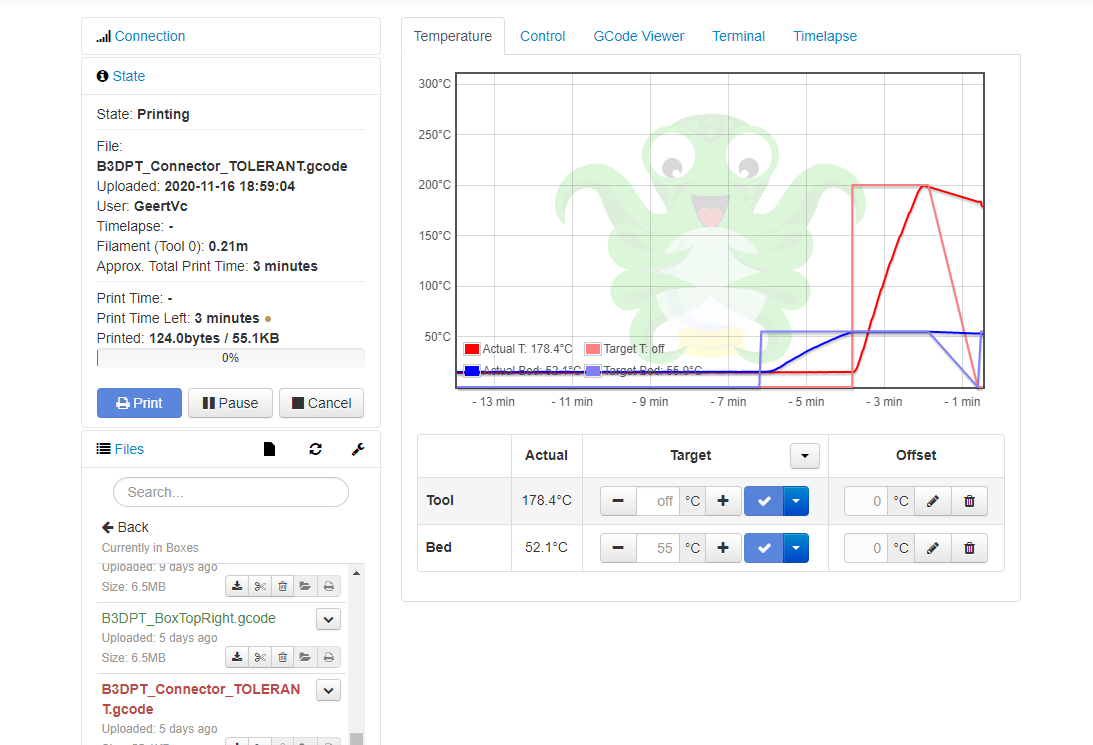
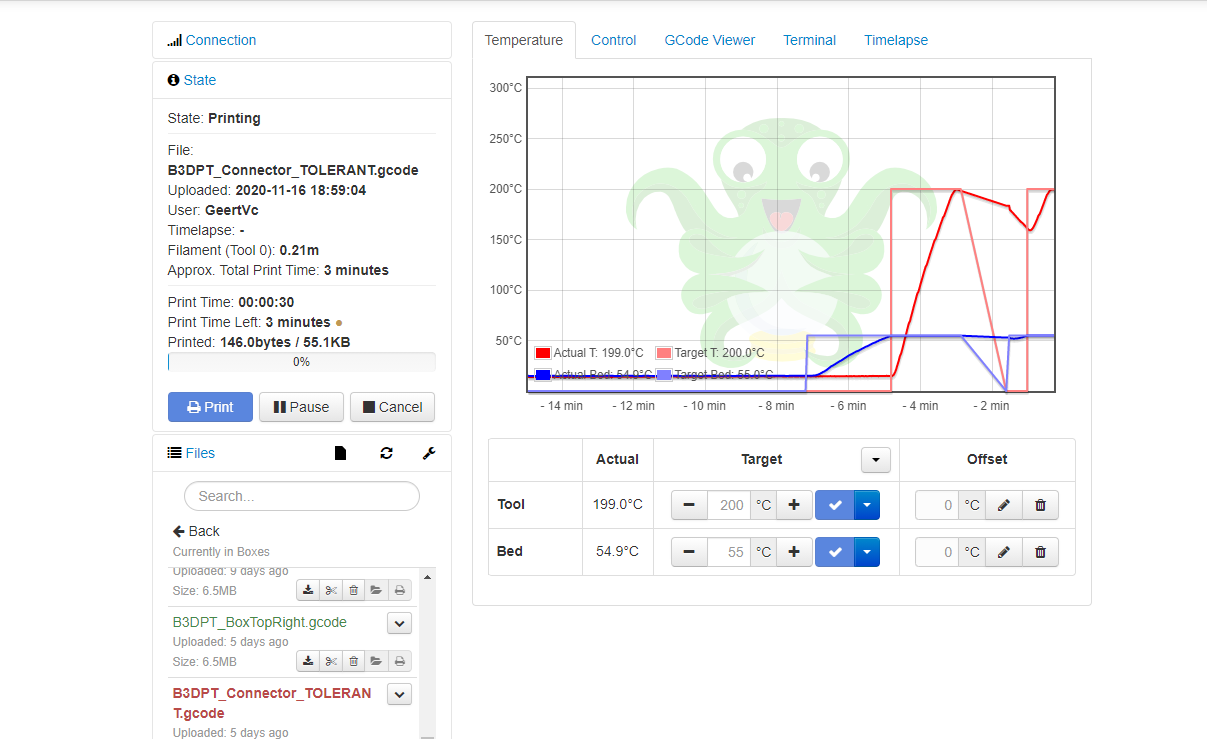
In the mean time, the Z-position is more or less OK and I reconnected to the printer + activated the print action again. You can see the wanted bed temperature is set again:
Pls. have a look from line 44 onwards (20201121): this is the start of the serial communication for this print batch.
At line 368, the bed has reached its required temperature (55°C).
At line 372, the nozzle get its wanted temperature (200°C)
At line 482, the nozzle has reached its temperature (or almost...)
At line 497, the error occurs.
Before I look at the files I want to say thanks, @GeertVc, for your efforts in delivering the information. If it's any consolation, your post count may now be high enough that you have graduated from new user status
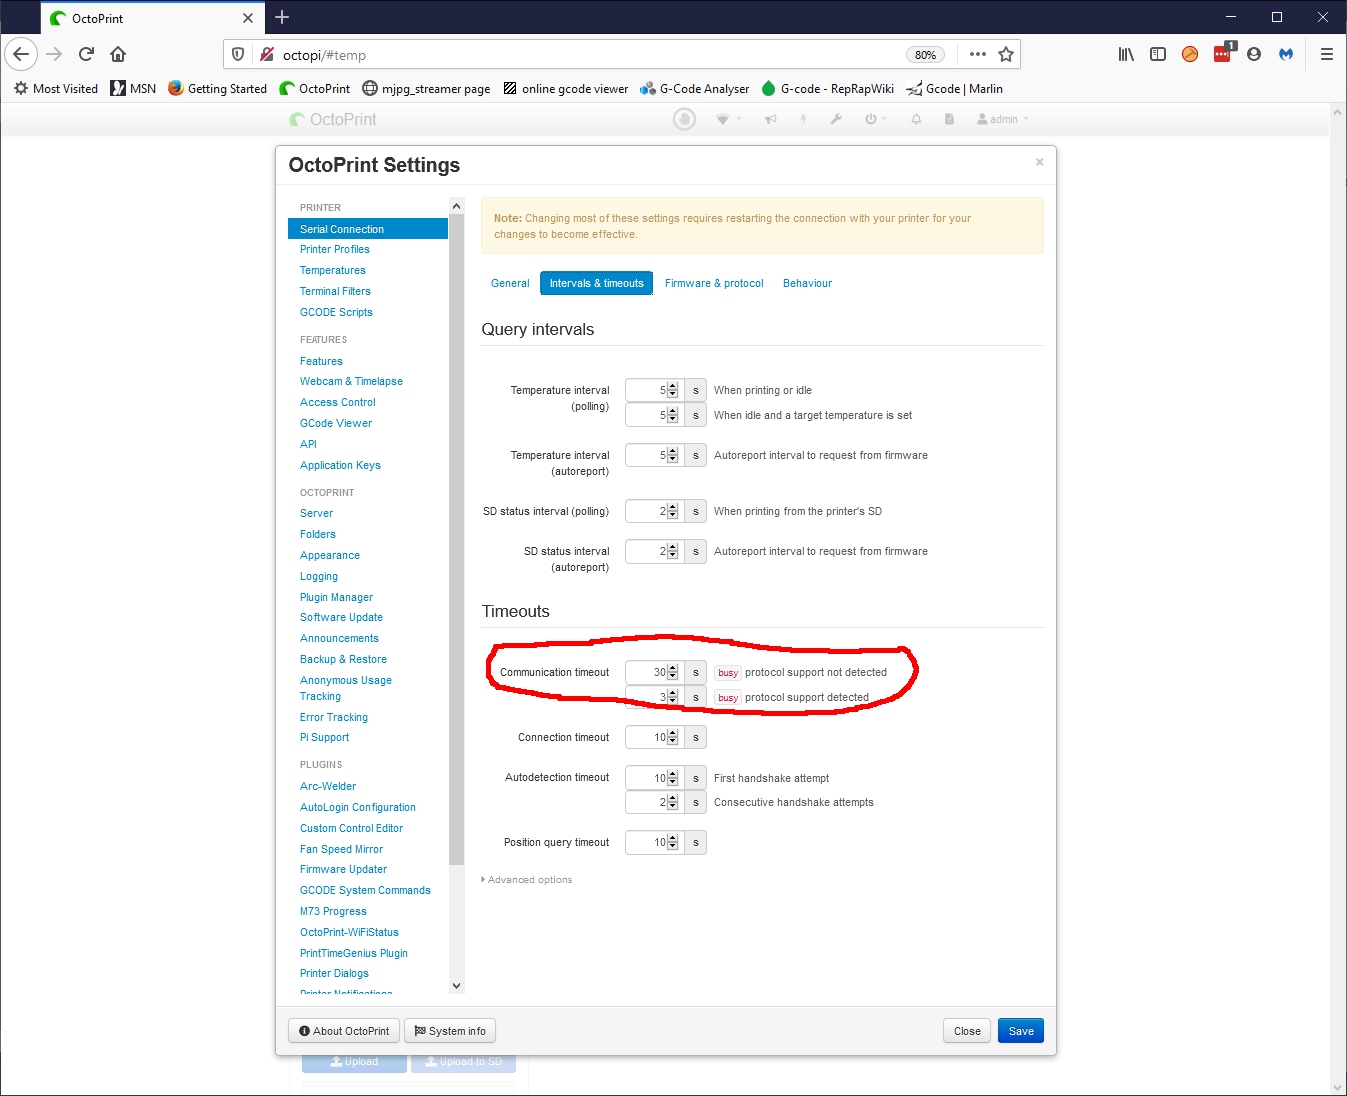
First, in the serial.log the following line appears:
2020-11-21 13:11:15,300 - Send: N10 G28 Z0*104
2020-11-21 13:11:55,363 - No response from printer after 6 consecutive communication timeouts, considering it dead. Configure long running commands or increase communication timeout if that happens regularly on specific commands or long moves.
I think we have established that this happens regularly on specific commands so let's do what it says.
Click on the wrench at the top of the screen
Click on Serial Connection
Click on Intervals and timeouts (Your printer's firmware doesn't appear to support the busy protocol)
Change the Communication timeout busy protocol not detected to 60 or
Click on Advanced options (the image doesn't show these next steps)
Change Max. consecutive timeouts while printing and Max. consecutive timeouts during long running commands to 10 (and leave the timeout busy protocol not detected at 30).
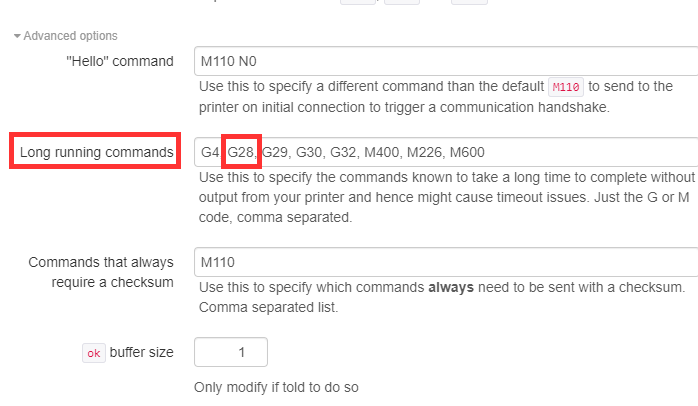
Click on Advanced options at the bottom under Protocol fine tuning
In the Long running commands text block, verify that G28 is in the list. If not, add it following the instructions below the text block.
Click Save at the bottom (if you changed anything)
If your printer is connected to OctoPrint, disconnect and reconnect so these changes take effect.
Before we try the experiment again, Your start gcode has the following commands in it:
G1 Z15.0  ;move the platform down 15mm
G1 F{travel_speed}
Remove the F{travel_speed} part (remove the second command completely). The slicer is supposed to replace this with the value of travel_speed. You appear to be using Cura 3.4.1 so the syntax is correct but travel_speed isn't defined. Alternatively, you could substitute 3600 for {travel_speed} as that speed appears within the gcode generated for the actual part.
Either edit the gcode you have already or slice your part again. Send it to OctoPrint and print it. Hopefully, we have fixed the problem but if not, you can examine the serial.log and verify that either the timestamps or the ...after 6... reflects the changes you made. Change the Max. consecutive to 20 if 10 didn't work and try again.
First off, thanks for your extensive explanation and the time you've put in preparing the answer for me. Much appreciated!!!
But no, I'm still not graduated to a higher level. I can still post only one embedded media at a time in a post. So, here we go again with my bits and pieces. Sorry again for that...
Next, if I understand you correctly, for the first section I should execute steps 3 and 4 OR steps 5 and 6. But not both (otherwise, two changes in one go...). Am I correct with my assumption?
If so, then I've executed steps 3 and 4 first. I already found the location for steps 5 and 6 too, but didn't change anything in that section so far. As you mentioned, one step at a time...
About the Long running commands section, I can confirm G28 is already part of the commands list. See image below:
;Sliced at: {day} {date} {time}
;Basic settings: Layer height: {layer_height} Walls: {wall_thickness} Fill: {fill_density}
;Print time: {print_time}
;Filament used: {filament_amount}m {filament_weight}g
;Filament cost: {filament_cost}
;M190 S{print_bed_temperature} ;Uncomment to add your own bed temperature line
;M109 S{print_temperature} ;Uncomment to add your own temperature line
G21        ;metric values
G90        ;absolute positioning
M82        ;set extruder to absolute mode
M107       ;start with the fan off
G28 X0 Y0  ;move X/Y to min endstops
G28 Z0     ;move Z to min endstops
G1 Z15.0 F{travel_speed} ;move the platform down 15mm
G92 E0                  ;zero the extruded length
G1 F140 E30              ;extrude 3mm of feed stock
G1 X20 Y0 F140 E30
G92 E0                  ;zero the extruded length again
G1 F{travel_speed}
;Put printing message on LCD screen
M117 Printing...
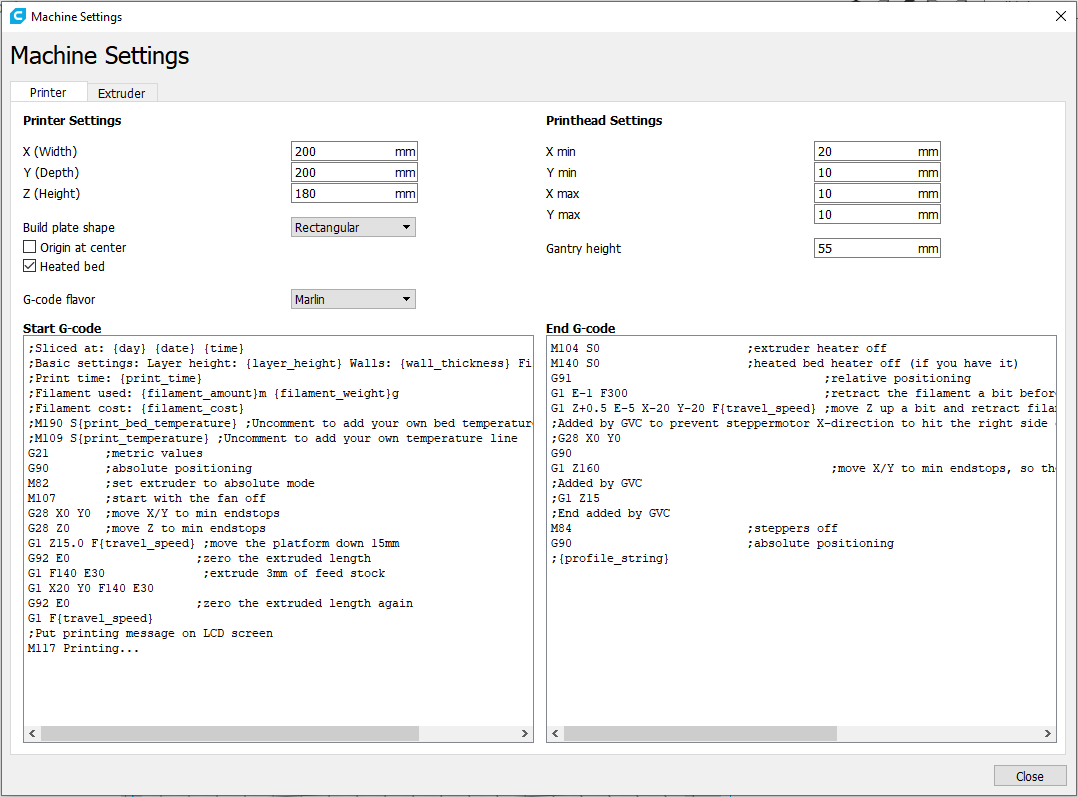
End code:
M104 S0                     ;extruder heater off
M140 S0                     ;heated bed heater off (if you have it)
G91                                    ;relative positioning
G1 E-1 F300                            ;retract the filament a bit before lifting the nozzle, to release some of the pressure
G1 Z+0.5 E-5 X-20 Y-20 F{travel_speed} ;move Z up a bit and retract filament even more
;Added by GVC to prevent steppermotor X-direction to hit the right side of the printer
;G28 X0 Y0
G90
G1 Z160                                 ;move X/Y to min endstops, so the head is out of the way
;Added by GVC
;G1 Z15
;End added by GVC
M84                         ;steppers off
G90                         ;absolute positioning
;{profile_string}
I can see the command you mentioned in the start code, but then in one line, not two lines.
G1 Z15.0 F{travel_speed} ;move the platform down 15mm
Is this similar to what you mentioned (except that it's written in one line iso 2...)?
Next to this, I already had to change the end code too (see the comments with the trigram "GVC") because the motor was hitting the right side each and every time a 3D printing was finished. With that change, it doesn't happen anymore...
This was the code causing the issue (but now commented out):