I have a Raspberry Pi Camera Module V2.1 connected to the latest version of OctoPrint (1.8.4) running on a Raspberry Pi 4B. The camera is attached with a 60cm long ribbon cable.
Although the camera works within OctoPrint the resolution only appears to be 640 x 480 and in 4:3 format. From the specifications of the camera module, I believe it should be possible to go to full 1080p HD quality.
Also, the Camera Settings OctoPrint add-in doesn't seem to be recognising the Pi camera - it's simply listed as 'camera0'.
I have tried, without any success, to modify the octopi.txt file in order to get the camera working at full resolution.
I would really appreciate any help to get my camera working properly.
Sorry but I cannot see where I can access the webcamd.log file.
Please advise and I will forward it if required.
After further web searches and trials with various settings in my octopi.txt file I've made some progress in getting higher resolution from the Raspberry Pi 2.1 camera.
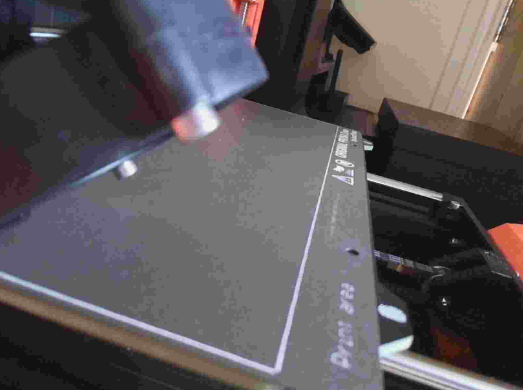
However there's one issue which I don't seem to be able to correct. The picture from the camera appears to be limited in the number of colours (I think photographers refer to it as 'solarised').
As an example I've attached a screen capture from the camera:
Is there anything that I can try before the camera gets thrown out of the window / replaced by a USB webcam?
You can try and increase the bitrate (best done with the camera settings plugin), and if that doesn't work increase the GPU memory through sudo raspi-config.
Many thanks for that - increasing the bitrate to its maximum value (25000000) worked
I've been absolutely delighted with the OctoPrint system but the camera side (with my Raspberry Cam 2.1) was really bugging me. I {incorrectly} assumed that the official Pi camera would be plug'n'play but now realising that it requires a few 'tweaks'.
I have an ArduCam (it's a Pi Cam V2.1 but with electronic focus) here is a guide that I typed up for installing either camera.
Raspberry Pi Camera or Arducam focusing camera installations. (Skip steps marked with * if just installing a Pi Camera.)
Physically install the camera as normal.
ssh into your Raspberry Pi (please look up on how to use ssh for your operating system {Windows, Mac O/S, Linux, etc.)
a) ssh pi@[name/IP address]
b) example: ssh pi@raspberrypi.local
c) enter the password for the pi user.
Verify that your Raspberry Pi recognizes your camera
vcgencmd get_camera
a) Should return “supported=1 detected=1”
(a) If it doesn’t return the above, please verify your physical installation is correct.
*run raspi-config and enable the P5 I2C
sudo raspi-config
b) Navigate to and select “Interface Options”
c) Navigate to and select "P5 I2C”
d) Navigate to and select “Yes”
e) You should see “The ARM I2C interface is enabled”
f) Select “OK”
g) Tab and select “Finish”
*Edit the Raspberry Pi config.txt file to enable the plug-in to focus your camera.
sudo nano /boot/config.txt
b) check if these lines exist, uncomment or add as needed:
dtparam-i2c_arm=on
dtparam=i2c_vc=on
Note: in nano “ctrl+s” will save the file, “ctrl+x” exit nano. Please enter each in order to save the file and exit the nano text editor.
Update installed packages
sudo apt-get update
sudo apt-get dist-upgrade
*Install smbus package
sudo apt-get install -y python3-smbus
Enable the Pi camera driver
sudo nano /etc/modules
b) Add the following to the end of the file
bcm2835-v4l2
Reboot (just to make sure everything is enabled and functioning)
sudo reboot
*Install Arducam Camera Control plugin from the plugin manager
*You should be able to now control the focusing from within Arducam Control section in Octoprint Control screen (make sure that you have enabled the webcam inside Octoprint and selected the appropriate options for your camera).
webcam configurations:
The most common question about the webcam is: "What's a good resolution to use, and how do I eliminate black bars?"
To eliminate the black bars, you need to set resolution of the webcam. This is done by editing the octopi.txt file.
ssh into your Raspberry Pi
ssh pi@[name or IP address of your Raspberry Pi]

sudo nano /boot/octopi.txt
c) Note: at the end of file change the following if you plan on running Octolapse:
e) Edit this line by first removing the ‘#’ then choosing the appropriate NATIVE sensor modes and REMOVE "-f 10"
camera_usb_options="-r 640x480"
(Since the device is set to USB, instead of raspi, because the newest version of Raspberry Pi will default finding the camera as a USB device, removing the framerate parameter will use MJPEG as input from the camera instead of YUYV format and reduce cpu overhead/usage).You will get a higher/smoother framerate this way.
If you want, you can force which camera to use USB by entering the line: