As am I. Normally I'd say either network latencies or it's a first time load, but if it stays slow on repeated reloads something else is off. If possible, try loading without the reverse proxy in between, to rule that out as the problem.
I am sure it is not latency. I am on the same small subnet and do not have much other traffic.
I have loaded it up with out nginx in the middle and it is super fast per usual.
WITH nginx doing rev proxy octoprint loads quickly - it is just the cam and login button drop down that take a long time to load.
Once the cam loads and I log in everything is super fast as it is with nginx out of the picture.
This is just a guess again, but it sounds like the initial page initialization might be taking up quite some time, causing the JS not to bind (and hence the login button to not be "armed"). When you disable the webcam, do you get the same issue? Just to rule out that it's the webcam stream through nginx somehow blocking any kind of needed request for full page initialization...
I like your thought process.
With webcam disabled it still takes "a long time" for the login button to "arm".
Next step will be a deep dive into the JS error console and the Network tab I fear. Something's hanging. Oh, also - same issue in safe mode?

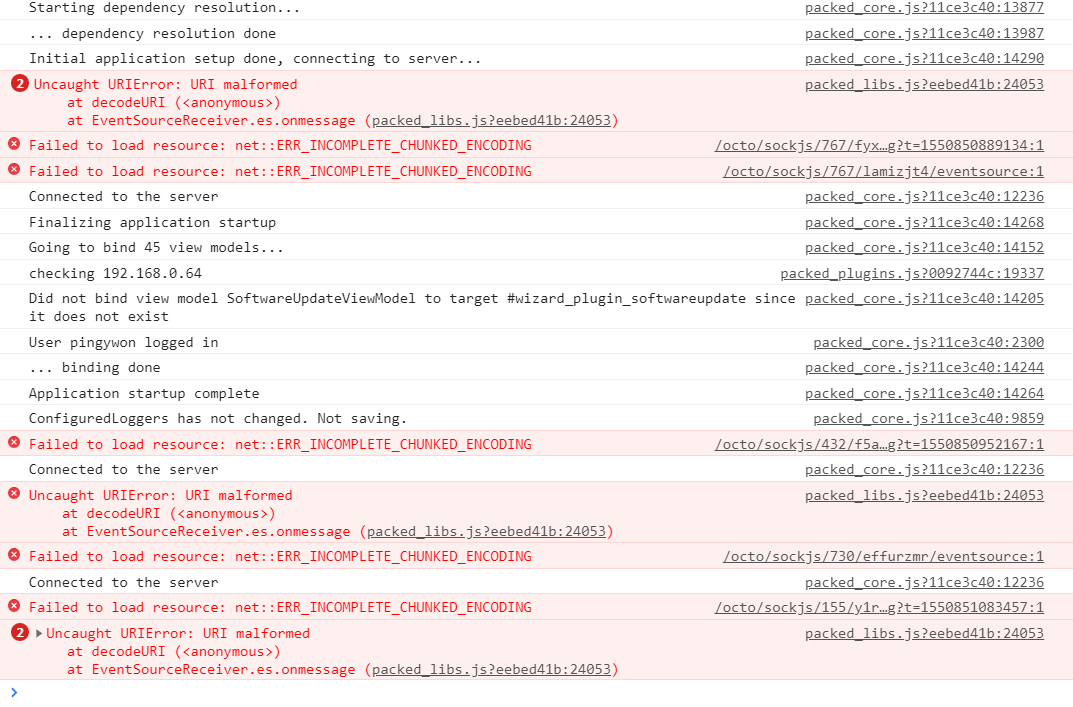
Looks like it isn't connecting via the websocket and falling back on a long poll transport, and running into timeout issues with that.
The question is why it's not connecting via proper websocket in the first place, the Network tab might have the answer to that.
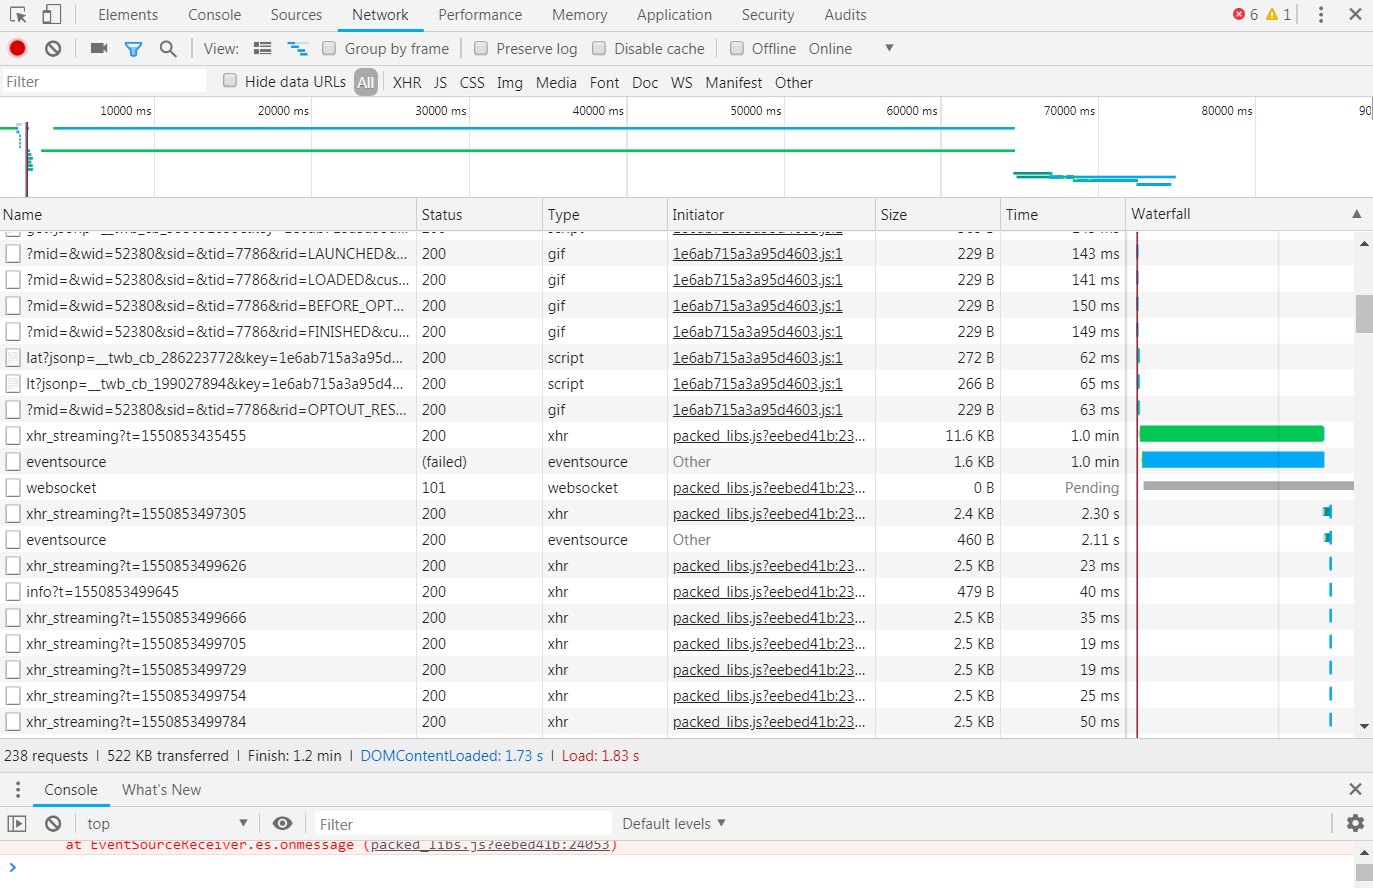
Hm, nope, the problem is higher up. Or at least I'd expect it to be higher up. The first thing that happens on socket initialization is a request to sockjs/info (IIRC), then a websocket will be attempted to be opened, then if that fails it's a fallback to various long polling approaches. Here I see an open websocket  and a failed attempt to use the
 eventsource backend.
Frankly, this confuses me 
well - good. because I am confused by it also.
This being a current sandbox env I am throwing the kitchen sink at it.
I took the stack-overflow advice and changed the owner of the /var/lib/nginx to the nginx user who is running the worker process.
The /var/cache/nginx dir was already owned by the nginx user.
I also changed the:
proxy_buffers 8 1024k; proxy_buffer_size 1024k;
all to no current avail. I have not totally broken nginx though - so I guess that is a good thing.
I have read some stack over flow threads and searched around to no avail - these seem to be the errors that are making it hang

Hi,
I have another probem  I have two printer with octoprint.
Now I would like to have nginx as reverse proxy with basic authentification.
This works fine with the first instance, with /printer1 and /webcam. And here is the trouble. I can setup /printer2 to show the second octoprint, but I can't add a second location for the webcam on the second octoprint.
Is there a way to change the /webcam stream to another location?
Cheers
Kiwix
Thanks for the example. This is just want I was looking for to get started with an niginx reverse proxy for OctoPrint!
I'm using Nginx in a docker container with built in letsencrypt support and SSL, but the principle should be the same. Here's what I've got to serve up Octoprint on a subfolder of my main domain and with a webcam (Logitech C920) working fine.
My Raspberry Pi has a static IP on 192.168.0.240.
I can reach Octoprint on https://server.com/octoprint & the webcam on https://server.com/octocam
This reverse proxy configuration works "out the box" with no edits required to /boot/octoprint.txt
    location /octoprint/ {
        proxy_pass http://192.168.0.240/;
        proxy_set_header Host $http_host;
        proxy_set_header Upgrade $http_upgrade;
        proxy_set_header Connection "upgrade";
        proxy_set_header X-Real-IP $remote_addr;
        proxy_set_header X-Forwarded-For $proxy_add_x_forwarded_for;
        proxy_set_header X-Scheme $scheme;
        proxy_set_header X-Script-Name /octoprint;
        proxy_http_version 1.1;
        client_max_body_size 0;
    }

    location /octocam/ {
        proxy_pass http://192.168.0.240:8080/;
        proxy_set_header Host $http_host;
        proxy_set_header Upgrade $http_upgrade;
        proxy_set_header Connection "upgrade";
        proxy_set_header X-Real-IP $remote_addr;
        proxy_set_header X-Forwarded-For $proxy_add_x_forwarded_for;
        proxy_set_header X-Scheme $scheme;
        proxy_set_header X-Script-Name /octocam;
        proxy_http_version 1.1;
        client_max_body_size 0;
    }
Once you've confirmed that the above two are working you can configure Octoprint in the webui with a webcam stream URL of https://server.com/octocam/?action=stream and a snapshot URL of https://server.com/octocam/?action=snapshot
Obviously the IP of 192.168.0.240 and server.com will be replaced by whatever you are using in your setup.
Just posting here in case anybody is struggling.
5 Likes
Any chance you can share your subdomain config info? I'm using letsencrypt in a docker image on an R710 server and trying to figure out the proper subdomain config file
Thanks for posting that!
I Copy pasted that into a file "octoprint.subfolder.conf" in the config files for my LinuxServer/LetsEncrypt container, and it worked perfectly.
I was previously working fine using subdomains, but I needed to change my certificate so I restructured LetsEncrypt.
Here was the working config I had for a LetsEncrypt Subdomain:
@jagr200
# make sure that your dns has a cname set for deluge and that your deluge container is not using a base url

server {
    listen 443 ssl;
    listen [::]:443 ssl;

    server_name octoprint.*;

    include /config/nginx/ssl.conf;

    client_max_body_size 0;

    # enable for ldap auth, fill in ldap details in ldap.conf
    #include /config/nginx/ldap.conf;

    location / {
        # enable the next two lines for http auth
        #auth_basic "Restricted";
        #auth_basic_user_file /config/nginx/.htpasswd;

        # enable the next two lines for ldap auth
        #auth_request /auth;
        #error_page 401 =200 /login;

        # DO NOT INCLUDE THE DEFAULT - OVERRIDES BELOW
		#include /config/nginx/proxy.conf;

		#Settings per this link: https://community.octoprint.org/t/reverse-proxy-configuration-examples/1107
		proxy_set_header Host $http_host;
		proxy_set_header Upgrade $http_upgrade;
		proxy_set_header Connection "upgrade";
		proxy_set_header X-Real-IP $remote_addr;
		proxy_set_header X-Forwarded-For $proxy_add_x_forwarded_for;
		proxy_set_header X-Scheme $scheme;
		proxy_http_version 1.1;
		client_max_body_size 0;

		#Settings from the proxy.conf that need to be imported since import was disabled
			client_body_buffer_size 128k;
			#Timeout if the real server is dead
			proxy_next_upstream error timeout invalid_header http_500 http_502 http_503;

			# Advanced Proxy Config
			send_timeout 5m;
			proxy_read_timeout 240;
			proxy_send_timeout 240;
			proxy_connect_timeout 240;

			# TLS 1.3 early data
			proxy_set_header Early-Data $ssl_early_data;

			# Basic Proxy Config
			proxy_set_header X-Forwarded-Proto https;
			proxy_set_header X-Forwarded-Host $host;
			proxy_set_header X-Forwarded-Ssl on;
			proxy_redirect  http://  $scheme://;
			proxy_cache_bypass $cookie_session;
			proxy_no_cache $cookie_session;
			proxy_buffers 32 4k;
			proxy_headers_hash_bucket_size 128;
			proxy_headers_hash_max_size 1024;


		#Required in this file
        resolver 127.0.0.11 valid=30s;
        set $upstream_octoprint 192.168.1.105;
        proxy_pass http://$upstream_octoprint;
    }
}
2 Likes
I have a different issue. Created a separate topic Nginx reverse proxy stuck at "Loading OctoPrint's UI, please wait..."
I stumpled across this, coming from Unable to display OctoPrint inside Home Assistant iframe
haproxy example from first post is deprecated, for reference my current version:
backend octoprint
  # ref https://community.octoprint.org/t/reverse-proxy-configuration-examples/
  http-request replace-path ^([^\ :]*)\ /local_octoprint_proxy/(.*)  \1\ /\2
  http-request add-header X-Script-Name %[req.hdr(X-Ingress-Path)]
  option forwardfor
  server octoprint OCTOPRINT_HOST:OCTOPRINT_PORT USE_SSL VERIFY_SSL check
The http-request add-header X-Script-Name is the most important.
I run some small haproxy against the octopi image which also runs some haproxy. Because, why not.
Here is a basic Caddy Server v2 configuration, assuming you are running Caddy on the same machine as the OctoPrint. It is easy to adapt if your OctoPrint installation is on another machine. The example is in the "Caddyfile" style.
localhost

reverse_proxy 127.0.0.1
header_up X-Scheme {scheme}
That's it.
In my specific case, I have a subdomain assigned to the OctoPrint installation, which is running on another machine from Caddy Server. My configuration is thus:
subdomain.example.com {
    reverse_proxy 192.168.0.100 {
    header_up X-Scheme {scheme}
    }
}
Because I have not specified http at the beginning of subdomain.example.com, the default is assumed to be https, and it will automatically generate a Let's Encrypt certificate and attach it by default.
2 Likes
I was looking for a Caddy example to replace the haproxy.cfg (to use Caddy instead of HAProxy). It's surprisingly simple:
host.domain:80 {
        reverse_proxy localhost:5000
        handle_path /webcam* {
                reverse_proxy localhost:8080
        }
}
47 lines of haproxy.cfg are replaced with 6 lines of Caddyfile. And if you want TLS, it's just a few lines more (if this were exposed to the Internet, which it shouldn't be, you'd get TLS by just getting rid of :80 on the first line--but if it's internal, you'd need to configure for DNS validation, or use Caddy's internal CA).
1 Like