I am trying to set up octoprint on a raspberry pi as an aces point because I am going to do a demonstration for a church youth group so I wont be able to use a WiFi network to connect. My printer is reliant on octoprint. I saw it set up like that in this video but I don't know how to set it up in that configuration and I wasn't able to find a tutorial. Does Anyone know how to do this?
Don't know if the plugin still works or not, but I assume the above link's instructions for linux should still be relevant.
you may want to check out the Mr. Beam forks of those projects though, as it seems they are recently updated.
You could also try this one
I have this page from Raspberry Pi bookmarked:
I am trying to install netconnectd_mrbeam. On the step where you run the flowing command I get an error.
sudo hostapd -dd /tmp/hostapd.conf
hostapd: command not found
I am not sure what is causing this but I have not been able to fix it.
Did you do the first step:
Prepare the system
Install the hostapd, dnsmasq, logrotate and rfkill packages:
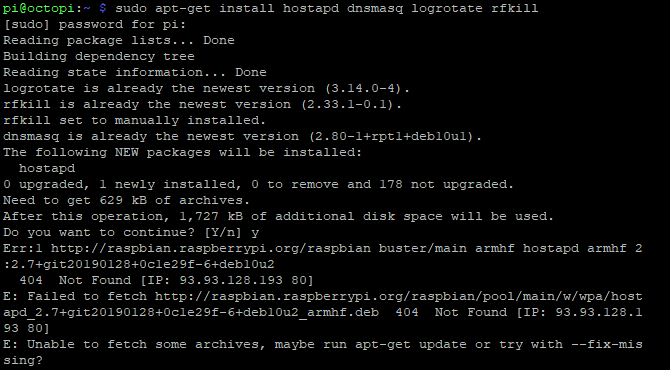
sudo apt-get install hostapd dnsmasq logrotate rfkill
Yes I did. I tried running running it again and got this.

run
sudo apt update
first.
If you get this error
E: Repository 'http://raspbian.raspberrypi.org/raspbian buster InRelease' changed its 'Suite' value from 'stable' to 'oldstable'
N: This must be accepted explicitly before updates for this repository can be applied. See apt-secure(8) manpage for details.
run
sudo apt-get update --allow-releaseinfo-change
instead.
That worked. I made it to this point where I got an error. I am new to Linux so I have no idea what to do here.

looks like you're missing setuptools in your python environment. Should be able to fix with sudo python3 -m pip install --upgrade pip setuptools wheel.
Also, just noticed that the commands listed on the mr beam readme is cloning the original repo and not their fork.
git clone https://github.com/foosel/netconnectd
should be
git clone https://github.com/mrbeam/netconnectd_mrbeam
Why don’t you simply add a static ip and use a network cable, since it’s going to be something temporary?
I realize that you have spent a great deal of time trying to set this up. If this demonstration is just a one time thing, and you want to minimize the custom setup, why not just grab your wi-fi router and bring it with you to the demonstration. Power on your router, computer and printer and they should all connect (except there will be no interbnet access) and printing should happen just as if you were home.
That's a great idea. I initially thought this would be easier. Thanks for your replies.
Another suggested quick fix is to just physically connect your computer to the Pi with Cat 5 cables and a hub.
Good luck.
For a direct connection, both machines will need static IP addresses.
You can even eliminate the hub if you use a crossover cable or either one or both ethernet adapters support auto-sensing.
What ip would you use for that?
It wouldn't really matter as long as they are on the same network, so something as mundane as 10.0.0.1 and 10.0.0.2 should work.
I've made an integrated image that works similar to netconnectd....
My sugestion is: just install GitHub - RaspAP/raspap-webgui: Simple wireless AP setup & management for Debian-based devices
Steps I took on my octoprint already runing (did it today):
1 - Update everyting:
sudo apt-get update
sudo apt-get full-upgrade
sudo reboot
2 - Set the "WLAN country" option in raspi-config 's Localisation Options:
sudo raspi-config
3 - Install RaspAP:
curl -sL https://install.raspap.com | bash
4 - Before reboot, change web server port of lighttpd to 8080:
sudo nano /etc/lighttpd/lighttpd.conf
Change server.port from 80 to 8080 (or other you want)
5 - Reboot
sudo reboot
6 - Access on browser:
Octoprint = your_host_name.local/
Access Point config = your_host_name.local:8080
Obs:
Configs for first access using raspberry AP:
IP address: 10.3.141.1
Username: admin
Password: secret
DHCP range: 10.3.141.50 — 10.3.141.255
SSID: raspi-webgui
Password: ChangeMe