Got an issue with the new camera stack? Open a new topic!
If you are running into any issues with the new camera stack of which the configuration is described below, DO NOT REPLY TO THIS TOPIC, open a new one please. This is a documentation topic, not a support topic.
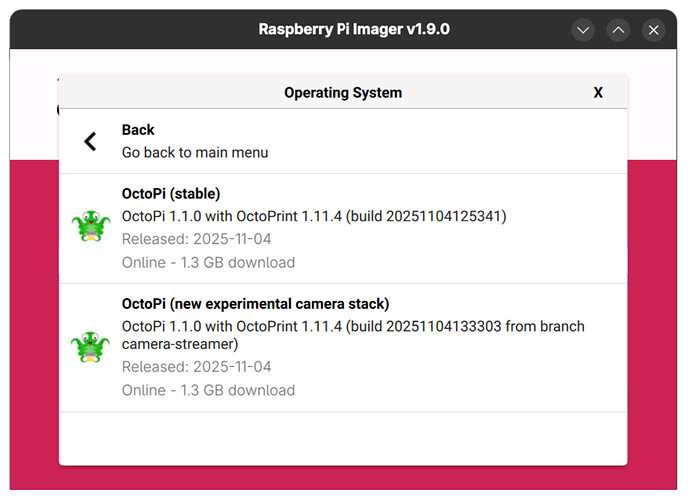
An alternative OctoPi-UpdateToDate build replaces mjpg-streamer and webcamd with a new camera streaming setup based on camera-streamer. This build can currently be found as "OctoPi (new experimental camera stack)" in the RPi Imager:
It is currently still deemed experimental as there are some blocking issues with it (crashes, Raspberry Pi 5 incompatibility for libcamera based cameras like the RPiCam) and it might yet get swapped for another approach if those issues can't be resolved.
camera-streamer supports libcamera based cameras incl. the RPiCam v3 and newer ArduCams, as well as USB cameras. The setup on the OctoPi image allows easy configuration of camera parameters through configuration files in /boot/firmware/camera-streamer (or the camera-streamer on the root of the card if is used as a thumb drive), hot-plugging of USB cameras and also includes multi-cam support.
Service
A central camera-streamer service is available that takes care of camera control. You can start/stop/restart it via systemctl (sudo systemctl {start|stop|restart} camera-streamer). The log is accessible via journalctl -u camera-streamer.
The individual cameras have their own service files. Libcamera based cameras are managed by camera-streamer-libcamera. USB cameras are managed by a service unit camera-streamer-usb@<name> and a path unit camera-streamer-usb-<name>.path. The path unit starts the service unit as needed.
Libcamera configuration
A single libcamera device can be configured through /boot/firmware/camera-streamer/libcamera.conf.
You have the following configuration options:
PORT: The port for the camera-streamer instance to listen on. Must be unique among all configured cameras. Defaults to 8080.WIDTH: Resolution width to request from the camera sensor, defaults to 1920.HEIGHT: Resolution height to request from the camera sensor, defaults to 1080.VIDEO_HEIGHT: Resolution height to use for the video stream, defaults to 720.SNAPSHOT_HEIGHT: Resolution height to use for the snapshots, defaults to 1080.FRAMERATE: Framerate to configure, defaults to 15, so 15fps.NBUFS: Number of buffers to use, defaults to 2 if unset.OPTIONS: Further options to pass tocamera-streamer. Defaults to--camera-options="AfMode=2" --camera-options="AfRange=2"to attempt to enable auto-focus.
![]() Please note that apart from
Please note that apart from OPTIONS and NBUFS, all of these fields must be set!
USB camera configuration
USB cameras can be configured through individual usb-<name>.conf files in /boot/firmware/camera-streamer. Per default, the image ships with a single usb-default.conf file that will trigger on availability any USB webcam.
You have the following configuration options:
PORT: The port for the camera-streamer instance to listen on. Must be unique among all configured cameras. Defaults to 8080.DEVICE: Device path for the camera, defaults to/dev/v4l/by-id/usb-*-video-index0. If you want to run multiple USB cameras, you should change this. See below for information.FORMAT: Image format to set on the camera, defaults to YUYV.WIDTH: Resolution width to set on the camera, defaults to 1280.HEIGHT: Resolution height to set on the camera, defaults to 720.FRAMERATE: Framerate to configure, defaults to 15, so 15fps.NBUFS: Number of buffers to use, defaults to 2 if unset.OPTIONS: Further options to pass tocamera-streamer.
![]() Please note that apart from
Please note that apart from OPTIONS and NBUFS, all of these fields must be set!
VIDEO_HEIGHT and SNAPSHOT_HEIGHT are not offered for USB cameras, since it depends on the camera model whether they will work well or not. You can set them using --camera-snapshot.height and --camera-video.height via OPTIONS if so desired, but note that this might require some tinkering on your part, and/or increasing the available GPU memory.
Available additional options to be included in OPTIONS
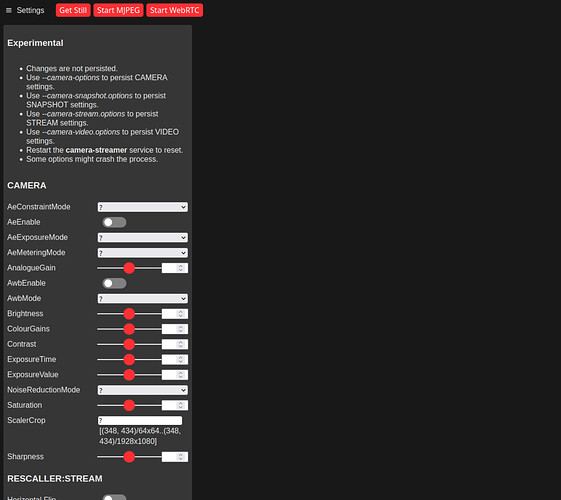
To learn about the available options of you specific camera, navigate to its /control endpoint, e.g. http://octopi.local/webcam/control. That will show you output roughly like this:
Anything listed under "CAMERA" can be provided as a -camera-options setting in OPTIONS, e.g. --camera-options=AwbEnable=1. Accordingly, "SNAPSHOT" may be provided via --camera-snapshot.options, "STREAM" via --camera-stream.options and "VIDEO" via --camera-video.options.
Additionally, any of camera-streamer's command line parameters can be provided as well:
$ camera-streamer --help
Usage:
$ camera-streamer <options...>

Options:
  --camera-path=%s            - Chooses the camera to use. If empty connect to default.
  --camera-type=arg           - Select camera type. Values: v4l2, libcamera, dummy.
  --camera-width=%u           - Set the camera capture width.
  --camera-height=%u          - Set the camera capture height.
  --camera-format=arg         - Set the camera capture format. Values: DEFAULT, YUYV, YUV420, YUYV, NV12, NV21, MJPG, MJPEG, JPEG, H264, RG10, GB10P, RG10P, BG10P, RGB565, RGBP, RGB24, RGB, BGR.
  --camera-nbufs=%u           - Set number of capture buffers. Preferred 2 or 3.
  --camera-fps=%u             - Set the desired capture framerate.
  --camera-allow_dma[=1]      - Prefer to use DMA access to reduce memory copy.
  --camera-high_res_factor=%f - Set the desired high resolution output scale factor.
  --camera-low_res_factor=%f  - Set the desired low resolution output scale factor.
  --camera-options=%s         - Set the camera options. List all available options with `-camera-list_options`.
  --camera-auto_reconnect=%u  - Set the camera auto-reconnect delay in seconds.
  --camera-auto_focus[=1]     - Do auto-focus on start-up (does not work with all camera).
  --camera-force_active[=1]   - Force camera to be always active.
  --camera-vflip[=1]          - Do vertical image flip (does not work with all camera).
  --camera-hflip[=1]          - Do horizontal image flip (does not work with all camera).
  --camera-isp.options=%s     - Set the ISP processing options. List all available options with `-camera-list_options`.
  --camera-snapshot.options=%s- Set the JPEG compression options. List all available options with `-camera-list_options`.
  --camera-snapshot.height=%u - Override the snapshot height and maintain aspect ratio.
  --camera-stream.disabled[=1]- Disable stream.
  --camera-stream.options=%s  - Set the JPEG compression options. List all available options with `-camera-list_options`.
  --camera-stream.height=%u   - Override the stream height and maintain aspect ratio.
  --camera-video.disabled[=1] - Disable video.
  --camera-video.options=%s   - Set the H264 encoding options. List all available options with `-camera-list_options`.
  --camera-video.height=%u    - Override the video height and maintain aspect ratio.
  --camera-list_options[=1]   - List all available options and exit.
  --http-listen=%s            - Set the IP address the HTTP web-server will bind to. Set to 0.0.0.0 to listen on all interfaces.
  --http-port=%u              - Set the HTTP web-server port.
  --http-maxcons=%u           - Set maximum number of concurrent HTTP connections.
  --rtsp-port[=8554]          - Set the RTSP server port (default: 8854).
  --webrtc-ice_servers=%s     - Specify ICE servers: [(stun|turn|turns)(:|://)][username:password@]hostname[:port][?transport=udp|tcp|tls)].
  --webrtc-disable_client_ice[=1]- Ignore ICE servers provided in '/webrtc' request.
  --log-debug[=1]             - Enable debug logging.
  --log-verbose[=1]           - Enable verbose logging.
  --log-stats[=1]             - Print statistics every duration.
  --log-filter=%s             - Enable debug logging from the given files. Ex.: `-log-filter=buffer.cc`

Command line:
[...]
For example, you can do a 180° rotate via --camera-hflip=1 --camera-vflip=1, if your camera supports that.
![]() Please note that the service files already use
Please note that the service files already use --camera-path, --camera-type, --camera-width, --camera-height, --camera-format, --camera-nbufs, --camera-fps and --http-port, and in case of the libcamera also --camera-snapshot.height and --camera-video.height, so don't set those yourself in OPTIONS but rather use the provided direct settings like PORT, WIDTH, HEIGHT, etc for those.
Configuring multiple cameras
The configuration shipped on the image will support running either a libcamera device or a USB camera device. To support multiple cameras (one libcamera and/or one or more USB cameras), you'll need to add configuration files to tell the camera setup what to start up.
The image ships with some helper scripts to assist in the initial multicam setup. You'll need to log into your Pi via SSH or with a display and keyboard to use these.
It is recommended to first remove the default USB webcam:
sudo remove-usb-camera default
To add a new USB camera named <name>, first plug it into your Pi, then run
sudo add-usb-camera <name>
The script will select a free port and then ask you to select your camera from a list of possible options. Enter the number of your camera and confirm with Enter. This will create a corresponding configuration for your camera and also fire it up right away.
Rinse and repeat for any more cameras.
You may edit the configuration files to change any of the included parameters, but it is strongly recommended to keep DEVICE as is as that is what allowed the camera setup to recognize your specific camera.
Be aware that only the camera listening on port 8080 will be available under the /webcam/ endpoint and thus readily available for use in OctoPrint!
![]() Please note that starting with version 0.2.5,
Please note that starting with version 0.2.5, camera-streamer also no longer listens on all network interfaces by default and has to be told to do so via --http-listen=0.0.0.0 - you'll need to add that to OPTIONS if you don't intend to add a forward rule for your additional cameras to haproxy.


