This guide will help you install OctoPrint onto Windows.
Do you just want to access your existing OctoPrint instance under Windows?
Then there's absolutely no need to follow this guide, this is for installing the OctoPrint server under Windows, which is probably a rather unusual setup. If all you want is to access your existing OctoPrint instance (e.g. running on a Raspberry Pi via the OctoPi image), fire up your browser of choice and direct it to that instance's URL. Don't know what that is? Read this guide instead.
While OctoPrint's intended use case is to be installed on low-powered embedded devices with Linux, it is platform agnostic and can also be installed under Windows instead of the more common option of installing it on something like a Pi.
Warning
Make sure to disable automatic reboots for updates in your Windows configuration if you intend to run OctoPrint productively under Windows, or your prints will get interrupted by that when you least expect it.
The nature of how windows handles file access also makes it currently impossible to update OctoPrint through itself (including switching to a release candidate and back to stable). You'll need to do that through the command line, and that might become annoying quickly.
To save you some hassle, it might be easier to just get yourself a Raspberry Pi or similar and install OctoPrint through OctoPi on that
Consider using OctoPrint-WindowsInstaller, an installation wizard for OctoPrint, maintained by jneilliii as an alternative to the below manual instructions.
Installing Python and OctoPrint
To install OctoPrint under Windows, you'll need to do the following:
-
Install Python 3 from python.org.
You need a version between 3.7 and 3.11 to run OctoPrint, Choose either the x86 or x64 builds, depending on your platform or preference. DO NOT install Python 3.12, OctoPrint is not yet compatible.
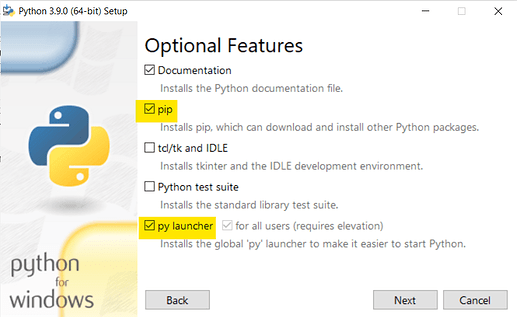
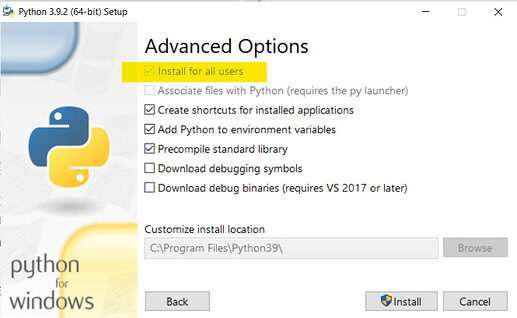
When installing, be sure to include pip in the installation and also to have the installer add python to your path:On the next page, it's useful to check 'Install for all users' to make Python install to
C:\Program Files\and be easier to find later on:
-
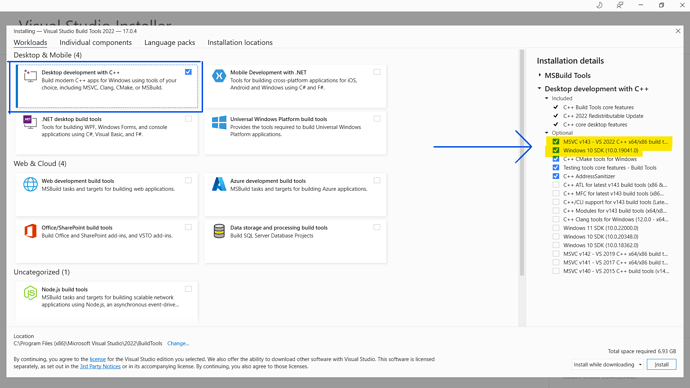
Download & Install Build tools for Visual studio. (On the download page, scroll down, under 'All downloads' open 'Tools for Visual Studio' and download 'Build tools for Visual Studio', you don't need the whole thing) This is required to install some dependencies of OctoPrint & some plugins.
Select “Desktop development with C++” and ensure the latest versions of “MSVCv143 - VS 2022 C++ x64/x86 build tools” and “Windows 10 SDK” are checked in the configuration on the right.
-
Open a command prompt (
Win+Rand executecmd, or just search for 'Command Prompt').
Check you are using the correct Python version you installed above, usingpy --version:> py --version Python 3.9.2If this says "Python 3.12" start again at step 1. As stated there, current stable OctoPrint is not yet compatible to Python 3.12, you need Python 3.11 at most!
If it is not using the correct one because you have multiple Python versions installed, wherever the guide says
pybelow, use the path to the Python version you want to use. For example,C:\Program Files\Python39\python.exe. -
Using the File Explorer, create a new folder for OctoPrint to reside in. For this tutorial we are assuming this to be
C:\OctoPrint. -
Open a command prompt (
cmd), change into OctoPrint's source folder and create a new virtual environment, and then activate it:cd C:\OctoPrint py -m venv venv venv\Scripts\activate.batYou should notice that the prompt now has
(venv)in front of it. This means the virtual environment is 'activated'. -
Install OctoPrint and its dependencies using
pip:pip install octoprintHopefully that will be a success, with the final line showing something like this with all the dependencies:
Successfully installed octoprint ... Note
NoteIf this installs an old version of OctoPrint,
pipprobably still has something cached. In that case add--no-cache-dirto the install command, e.g.pip install --no-cache-dir octoprintTo make this permanent, clean
pip's cache by deleting%LocalAppData%\pip\Cache. -
Start OctoPrint simply by executing
octoprint serve:(venv) C:\OctoPrint>octoprint serve 2020-11-03 17:39:17,979 - octoprint.startup - INFO - *************************** 2020-11-03 17:39:17,980 - octoprint.startup - INFO - Starting OctoPrint 1.4.2 2020-11-03 17:39:17,980 - octoprint.startup - INFO - *************************** [...] Note:
Note:At this point Windows will probably ask you if you want to allow OctoPrint to be accessible from within your network. Chances are high you want that, so allow access from trusted networks at least.
-
Open a new tab or window in your browser and enter http://localhost:5000. You should now be looking at your OctoPrint web interface.
If you want to access it from another computer on your local network, substitute
localhostfor your PC's IP, e.g.http://192.168.1.3:5000.
Congratulations, you now have a running OctoPrint setup!
To start your OctoPrint server, open a command prompt and run
C:\OctoPrint\venv\Scripts\octoprint.exe serve
If you want to stop OctoPrint, hit Ctrl+C in the command prompt window or simply close it.
Optional: Creating a shortcut
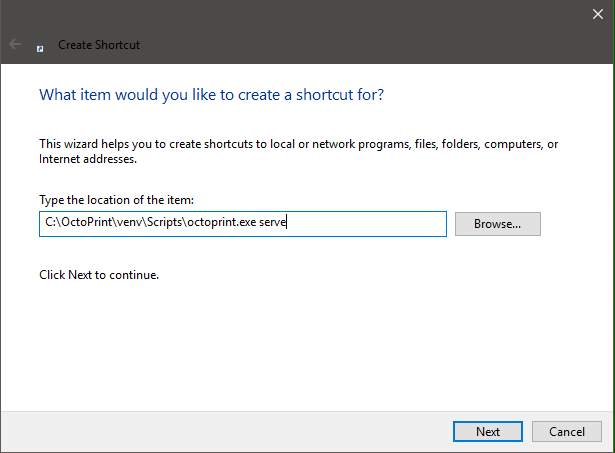
For easier starting of your OctoPrint server in the future you might want to create a shortcut on your desktop or somewhere else you'll easily find again, pointing to C:\OctoPrint\venv\Scripts\octoprint.exe serve:
Optional: Automatically start on startup
See this post shared by @Arg0n in the comments:
Optional: Installing a webcam server and configuring OctoPrint for it
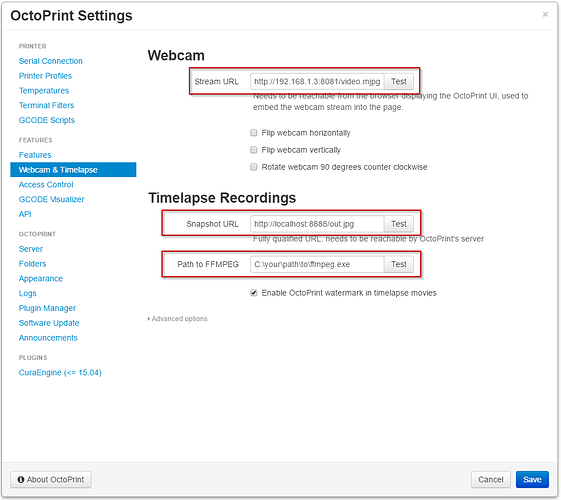
You can use something like YawCAM for similar functionality to MJPEG-Streamer under Windows. Enable the "HTTP" and "Stream" outputs and switch the "java" setting to "mjpg" if necessary. If you leave the configured ports at their defaults, your Stream-URL will be http://<ip_of_your_pc>:8081/video.mjpg and your Snapshot-URL will be http://<ip_of_your_pc>:8888/out.jpg.
You can configure these either through OctoPrint's own Settings dialog (see below) or in your config.yaml at %APPDATA%/OctoPrint:
webcam:
  stream: http://<ip_of_your_pc>:8081/video.mjpg
  snapshot: http://localhost:8888/out.jpg
If you also want to be able to use timelapsing, you'll have to obtain a static Windows build of FFMPEG. Those can be found here. Then configure the path to your ffmpeg.exe through the Settings dialog (see below) or config.yaml:
webcam:
  stream: http://<ip_of_your_pc>:8081/video.mjpg
  snapshot: http://localhost:8888/out.jpg
  ffmpeg: C:\your\path\to\ffmpeg.exe
Note:
The screenshot shows
192.168.1.3as the IP of the PC in the configured Stream-URL. You'll need to adjust that to match your PCs IP!
Updating your OctoPrint installation
Due to the nature of Windows it's sadly not possible to have OctoPrint update itself like on other OSes (e.g. a Raspberry Pi running Linux/OctoPi). When you get an update notification, attempting to apply the update from within OctoPrint will fail. You'll have update manually:
-
Shutdown your OctoPrint server. If it is running the update process will fail.
-
Open a command prompt. Navigate to the folder your have OctoPrint installed in (here:
C:\OctoPrint) and activate the virtual environment:C:\>cd OctoPrint C:\OctoPrint>venv\Scripts\activate.bat (venv) C:\OctoPrint> -
Install the new OctoPrint version::
pip install --upgrade https://get.octoprint.org/latestThat should look like this, with a different version number (prompt and output included, do not copy-paste this!):
(venv) C:\OctoPrint>pip install --upgrade https://get.octoprint.org/latest running install [...] Finished processing dependencies for OctoPrint==1.4.2 -
Restart your OctoPrint server. Your upgrade is done!
Switching to another release channel
The instructions are basically the same as for Updating, the difference is only the URL you use for pip install --upgrade, which depends on the chosen release channel:
-
Stable:
https://get.octoprint.org/latest -
Maintenance RCs:
https://get.octoprint.org/maintenance-rc -
Devel RCs:
https://get.octoprint.org/devel-rc
Note
If this installs an old version of OctoPrint,
pipprobably still has something cached. In that case add--no-cache-dirto the install command, e.g.pip install --no-cache-dir --upgrade https://get.octoprint.org/latestTo make this permanent, clean
pip's cache by deleting%LocalAppData%\pip\Cache.
Guide Changelog
- November 2020: Switch to recommend install under Python 3
- April 2021: Use
venvinstead ofvirtualenv, to simplify the process. Usepy -mto run modules to avoid issues with path not updating properly. - July 2023: Add note linking to OctoPrint-WindowsInstaller.
 I've rephrased the first sentence a bit to hopefully make it crystal clear.